From Martel’s own product gallery. Illustrative arrangement; room coverage depends on placement, acoustics and testing.
A public meeting microphone system has to serve people who work in very different ways. A chair moves the agenda forward. Board members turn toward one another. Staff answer questions from the side of the room. A resident approaches a public comment position. Remote participants need to follow all of it without guessing who spoke.
The right conference microphone system begins with those speaking positions and a repeatable operating procedure. Microphone quantity matters, but placement, computer audio selection, loudspeaker arrangements, staff responsibilities, and the recording workflow matter too.
This guide explains how to develop a practical purchasing specification, compare microphone packages, and test a proposed setup in a council chamber or school board room. It also shows where a Martel Zoom multiple microphone system can fit into a room that uses Zoom or Microsoft Teams. The examples are illustrative planning exercises, not descriptions of particular customers.
Define the meeting before specifying the equipment
Start by writing a one paragraph description of the actual meeting. Include the room, the people who normally speak, the online platform, and the records staff need afterward. A description such as “nine board members in a large room” leaves out most of the purchasing problem.
A more useful description would be: “Seven board members sit along three tables, two staff members present from a side table, residents speak from a designated position, and remote guests join through one staff computer. The clerk needs a usable meeting recording and a documented process for locating it.” That description immediately raises questions about ten speaking areas, computer responsibility, and public comment handling.
Document occasional formats separately. A work session around a square table is different from a formal meeting at a dais. A budget hearing with many audience speakers is different from a regular agenda with one scheduled presentation. Equipment that works in the normal room should be tested again when the layout changes substantially.
Before comparing products, identify the meeting that is hardest to support reliably. Design the essential workflow around that case. Then decide which less frequent events justify a different seating plan or temporary equipment arrangement. This prevents a purchase specification from quietly assuming that every meeting will behave like the easiest one.
Separate the four jobs that people call “meeting audio”
Purchasing discussions become clearer when four audio jobs are named explicitly. Capturing local voices is one job. Sending those voices to remote participants is another. Playing remote participants into the room is a third. Saving a usable record is a fourth.
A microphone package may address the first two jobs when connected to the meeting computer, but that does not establish how the room hears remote speakers or how recordings are retained. Those decisions deserve their own lines in the project plan.
Job
Question to answer before purchasing
Evidence to request
Local speech pickup
Which speaking positions must be heard?
A room map and live speech test
Online meeting input
What device will Zoom or Teams use?
A demonstrated computer input selection
Room listening
How will people hear a remote guest?
A listening test from occupied seats
Meeting record
Where will the final recording be saved?
A complete sample recording and retrieval test
Assign an owner to each job, even if one person owns several. For example, information technology staff may support the computer while the clerk verifies the meeting record. A clear division of responsibility is particularly useful when a speaker can hear the room but the recording is missing, or when the room can hear a remote guest but online listeners cannot hear local questions.
Treat the complete path as the deliverable. A box arriving on time is only the beginning of a working meeting system.
Build a speaking position inventory
Count positions before counting people. A speaking position is a place from which someone is reasonably expected to contribute without relocating a microphone during ordinary discussion. A seven member board might require more than seven positions if administrators, counsel, presenters, and a public comment station also need to speak.
Create a simple inventory with a row for each position. Record whether the person stays seated, turns toward other speakers, reads papers, uses a laptop, or stands. Note whether the position is occupied throughout the meeting or only for particular agenda items. A staff table that is quiet for most of the evening can still be essential during a detailed question period.
Include the chair’s usual movements. If the chair alternates between facing the audience and looking down the board table, test both orientations. Similarly, a presenter who turns toward a display may change the relationship between their mouth and the microphone. These details are more useful than an unsupported promise that a microphone covers an entire table.
Do not silently count the audience as one more position. Audience discussion, a controlled comment station, and questions shouted from seats are three different operating models. Decide which model the meeting will actually use. If residents are expected to approach a designated position, make that expectation visible in the room and explain it at the beginning of the meeting.
Map the room with everyday obstacles included
A useful room sketch does not need architectural precision. It does need the tables, normal seats, public comment position, meeting computer, power locations, display, loudspeakers, and practical cable routes. Add doors, walking paths, and areas that must remain clear.
Then annotate what happens on the tables. Name plates, folders, water containers, laptops, and presentation materials can influence where microphones fit. A proposed arrangement should leave enough space for people to work normally. A microphone that occupies the only clear writing area is likely to be moved during the meeting.
Consider setup and removal too. In a room shared with classes, training, or community events, equipment may have to be packed away after every meeting. Record who will do that work, where the case will be stored, and how the next operator will know where each item belongs. Photographs of an approved arrangement can be useful internal setup references.
Use the sketch to discuss extensions and routing with the supplier. Do not assume that a package’s included cables will match an unusually shaped dais or a long path to the computer. Ask for an exact list of supplied components and the approved arrangement for your proposed layout.
The point is to discover physical constraints before ordering. A paper layout is easy to change. A crowded table and an unsuitable cable path are much harder to solve as residents arrive.
Specify understandable speech as the acceptance goal
“Loud enough” is an incomplete test. A remote listener may hear substantial volume while still missing names, short interjections, numbers, and the ends of sentences. Your acceptance goal should be understandable speech from every required position under ordinary meeting conditions.
Choose sample material that resembles the work. Ask one person to read a short motion, another to state a name and address format appropriate to your meeting procedures, and another to explain a budget figure. Include quiet speech and normal conversational exchanges. Avoid relying entirely on a confident presenter speaking directly into a microphone.
Have a remote tester write down what they heard without seeing the script. Compare that response with the original. This is a practical way to identify positions that sound acceptable at first but fail when a specific number or name matters. It is a project acceptance exercise, not a scientific certification.
Also listen for the effort required. If a tester repeatedly changes volume or strains to understand soft speakers, record that observation. If papers or table contact overwhelm speech, try a placement adjustment and repeat the same passage.
Do not promise that equipment will make every simultaneous exchange intelligible. A chair who recognizes speakers, asks people to finish one at a time, and restates unclear motions contributes directly to usable meeting audio. Procedures and equipment should support each other.
Use package sizes as a starting point
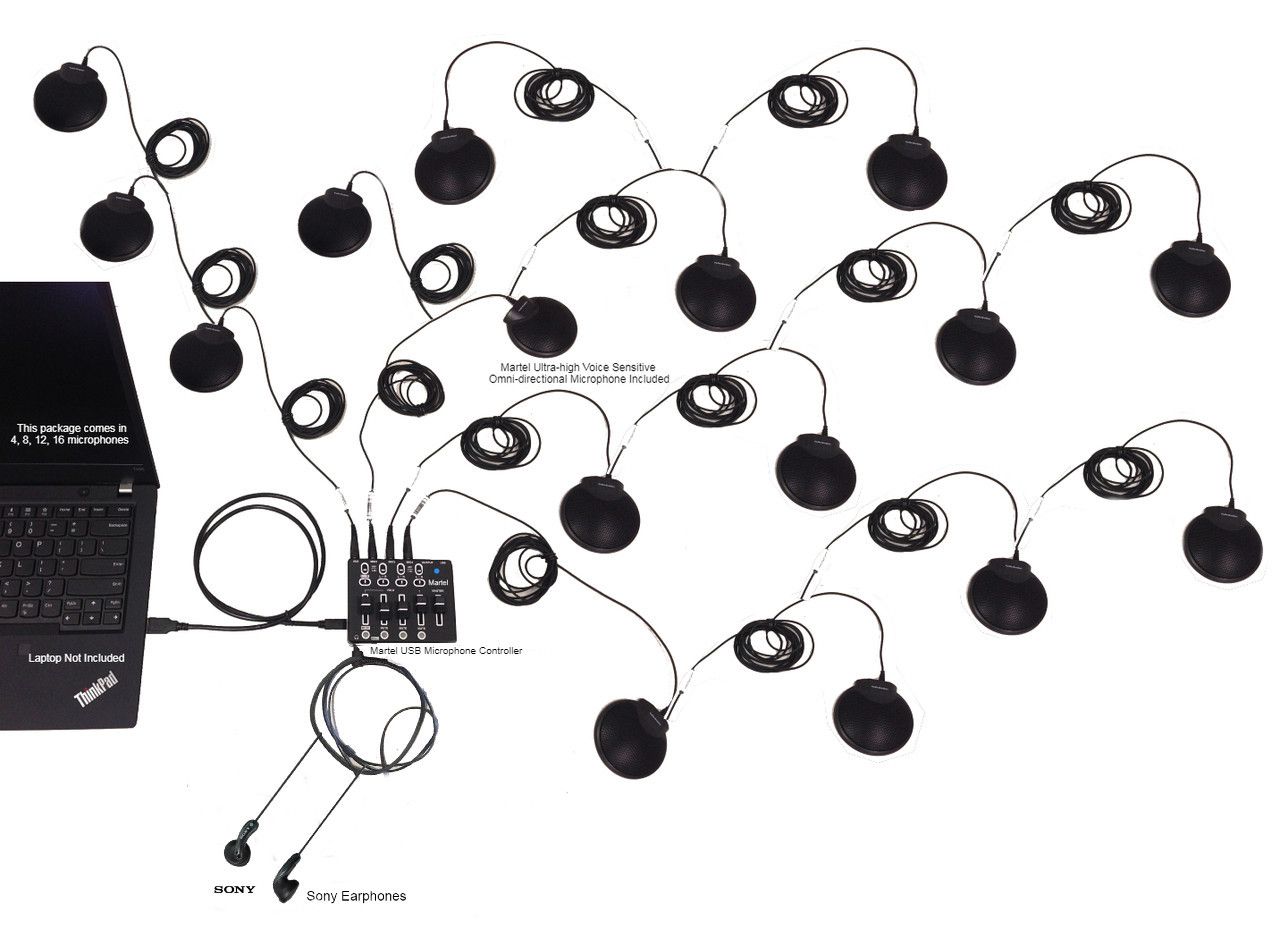
Martel currently offers its Zoom multiple microphone systems in four, eight, twelve, and sixteen microphone packages. The product family uses a USB connection to a meeting computer, and Martel lists Zoom and Microsoft Teams among the supported meeting applications. Confirm the current configuration and computer requirements before ordering. See the Martel package collection.
For preliminary planning, the following choices organize a supplier conversation. They are starting points, not guarantees about a particular room or number of people.
A larger collection of required speaking positions
Select the package after mapping the room and discussing the proposed placement. More microphones do not automatically fix unsuitable positioning, uncontrolled room noise, or the wrong computer input. Conversely, a smaller package that forces staff to pass microphones constantly may create unnecessary meeting interruptions.
Ask Martel to review the actual arrangement and identify what else the complete workflow requires. That discussion should include room listening and recording needs, rather than treating a microphone purchase as proof that every audio job has been solved.
Write a requirements worksheet that staff can actually use
A procurement worksheet should separate required behavior from desirable conveniences. Requirements should be specific enough to test and simple enough for an operator to recognize. “Professional audio” is difficult to evaluate. “The remote tester can understand a motion read from each occupied board position” gives staff something concrete to verify.
Use a table like this during the planning meeting:
Requirement
Required or optional?
Who verifies it?
How it will be tested
Every board position reaches the online meeting
Required
Meeting operator
Script read from each seat
Public comment reaches remote listeners
Required if hybrid comment is offered
Clerk
Test from marked comment position
Room hears remote participants clearly
Required
Room staff
Remote speech heard at several seats
Recording can be located by authorized staff
Required
Records owner
Retrieve the completed sample file
Setup can be repeated by a substitute
Required
Department supervisor
Substitute follows written instructions
Equipment fits an alternate table layout
Optional unless regularly used
Facilities staff
Trial layout and cable review
Add columns for unresolved questions and the person responsible for answering them. Do not allow an unanswered question to disappear into an assumption. If nobody knows which computer will host the meeting, that is a project decision awaiting an owner.
Keep the final worksheet with the operating instructions. It can later explain why a particular microphone count or placement was chosen, and it gives future staff a baseline when the meeting format changes.
Plan public comment as its own audio event
Public comment deserves a deliberate workflow because speakers arrive with different heights, speaking styles, and familiarity with the room. A resident may speak softly, turn toward the board, read from a paper, or step away while answering a question. A staff member should be able to guide the person without improvising the microphone arrangement each time.
Identify a stable comment position and test speech from the location people will actually use. Make the area easy to find. Decide who invites the next speaker forward and who reminds a speaker to return to the position if their voice becomes difficult to hear.
Avoid assuming that the board’s table microphones will capture a person standing elsewhere in the room. If the comment position requires its own microphone or a different arrangement, include that requirement in the supplier conversation and acceptance plan. Also verify how that position fits the available connections and cable routing.
Test a short exchange rather than a monologue alone. Have the chair ask a question, let the resident answer, and have a staff member respond from the staff table. The remote tester should hear the entire sequence.
Meeting procedures, participation rules, accommodation decisions, and recordkeeping obligations belong to the responsible organization and its advisers. Audio equipment can support a chosen process, but purchasing a package does not establish that the process meets every applicable obligation.
Give remote participation a complete path
A remote participant needs two working directions. They must hear local speakers, and local participants must hear them. Testing only the room microphone checks one direction and leaves the other unresolved.
Choose a remote tester who joins from a separate location using headphones when practical. Ask them to listen while the chair, board members, staff, and public comment speaker take turns. Then ask the tester to speak while someone walks through the occupied room and listens from normal seats.
The operator should know which microphone input and speaker output the meeting application is using. They should also know the approved arrangement for any additional computers in the room. Multiple devices connected to meeting audio can complicate troubleshooting, so document their intended roles before the session begins.
If a presentation computer is separate from the meeting computer, test the handoff explicitly. Confirm who shares material, whether any presentation sound is intended to be heard, and who remains responsible for the meeting audio. A successful screen share does not by itself establish that every sound source is reaching remote participants.
The acceptance test should include a question from the remote guest followed by an answer from a quieter local participant. That exchange reveals problems that a one sided microphone demonstration can miss. Save the result in the test log so staff know the full conversation path was checked.
Choose one accountable meeting computer
Even when several staff members bring laptops, nominate one primary meeting computer for the microphone system and document that choice. Record its usual location, power arrangement, login responsibility, and the person who can resolve an access problem before the meeting.
Treat changes to that computer as changes to the meeting workflow. A replacement laptop may present audio devices differently, use another operating system configuration, or require a new permission prompt. Test it before the next public session. Do not assume that copying the meeting link also copies every necessary setting.
Keep the operator’s instructions focused on visible outcomes. They should explain how to confirm that the intended microphone is selected, how to check the speaker output, and how to recognize input activity. Include the approved fallback contact and the point at which staff should stop troubleshooting during the meeting and use their established contingency procedure.
A second staff member should understand the essential controls. This does not mean two people operate the computer simultaneously. It means that an absence or an unexpected interruption does not leave the organization dependent on one person’s memory.
Where practical, make a short premeeting test part of the room booking or agenda preparation routine. A dependable process reduces the chance that a software prompt, disconnected cable, or changed device selection becomes the first item the audience experiences.
Check Zoom settings using the actual room
Zoom provides separate microphone and speaker selection and testing in its audio settings. Its microphone test records and plays back a sample, which is useful for checking whether the intended input is active. Zoom also offers a test meeting. The official audio testing instructions explain the current controls.
Use these tools as the beginning of verification. A test spoken beside the laptop does not prove that a distant board position works. Once the system is selected, speak from each planned position and have a remote tester evaluate the meeting connection.
Write down any audio processing choices that differ from the application’s normal settings. Avoid changing several settings at once when diagnosing a problem. Make one controlled adjustment, repeat the same short passage, and record whether the result improved. That method is more useful than collecting a mixture of settings from unrelated online discussions.
Keep instructions aligned with the version staff actually see. If a software update changes a menu, update the room guide after verifying the new path. The durable instruction is to confirm the intended input, test the output, and listen remotely; screenshots are supporting aids.
Finally, test ordinary conversation as well as isolated speech. A system that sounds satisfactory during a single microphone test still needs to demonstrate clear turn taking across the whole meeting table.
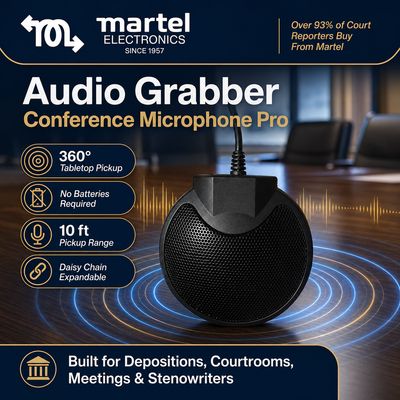
A closer look at Martel’s Audio Grabber tabletop microphone. Microphone placement and the complete connection path should be checked for your room.
Check Microsoft Teams settings for shared room speech
Microsoft Teams allows staff to select the microphone and speaker and, in supported circumstances, make a test call. Microsoft’s device settings guide explains those controls. Use the actual meeting computer and selected device rather than relying on a staff member’s personal headset configuration.
Pay attention to processing designed for an individual speaker. Microsoft describes voice isolation as a feature that can remove other voices using a voice profile. That behavior deserves review when a room intentionally sends several local speakers through one meeting input. See Microsoft’s voice isolation explanation.
Do not turn every processing option off as a routine rule. Instead, test the selected settings with the people and speaking positions the room needs to support. If one person is heard and another is reduced or disappears, include processing settings in the investigation alongside placement and input selection.
Run a real meeting test after the basic device test. Have a remote listener join, hear local discussion, speak back, and confirm the result. Record the approved configuration in the operator’s guide.
Teams settings, account permissions, and organization policies can vary. Have the responsible administrator resolve unavailable controls before the meeting, when there is time to investigate without interrupting public business.
Make the recording workflow a separate decision
Ask what staff need after the meeting: a reference recording, an audio file for review, material for a transcript, or another defined output. Then identify the approved recording method and the person responsible for verifying it. A microphone input alone does not make or retain a recording.
Zoom distinguishes computer recording from cloud recording. Its recording overview explains the different storage paths and availability. Teams recording depends on the meeting and organizational setup; Microsoft describes its storage and access process in the meeting recording guide.
For purchasing purposes, require a completed sample file, not just a visible recording indicator. The sample should contain speech from board, staff, public comment, and a remote participant. Close the session, allow the normal processing to finish, and retrieve the file using the procedure staff will follow after a real meeting.
Then have the records owner play it from beginning to end or use a documented review method appropriate to the organization. Check that the required conversation is present and that authorized staff can find it.
Retention periods, public access, notice, and approval requirements must come from the organization’s established policies and responsible advisers. Include those requirements in the workflow without claiming that a particular microphone package supplies legal compliance.
Prepare purchasing questions that expose gaps
A useful supplier conversation is specific to the room. Send the speaking position inventory and layout with your inquiry. Ask how the proposed package would be arranged and what staff should verify before the first meeting.
Use these questions to develop a complete quotation:
Which package is the recommended starting point for the attached layout, and why?
What exactly is included in that configuration?
Which cables, extensions, adapters, power connections, or other items would this layout require?
How should the system connect to the proposed meeting computer?
What remains necessary for people in the room to hear remote participants?
How should the proposed setup be tested with Zoom or Teams?
What does the system provide as the computer’s audio input, and what should staff avoid assuming about individual microphone channels?
What support information, setup instructions, return terms, and warranty terms apply to this order?
Record the answers with the quotation. If two proposals use different assumptions, normalize the assumptions before comparing the totals. One may include a practical cable arrangement while another assumes the computer sits much closer to the microphones.
For a room built around online participation, review Martel’s multiple microphone packages alongside your room map. Ask for the configuration that fits the required speaking positions and confirm the remaining listening and recording components before purchasing.
Compare total operating effort as well as purchase cost
The purchase price is only one part of the decision. Staff time is consumed by setup, packing, checking device selection, resolving unclear speech, locating files, and helping substitute operators. A system that appears inexpensive can demand a complicated routine if its configuration does not match the room.
List the recurring tasks for each proposal. Estimate how many people are needed and when the work occurs. A five minute task before every meeting may be manageable; a procedure that requires a specialist to arrive early every time may be difficult for a small department.
Include storage and handling. If equipment is shared, staff need a clear process for checking that all pieces return to the case. If the room is permanent, the organization may still need labeling and a process for detecting when furniture or cables have moved.
Avoid inventing financial savings without evidence. Instead, identify observable outcomes: fewer emergency rearrangements, a simpler setup sheet, less time searching for the correct file, and a substitute operator who can complete the check. Those outcomes can be evaluated during the trial.
When presenting the recommendation, explain the operational tradeoff in ordinary language. For example: “This arrangement gives the presenter and clerk dedicated speaking positions and can be set up from a labeled plan.” That is more useful to a purchasing committee than a list of unexplained technical terms.
Run a structured acceptance session
Schedule acceptance testing when the room is available and the relevant staff can participate. Use the proposed equipment, meeting computer, application, furniture layout, and listening arrangement. A demonstration in another room can inform a decision, but it cannot settle every question about your room.
Follow a repeatable sequence:
Set up from the written layout without verbal coaching from the original planner.
Confirm the chosen microphone and speaker in the meeting application.
Read the same short passage from every required speaking position.
Test the public comment exchange and a presenter facing the display.
Ask a remote participant to speak and receive questions from the room.
Start the approved recording process and capture a realistic agenda segment.
End the meeting, retrieve the file, and review the required voices.
Record problems, make one adjustment at a time, and repeat the affected test.
Give each observation an outcome: passed, requires adjustment, or unresolved. Name the owner and next action for unresolved items. Avoid a vague conclusion that the equipment “seemed fine.”
Keep the accepted room layout, application settings, and test result together. That record becomes useful when a future issue appears. Staff can compare the current arrangement with the version that was actually tested rather than guessing what has changed.
Rehearse the difficult moments
An acceptance test should include more than orderly speeches. Rehearse the moments that tend to disrupt public meetings. Have someone ask a brief question while seated sideways. Let a presenter turn toward a screen. Move papers near a microphone. Ask a quiet speaker to respond after a louder participant.
Include a planned operator interruption. The primary operator steps away for a minute while a trained substitute checks whether the meeting is still connected and recording. This reveals whether the instructions use understandable language and whether the essential controls are easy to locate.
Practice a change of presenter too. Who moves to which position? Who shares the presentation? Does someone accidentally move a microphone to make space for a laptop? The goal is to find preventable confusion while the room is empty.
Do not turn the rehearsal into a contest to defeat the equipment. Use realistic behavior and agree on reasonable meeting procedures. If simultaneous speech is difficult to follow, document how the chair will manage turn taking. If a participant must remain near a designated position, include that guidance in the meeting routine.
A rehearsal can produce small but valuable changes: a clearer table label, a better cable route, a reminder in the chair’s opening script, or a different location for the presenter’s papers. Those improvements often matter more than adding another feature to the specification.
Create a one page premeeting check
A lengthy manual is useful for setup planning, but the operator needs a short check that can be completed before every session. Build it from the accepted configuration, not from a generic equipment list.
The check should verify the following outcomes:
The room matches the approved seating and microphone plan.
Cables and power connections are in place without obstructing normal movement.
The intended microphone and speaker are selected on the meeting computer.
A person away from the computer can be heard by the remote tester.
A remote voice can be heard from representative seats in the room.
The responsible person can start the approved recording method.
The operator knows where the completed file should appear.
The substitute operator and support contact are identified.
Leave a space for date, operator, and any temporary change. A changed table layout or replacement laptop should be visible in the record. Do not let a temporary workaround silently become the permanent standard.
The check should finish early enough to correct a problem. If staff routinely perform it seconds before the chair calls the meeting to order, move the check earlier in the preparation process. The objective is to discover an issue when there is still time to address it calmly.
Handle changes during the meeting deliberately
Even a carefully planned room can change during a session. An additional presenter arrives, a participant changes seats, or someone moves a microphone while reorganizing papers. Establish who is allowed to adjust equipment and how that person will confirm the result.
Use a simple rule: after a meaningful audio change, verify the affected speaking path. If the public comment position moves, ask the remote monitor to confirm the next speaker. If the meeting computer changes, repeat the essential input and output checks before relying on it.
Avoid asking several people to change application settings simultaneously. One operator should control the meeting computer while another person reports what is heard. That arrangement makes it easier to connect an adjustment with its result.
Keep a brief event note when an issue affects the meeting record. Note the approximate agenda item or time, the symptom, and what staff did. The records owner can then review the relevant section rather than discovering the issue later without context.
The organization should define its response when an essential audio path fails. Equipment guidance can help staff diagnose a symptom, but the decision to pause, continue, repeat a statement, or use another established procedure belongs to the people responsible for the meeting.
Give postmeeting verification an owner
The meeting is not operationally complete when participants leave. Someone needs to confirm that the expected recording exists, that the necessary voices are present, and that the file is in the approved location. Make that task an assigned responsibility with a backup.
Use a short handoff record. Include meeting name, date, recording method, location or link, person who verified it, and any known interruption. If a file needs processing before it can be accessed, record who will return to check it and when.
For a removable room setup, compare the packed equipment with the inventory. Report damaged or missing pieces immediately so the next meeting does not begin with a surprise. If a microphone position required an adjustment, update the room plan while the reason is still clear.
Review repeated problems as a system issue. If the same staff position is repeatedly difficult to hear, revisit placement and the approved configuration. If recordings are routinely difficult to find, improve naming and handoff practices. If substitute operators struggle, simplify the instructions and test them again.
A brief review after the first few meetings is particularly valuable. It turns a new purchase into an established routine and gives the organization evidence about what is working in normal use, beyond the original demonstration.
Illustrative example: a seven member council
Imagine a seven member council seated across a shallow horseshoe. The clerk works at one end, two staff members sit at a nearby table, and residents use a fixed comment position. Remote attendees join through a designated laptop.
The initial temptation is to buy for seven people. The speaking position inventory reveals a different problem: council, clerk, staff, and public comment each need a reliable path. The team sketches the room and discusses a larger microphone arrangement with the supplier. The final package choice follows the layout review and trial rather than the council headcount alone.
During testing, the council passages are clear, but the staff table becomes difficult to understand when presenters turn toward the display. Staff adjust the arrangement and repeat the same question and answer sequence. They also discover that residents tend to stand beside the intended comment position. A visible floor position and a brief staff instruction make the process easier to follow.
The useful lesson is not that every seven member council needs the same package. It is that headcount hid two operational requirements. The room map and scripted test exposed them before the system became part of a live meeting.
After acceptance, the clerk retains the tested layout and a one page check. A substitute can now prepare the room without reconstructing the original purchasing discussion.
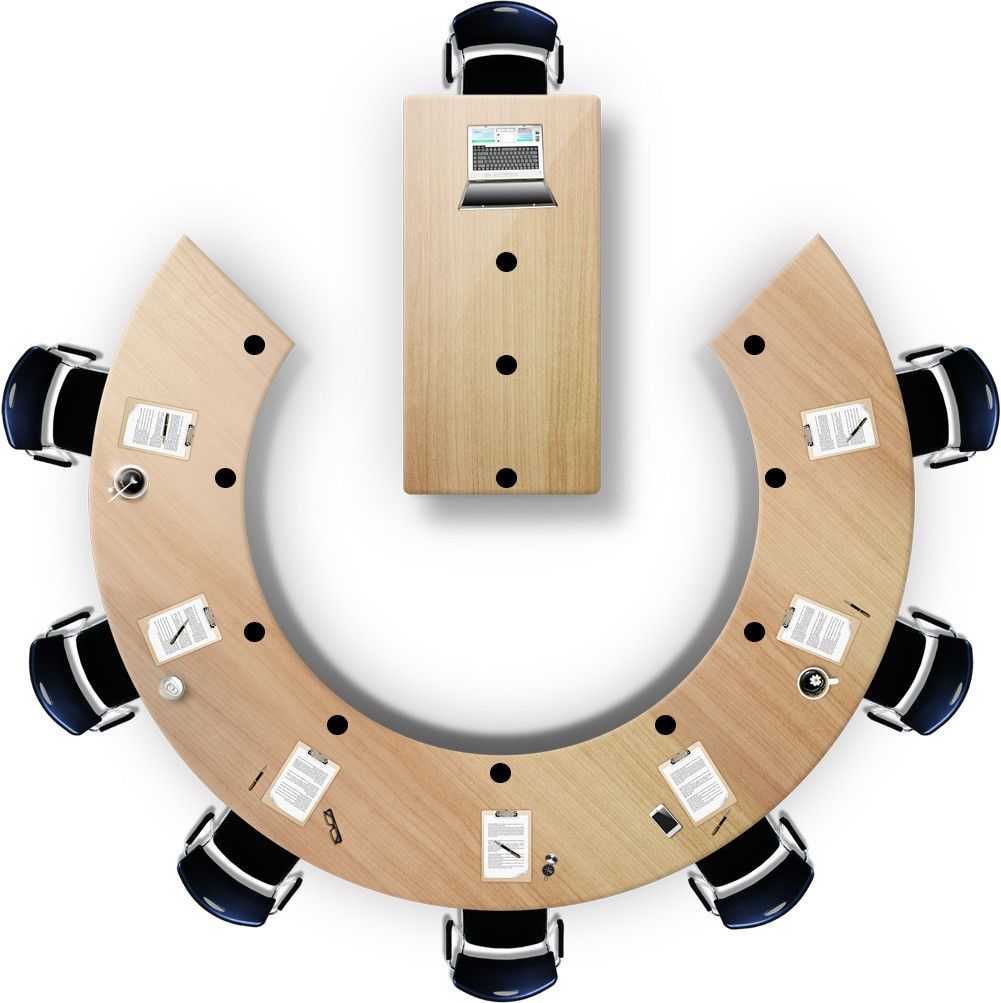
Meeting-room illustration from Martel’s gallery. It illustrates distributed microphone placement; it is not a measured coverage plan or an exact package inventory.
Illustrative example: a school board in a shared room
Consider a school board that meets in a room used for training during the day. Tables are moved frequently, presenters bring their own laptops, and the microphone equipment must be packed away after each meeting. The primary challenge is repeatability.
The planning team creates a labeled table diagram and a case inventory. The approved microphone positions leave room for board papers and presentation devices. The meeting computer has a fixed role, while presenters follow a separate handoff process for showing materials.
Acceptance testing includes a substitute operator who has not attended the purchasing meetings. That person follows the setup sheet and identifies two unclear instructions: which computer connection to use and where the public comment position belongs. The team corrects the instructions and repeats the test.
The board also practices a student presentation followed by questions from different seats. This checks the real exchange rather than only a prepared speech. The remote tester confirms whether both the presentation and the board’s questions can be understood.
For this organization, the strongest purchasing case combines appropriate microphone coverage with manageable setup work. A technically capable arrangement that only one employee understands would leave the board vulnerable to ordinary absences. The written plan, labeled inventory, and verified handoff are part of the finished solution.
Common procurement questions
How many conference microphones does a board need?
Begin with required speaking positions and the room layout. Include staff, presenters, and public comment where relevant. Use package sizes to start a supplier discussion, then test the proposed arrangement. There is no dependable universal rule that one microphone serves a fixed number of people in every room.
Does a USB microphone system also provide room sound?
Confirm the exact package and signal path. A system that supplies microphone audio to a computer does not by itself establish how remote participants will be played into the room. Include speaker output and room listening in the specification and acceptance test.
Can the same arrangement support Zoom and Teams?
Martel lists both applications for its multiple microphone product family. The computer must still select the intended device in the application being used. Test each approved platform with the actual room, account, and computer rather than assuming the second application inherits the first application’s settings.
Will adding microphones fix every unclear recording?
No. Investigate the complete path: position, selected computer input, application processing, meeting behavior, recording method, and file playback. More microphones may address a position problem, but they cannot substitute for choosing the correct input or verifying the final file.
Does this equipment establish accessibility or records compliance?
Equipment can support a meeting process, but the responsible organization must determine its own obligations and required accommodations. Include those requirements in the project with the appropriate advisers. Avoid treating a product description or a successful audio test as a legal conclusion.
Choose a system around the meeting you actually run
A dependable council or school board audio setup combines suitable microphones, clear room listening, an accountable operator, and a verified record. Begin with the speaking positions, document the complete conversation path, and test realistic exchanges before accepting the arrangement.
If your room uses Zoom or Microsoft Teams, compare Martel’s Zoom multiple microphone systems. Bring the room map, seating inventory, and recording requirements to the conversation. Choose a four, eight, twelve, or sixteen microphone package as part of a complete, tested workflow that staff can repeat at the next meeting.
Martel gallery image of the 16-microphone system. See the product page for the supplied configuration.
Martel Electronics | 7 hours ago
Conference Microphone Systems for City Councils and School Boards
Plan council and school board meeting audio with microphone worksheets, hybrid meeting tests, public comment procedures, and Martel USB system options.