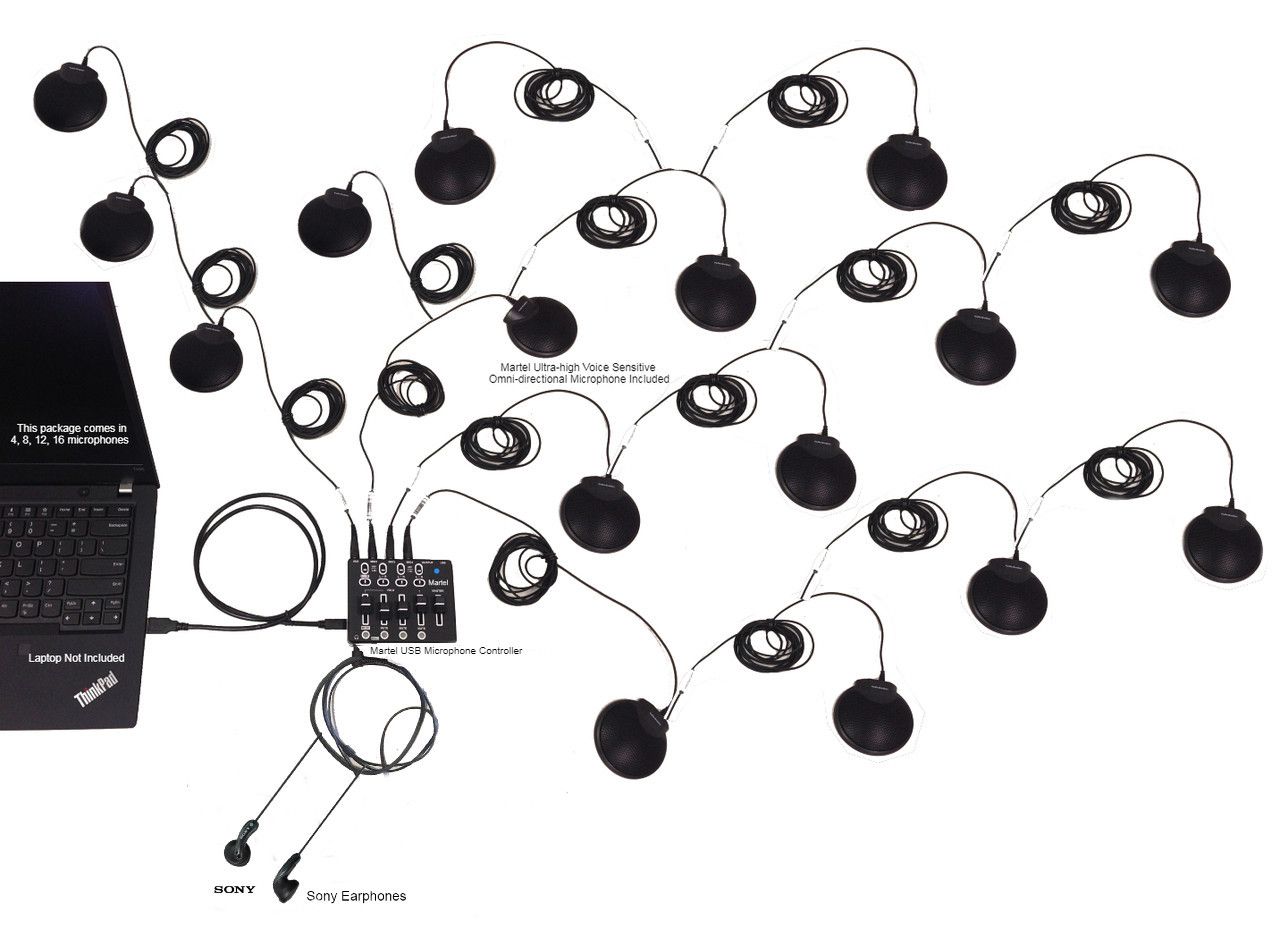
From Martel’s own product gallery. Illustrative arrangement; room coverage depends on placement, acoustics and testing.
When Microsoft Teams carries the person beside the laptop clearly but misses colleagues farther around the table, the most useful first question is where those other voices disappear. The microphone position, the selected input and the meeting's voice-processing settings can produce similar complaints. Replacing equipment before separating those possibilities can leave the room with the same problem and a larger collection of cables.
Start with a remote listener, a simple seating sketch and a short repeatable speaking exercise. Check the shared microphone path before changing every audio setting. If Teams is using a feature intended to preserve one person's voice, correct that mismatch. If distant seats remain unclear after the software route works, improve the room's pickup positions with an appropriate microphone system.
Martel's Zoom multiple-microphone systems are worth comparing when a group needs several pickup locations feeding a meeting computer. The goal is to bring useful microphones nearer the conversation. This guide explains how to determine whether that is the missing part of your Teams room, how to avoid confusing it with a settings fault and how to verify the result before the next meeting.
“Teams cannot hear everyone” is a useful complaint, but it is not yet a diagnosis. Ask the remote participant to describe what happens while each person speaks alone. A voice may be completely absent, present but faint, clear for a few words and then interrupted, or understandable until another person begins talking. Those observations lead to different next steps.
A consistently faint seat suggests a different starting comparison from a colleague whose normal voice disappears even while sitting beside the main speaker. A problem that follows one physical position may involve distance or placement. A problem that follows the same person after seats are exchanged may justify closer attention to individualized processing, speaking direction or the test itself.
Avoid asking whether the audio is “better” after each change. Ask a concrete question: could the listener repeat the final number, distinguish the two names or follow the full sentence without guessing? Listeners naturally fill gaps from context. A familiar agenda item can sound usable even when an unfamiliar name or qualification is missing.
Write a one-sentence symptom that includes who hears the problem. For example: “The outside listener hears the chair clearly, but three people on the window side lose the beginning of their sentences.” That description is much more actionable than “bad microphone.” Keep it beside the test notes so a temporary change does not quietly redefine success.
Separate three parts of the shared-room audio path
The room has a physical pickup stage, a computer input stage and a meeting stage. At the physical stage, voices reach microphones through the room. At the input stage, connected equipment delivers an audio signal that the computer can use. At the meeting stage, Teams uses the chosen input and its available processing before remote attendees hear the result.
These stages should be tested in order without assuming that a working later stage proves every earlier detail is correct. A moving meter demonstrates some incoming activity. It does not identify every voice, establish that the intended microphone is selected or tell you how the conversation sounds remotely.
Create a plain-language connection description: “Table microphones connect to the supported controller; the controller connects by USB to the meeting laptop; Teams selects that input.” Then identify the separate speaker route used to hear callers. If staff cannot describe which device carries local voices, begin there rather than opening advanced controls.
The benefit of this separation is practical. You can improve a pickup problem with microphone placement, correct an input problem with a device selection, and investigate a meeting-processing problem with a controlled settings comparison. Each action has a purpose. An orderly sequence also produces a working arrangement that another employee can repeat.
Understand why Voice isolation matters in a shared room
Microsoft describes Teams Voice isolation as a feature that uses a person's voice profile to distinguish that voice from surrounding sounds and other voices. Its support guidance specifically addresses someone nearby sharing the device: turn off Voice isolation when that person should also be heard. That makes this setting a relevant check when one computer represents several people around a table. See Microsoft's Voice isolation instructions.
Treat the feature according to the job it is intended to do. A person joining alone from a busy shared workspace may want to exclude nearby conversation. A conference room representing a committee wants the opposite outcome: every intended participant must have a usable path to the call. The same setting can be helpful in one arrangement and unsuitable in another.
Do not diagnose Voice isolation merely because one person is louder. It is a candidate to check, not proof of the cause. Record whether it is enabled, make one suitable change and repeat the same speaking test. If no improvement follows, continue through the remaining route. A systematic comparison prevents a plausible explanation from becoming a fixed assumption.
There is no need to enroll a new voice profile as part of this shared-room troubleshooting exercise. The immediate task is to make the intended group audible, using the settings available to the meeting organizer and the organization's supported configuration.
Check whether Teams offers a suitable room mode
Teams also documents a desktop meeting room mode. Where available, users can choose Room audio before joining or use More, Settings, Optimize for room during the meeting. Microsoft says this mode disables Voice isolation for the shared room. Automatic activation depends on recognized shared-device or room-association conditions; do not assume a Martel package is certified or automatically detected. Check the current Microsoft meeting room mode guidance, including its noted lack of breakout-room support, against the meeting you plan to run.
Inspect the resulting device choices after selecting any room-oriented option. An option that changes several aspects of a meeting deserves a complete rehearsal, including the display, the selected input and the remote sound. The operator should know what changed and whether that arrangement remains appropriate when the laptop is used elsewhere.
For example, a staff member might host a committee discussion in the morning and an individual call from an office later. Keep the room's operating note focused on the shared session. Do not describe the room configuration as a universal preference that everyone must preserve for every task. Matching settings to the actual job is part of reliable preparation.
Check the microphone Teams has actually selected
A computer can have several possible inputs: its internal microphone, a connected USB system, a display's audio device or a headset left attached from an earlier call. The fact that tabletop microphones are plugged in does not establish that Teams is using them. Inspect the application selection directly.
Microsoft's device-settings guide directs desktop users to Settings and more, Settings, then Devices, where the microphone and speaker can be selected. In the meeting, use the available audio controls to inspect the current choice. Interface labels may vary by client and account, so use the current controls rather than relying on a screenshot from a different installation.
Write the selected input name exactly as displayed. If two names are similar, compare them deliberately while the room is quiet and one designated person speaks. Do not unplug essential equipment repeatedly during an active session just to discover which name disappears. Use a scheduled test whenever practical.
After choosing the intended input, repeat the seat exercise before making another change. A single corrected selection may explain why the laptop-side person sounded acceptable while other people did not. If the test succeeds, save the selection in the operating notes and check it again when the computer or equipment arrangement changes.
Make a remote-listener test that answers the room's real question
Choose someone outside the conference room who can listen without already knowing the test sentences. A colleague in a separate office using an appropriate listening arrangement is more useful than another laptop sitting on the same table. The listener should not introduce a second unnecessary loudspeaker path into the room being tested.
Give each occupied speaking position an identifier such as A, B or C. Ask each person to state their position, say one ordinary sentence and then read an unfamiliar detail. Suitable details include an invented reference code, a date or a short name pair. Use fictional material rather than confidential meeting information.
An example sentence is: “Seat C recommends the blue folder for the Wednesday planning session.” Follow with a made-up detail such as “Reference garden forty-two.” The listener writes what they heard before seeing the script. The purpose is to expose missing beginnings, endings or consonants that a general conversation can hide.
Run the exercise with normal voices. A person leaning toward the laptop and announcing a sentence loudly is testing an unusual behavior. Include people looking toward their usual screen or papers. A room setup should support the way its participants ordinarily speak, within reasonable meeting discipline, instead of depending on everyone remembering a special microphone pose.
Use a small test record instead of changing settings from memory
A short written record helps distinguish a real improvement from the relief of hearing any sound. It also prevents staff from cycling through the same unsuccessful changes. Keep the record simple enough that someone will actually complete it during preparation.
Test detail
What to record
Speaking position
Seat identifier and usual facing direction
Selected microphone
Exact name displayed in Teams
Observed processing
Relevant setting before the test
Listening result
Words missed, faint passage or interruption
Controlled change
One adjustment made for the next comparison
Retest outcome
Whether the same phrase became understandable
Avoid writing only “pass” when the result contains a limitation. “Pass while facing forward; weak when turned toward display” tells the next operator something useful. A room may need a placement adjustment, a presentation microphone plan or a change in seating expectations.
Keep the source of each observation clear. The room operator can report the selected device and physical connections. The remote listener can report what arrived. Neither person should silently substitute their impression for the other's. A setting can look correct while the outcome remains poor, and an acceptable short passage can conceal an untested seat.
Compare background-noise suppression separately from voice selection
Voice isolation and ordinary background-noise treatment should not be treated as interchangeable terms. The first question in this article is whether intended colleagues are being excluded. The next question is how the complete room sounds with a suitable shared-voice arrangement.
Microsoft documents configurable background-noise suppression in Teams. Its guidance includes changing the setting from the main application or meeting controls, with options that depend on the platform. Use the available setting intentionally and compare a normal room sample rather than copying a universal recommendation.
For a controlled comparison, keep the same microphone input, seating and speaker level. Include normal ventilation, keyboard use and paper handling, then have each person speak. Listen for the balance between speech and distracting noise. If a different setting helps, verify that it also preserves quieter speakers and word endings.
Do not assume that the quietest background produces the clearest meeting. A listener needs complete speech. Conversely, allowing every room sound through can make a distant speaker harder to follow. The useful target is a setting-and-placement combination that preserves the required voices during ordinary activity. Make the choice from the repeated sample, then record it with the room setup.
Use local recording as a comparison with a limited purpose
A short local recording can help determine whether the intended USB input already contains usable speech before Teams is involved. Select that same input in an available recording application, make a sample from the relevant seats and play back the saved file. Follow the computer's normal permissions and application instructions.
This is a comparison, not a claim that every application captures exactly the same processing path. Different programs may use different settings. Record which application and input were used, and avoid treating a clear local file as conclusive proof that all meeting behavior must be correct.
The result is still useful. If both the local sample and the remote Teams listener miss the same distant words, the physical pickup arrangement deserves attention. If a local sample is clear while the remote result is poor, focus the next checks on the meeting selection, processing and delivery conditions. If the samples differ unpredictably, simplify the test before drawing a conclusion.
Save only the test material needed for the troubleshooting task and handle it according to the organization's normal procedures. Fictional test sentences keep the exercise easy to share with support. There is no advantage in recording an actual confidential discussion merely to check whether a person at the far seat can be heard.
When microphone placement is the next useful change
Once the shared input and meeting settings are suitable, consider the distance between intended speakers and the available pickup points. A microphone beside the laptop may serve the operator well while leaving the rest of a long table dependent on distant room sound. Increasing a level control does not move that microphone closer to anyone.
Start with the positions that failed the test. Move an appropriate microphone to a useful supported location, keeping normal table activity in mind. Leave space for documents, cups and hands. Do not hide the microphone behind a laptop display merely because the cable route looks tidier there.
Evaluate the whole connected arrangement after each meaningful change. Several microphones clustered near one person do not necessarily improve the neglected seats. Likewise, adding more pickup locations without checking the combined result can increase distracting room sound. The system should serve the conversation, with clear responsibilities for setup and operation.
This is where Martel's multiple-microphone package comparison becomes especially relevant. Compare the supported system against your seating sketch and the failed positions. Choose around the work the room needs to perform, then repeat the remote-listener exercise with the proposed arrangement.
Before selecting a package, prepare the occupied seating layout, typical speaking positions, meeting computer details and the route used for remote playback. A group-size suggestion is a starting point for discussion, not a guarantee that every room or speaking behavior will produce the same result.
Do not assume that adding microphone positions supplies every other part of conferencing. Plan the speaker arrangement and the meeting application's processing separately. Also distinguish a shared computer input from independently recorded tracks. A purchase decision should identify what the actual package supplies and what the existing room must still provide.
A useful equipment request describes a problem that can be checked: “We need clear contributions from both sides of this table, including the far-end presenter.” That gives Martel a practical starting point for discussing a supported configuration instead of guessing from a chair count alone.
Work through a hypothetical committee-room example
Consider an illustrative committee with a chair near the laptop and six other participants spread around a table. The chair sounds clear to the remote listener. A colleague beside the chair is intermittently absent, while two far-end seats are faint. These are fictional observations used to demonstrate the reasoning, not results from a product test.
The operator first confirms the selected Teams input and checks the relevant shared-voice setting. After a controlled settings comparison, the nearby colleague becomes consistently audible. The far-end seats remain faint in both a saved local comparison and the call. The room has improved, but the remaining symptom is now more specific.
The next comparison changes microphone placement within a supported arrangement. The listener repeats the same unfamiliar phrases rather than discussing the familiar agenda. The far-end detail becomes understandable, while a new microphone position beside a paper stack picks up avoidable handling noise. The operator moves that pickup point and retests it.
The final notes contain two separate corrections: a suitable shared-room setting and a better distribution of microphones. If staff had stopped after the first improvement, the remote participants would still have struggled with the far end. If they had bought equipment before checking settings, a preventable filtering problem might have remained in the new setup.
A closer look at Martel’s Audio Grabber tabletop microphone. Microphone placement and the complete connection path should be checked for your room.
Test the person, the seat and the speaking direction independently
A useful room test changes one variable at a time. If one person is hard to hear, ask that person to speak from a known clear position and ask a different person to use the troublesome position. Keep the sentence, normal speaking level and microphone configuration as similar as practical.
If difficulty follows the seat, investigate its relationship to pickup locations and nearby noise. If it follows the speaker, look at ordinary speaking level, facing direction and the already-checked application processing. If the outcome changes every time, first improve the test consistency. A moving target can make every theory appear partly correct.
Facing direction deserves its own comparison. A person may sound clear while looking at colleagues and less clear when reading toward a screen. That does not mean they need to shout throughout the meeting. It means the planned speaking behavior belongs in the equipment and placement test.
Document the useful result without judging the participant. “The presentation position needs a closer pickup point” is constructive. “The presenter is bad at microphones” is not an equipment plan. A shared-room system should accommodate the important speaking positions as reasonably as possible, while participants help by taking turns and avoiding unnecessary noise beside microphones.
Include overlapping conversation in the rehearsal
An orderly sequence of individual sentences establishes basic coverage, but real meetings also contain brief interruptions, agreement and questions. After every seat works alone, rehearse a few ordinary exchanges. Keep the exercise civil and representative rather than having everyone speak loudly at once.
For example, ask one person to give a short explanation, a second to ask a brief clarification and a third to state an action item after the first two finish. The listener reports whether the transition was understandable. Then try a modest interruption to see whether the room can recover when people briefly overlap.
The purpose is not to demand that equipment make simultaneous speech perfectly separable. Meeting discipline remains useful. It is to find whether the chosen arrangement handles normal turn changes without requiring the remote listener to guess who said what. A room can pass isolated sentences and still be frustrating during discussion.
Where accurate minutes or a transcript matter, give the chair a practical habit: pause, recognize the next speaker and repeat an unclear motion before the vote or decision. That improves the source conversation itself. It also gives the operator a moment to confirm that the next speaking position is reaching the call.
Check what changes when the meeting laptop changes
A room may work reliably for one employee and fail when another brings a different laptop. Treat that as a configuration change rather than proof that the microphones have become unreliable. The second computer may expose different input names, use a different meeting client or select a previously preferred audio device.
Build a short arrival routine: connect the supported equipment, inspect the microphone selection, inspect the speaker selection and run a brief remote check from the difficult seat. The purpose is to establish the actual working route on the machine being used that day.
Avoid relying on an employee's personal memory of a device name. Add a photo of the physical connection arrangement to the room's internal operating sheet and write the observed input label beside it. The label may still change, but the operator has a clear reference for what must be represented.
Keep adapters and extensions within the approved equipment arrangement. A connector that physically fits does not establish the complete electrical or software compatibility of a new route. If staff need to change the computer connection, test that version before the important meeting rather than discovering the difference after participants have joined.
Confirm saved audio separately when a record is required
Remote participants hearing the room is one outcome. A saved recording containing the required local and remote voices is another. If the meeting needs an audio record, include a permitted recording sample in the rehearsal and review the actual saved result.
Use a short exchange with a local person and an outside participant. Confirm that the file contains both sides, with enough context to understand the exchange. Identify the recording route and responsible person. Do not assume that the meeting's live sound tells you everything about another application or recorder saving audio.
When reviewing a transcript, compare uncertain passages with the source rather than attributing every error to the transcription process. A faint source word, an overlapping interruption and a mistaken speaker label are different problems. Improving future capture can reduce avoidable review work, but it cannot reconstruct words that were absent from an earlier recording.
The Martel guide collection includes recording and transcription workflows for the later stages. Use those alongside the room setup. A complete plan covers the voice reaching the call, the file reaching the reviewer and the reviewer knowing which source and meeting the file represents.
Build a room procedure that occasional users can follow
A configuration is more valuable when someone other than its original installer can operate it. Keep the everyday instructions short and place the detailed troubleshooting record somewhere accessible. The routine should identify the equipment, the connection sequence, the selected application devices and the quick speaking check.
Use labels that describe functions. “Meeting USB input” is easier to understand than an unexplained collection of personal nicknames. Mark supported cable positions without putting labels over connectors or controls. Keep a simple inventory so a microphone or adapter borrowed for another room is noticed before the meeting begins.
Decide who changes settings. An occasional user should know how to select the intended microphone and inspect the relevant shared-room option. More involved changes can be assigned to the room owner or support contact. The goal is a manageable division of responsibility, not a collection of forbidden controls.
After a successful test, stop making unrelated adjustments. Record the working state and use the next real meeting to observe whether the defined requirements are met. If a new failure appears, describe what changed and return to a controlled comparison. Rebuilding the entire setup for every complaint makes it harder to preserve what already works.
Prepare a support request that can be answered efficiently
A useful support request contains the room layout, microphone system, meeting computer, application type and exact symptom. Include the selected input name and whether the problem appears in the local comparison, the remote call or both. Say which controlled change was made and what happened afterward.
Avoid sending a long list of settings without explaining the result. Support needs a reproducible observation. “Seat B loses the first word while seats A and C remain clear” is a much better starting point than “we tried everything.” If a short fictional test sample is available and appropriate to share, identify what the reviewer should listen for.
When equipment selection is the next step, provide a seating sketch instead of estimating only the room's floor area. Show the chairperson, quieter seats, presentation position, display and remote-playback speaker location. Also explain whether tables move between sessions and who packs the system away.
For Martel product guidance, use the Martel website or the current contact link on the website. Describe the job the system must perform. That allows the discussion to focus on a supported microphone arrangement and the operating checks needed for your room.
A practical rehearsal from start to finish
Schedule a short session with the people needed to test the difficult positions. Begin with the system as staff intend to use it, including normal room activity. Give the outside listener the seat identifiers but keep the test details hidden until they have reported what they heard.
Write the problem in one sentence and identify the affected seats.
Confirm the physical input route and the microphone selected in Teams.
Check whether the shared-room voice-processing choice matches the intended group.
Run individual seat phrases and record specific missing details.
Make one justified settings or placement change and repeat the same exercise.
Add normal turn changes and brief representative overlap.
If recording is required, review a saved exchange containing both sides.
Record the working setup, remaining limitations and daily startup routine.
Finish with a decision. If the selected input and suitable settings solve the problem, preserve that configuration. If the far seats still need closer pickup, compare a supported multiple-microphone system. If the fault remains inconsistent or follows the connection to the call, give support the test record rather than continuing to increase gain.
A rehearsal has succeeded when it produces a repeatable arrangement and a clear next action, even if that action is a specific equipment change. It has not succeeded merely because the loudest person can be heard once.
Classify remaining failures before escalating
After the first controlled checks, place the remaining symptom in a practical category. A missing local voice, distorted loud passage, intermittent complete-room interruption and remote voice absent from a saved file are different observations. Mixing them in one complaint encourages broad changes that can conceal the original cause.
If one seat is faint while nearby seats remain clear, preserve the working application configuration and investigate that pickup location. If every seat fails together, examine a shared part of the route. If the local recording comparison remains clear while a call interruption occurs, include that difference in the report. These are ways to narrow the next question, not assurances that a single component has been proven faulty.
Use a stopping point for each test. Once a step answers its question, write the result and move to the next relevant comparison. There is little value in trying every available setting after the intended input has already been identified and verified. Unrelated experiments can create additional symptoms that make the original problem harder to reproduce.
Escalation becomes productive when the record shows what remains unresolved. Support can help more efficiently with a repeated failure under a described condition than with a list of every control someone remembers clicking. Keep the working parts of the setup intact while investigating the remaining issue.
Rehearse a presentation position as well as table seats
Some shared rooms pass a seated discussion but fail when a presenter stands beside the display. Treat the presentation position as another intended speaking location. Include its normal facing direction, the distance to a useful pickup point and the way the presenter moves between the screen and colleagues.
Use a hypothetical project briefing to test the transition. A participant speaks from a table seat, walks to the planned presentation location and explains an invented chart. The remote listener reports whether the explanation remains understandable. Repeat the test while the presenter points toward the screen, because that behavior can change the relationship between mouth and microphone.
If the position fails, compare a supported placement adjustment or a defined speaking area. Avoid declaring that the room works for presentations merely because the seated chairperson is clear. The job has changed, and the useful test must change with it. Equipment selection should account for the positions the meeting actually needs.
Keep the final instruction practical. A marked presentation position and a visible microphone arrangement are easier to repeat than a vague reminder to speak up. Include that arrangement in the room sketch and show occasional presenters where the supported speaking area is before the session begins.
Meeting-room illustration from Martel’s gallery. It illustrates distributed microphone placement; it is not a measured coverage plan or an exact package inventory.
Compare two remote listeners before changing the room again
Sometimes the room sounds complete to one outside participant while another still reports missing people. Preserve the room configuration long enough to compare those observations. Moving microphones immediately can destroy a useful distinction between a shared capture problem and a listener-specific problem.
Use a short fictional passage from the same speaking position while two remote listeners make independent notes. Ask each listener to repeat the unfamiliar detail before discussing the result together. If both miss the same words, investigate the common route. If their reports differ, record which listener heard which passage and ask the affected participant to check their own listening arrangement through the normal support process.
For an illustrative test, listener A correctly hears “the review is on Thursday,” while listener B misses the day even when the chairperson repeats it. That observation does not prove a particular fault. It does show why adding table microphones should not be the automatic next step. The operator needs another comparison that separates the room contribution from the affected listener's experience.
Keep the test brief and factual. Check whether the difference affects every room voice or only one seating position, and whether it also occurs while a remote colleague speaks. Provide those observations to the meeting support contact. A supported microphone system addresses the voices entering the meeting; a reliable investigation also accounts for the person listening at the other end.
Questions about Teams shared-room microphones
Why does Teams hear me but not a person beside me?
First confirm the input and check whether an individualized voice-processing feature is active. Then compare the same short phrase from both people without changing the seating or microphone. A nearby colleague being absent deserves a different investigation from someone seated far from every pickup point. Use the observed result to choose the next check.
Should every person join Teams on a separate laptop?
Do not add multiple active room audio paths as an automatic remedy. Additional devices can create new playback and pickup complications. A supported shared-room arrangement may be easier to operate. If participants need their own screens, plan their meeting-audio behavior deliberately and verify the complete room from outside it.
Does a higher microphone level solve faint seats?
A higher level may make an already usable signal louder, but it does not change the distance between a voice and a microphone. Compare close and distant speech, avoid distortion and investigate placement when the difference persists. The useful outcome is intelligible words, not simply a larger meter movement.
How can we tell whether the problem is Teams or our microphones?
Use a controlled comparison with the intended input in a local recording application and the remote meeting. Keep the phrase and position consistent. The comparison helps localize the next investigation, although application processing can differ. Report the observation precisely rather than treating one successful sample as proof of every stage.
Can one USB connection carry several room microphones?
A supported system can combine compatible pickup points for the computer input it provides. Review the exact controller, microphone and cable arrangement. Do not assume that separate microphones plugged into an arbitrary USB hub automatically become the same meeting input or independently recorded channels.
What should we test after buying a Martel package?
Test the real speaking positions, the intended meeting computer, the selected app input and the remote listening result. Include quiet voices, normal facing directions and a short exchange with a remote participant. If the meeting needs a recording, review the saved file as a separate part of acceptance.
Do more microphones guarantee a better transcript?
No microphone count guarantees transcription accuracy. Useful pickup positions can improve the speech available for review, but overlapping voices, terminology, delivery requirements and the transcription process still matter. Check the recording before relying on text, and preserve clear speaker turn-taking wherever the meeting allows it.
What information should we send Martel before ordering?
Provide the occupied table layout, typical speaking positions, computer connection, meeting software and recording requirement. Explain what currently fails and where. A concrete room description allows a more useful package discussion than a general request for the most powerful microphone system.
Give every intended speaker a tested route to the meeting
A shared Teams room works best when the setup matches the people it represents. Confirm the actual input, check individualized voice filtering, compare normal speech from every important seat and improve physical pickup where the test shows a need.
When the room needs distributed microphone positions, compare Martel's Zoom multiple-microphone systems. Choose a supported package around your table and workflow, then verify the complete Teams conversation with a remote listener. The result you want is a meeting where colleagues can contribute naturally and remote participants can follow the words that matter.
Martel gallery image of the 16-microphone system. See the product page for the supplied configuration.
Martel Electronics | 7 hours ago
Teams Can Hear One Person but Not the Rest of the Room: What to Check
Teams hears one person but misses colleagues? Check shared-room settings, selected input and microphone placement, then compare Martel microphone systems.