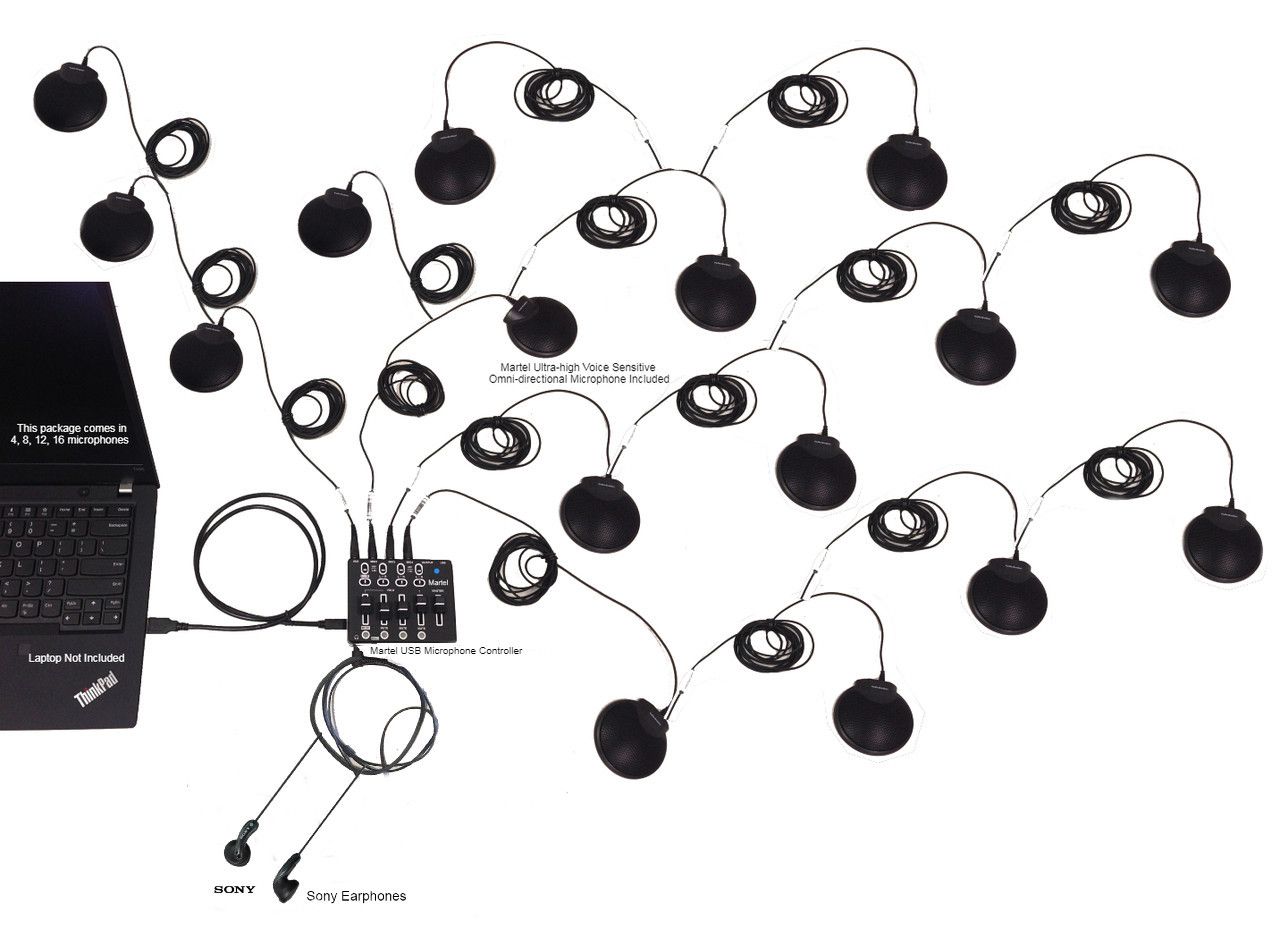
Martel gallery image of the 16-microphone system. See the product page for the supplied configuration.
To connect several conference microphones to one computer input, use a compatible microphone system that combines them before sending audio over USB. Connect the microphones through the system’s supported hardware, connect its USB audio controller to the meeting computer, and select that input in Zoom or Microsoft Teams. Then test the room from the remote listener’s side.
The distinction is simple but important: several physical microphones can serve one selected computer audio input. You do not need to make the meeting application recognize each microphone as a separate participant. Martel’s Zoom Multiple Microphone Systems provide a practical route for organizations that need several tabletop pickup positions and a shared USB connection. This guide explains how to plan that route, assemble it carefully and keep it usable between meetings.
Think about the system as a sequence of jobs. Microphones collect voices at useful positions. Supported connections carry those microphone signals into the controller. The controller presents audio to the computer through USB. The meeting application uses the selected input to send room speech to remote participants.
The return direction is a separate job. Remote participants speak into their own equipment, and your computer plays their voices through its selected output. The room must be able to hear that output. Purchasing more microphones does not, by itself, specify the loudspeaker arrangement for a hybrid meeting.
Recording is another job again. The recording workflow determines what is saved and where. A working live call does not establish that a particular recording contains both the room and remote participants. Keeping these jobs distinct makes troubleshooting much more precise: “remote people cannot hear us” points toward the outgoing path; “we cannot hear them” points toward playback.
Part of the workflow
What it does
What to verify
Table microphones
Collect room speech
Useful placement near speaking positions
Supported microphone connections
Carry signals within the system
Correct components and secure connections
USB audio controller
Connect the microphone system to the computer
Correct USB path and supplied power arrangement
Meeting microphone selection
Choose outgoing room audio
The intended system is selected
Meeting speaker selection
Choose incoming playback
Remote speech reaches the room
Recording workflow
Save required meeting sources
A sample file contains the expected voices
A USB hub and a microphone controller do different jobs
A USB hub adds connections for USB devices. It does not automatically combine several independent USB microphones into one selectable microphone. Plugging separate devices into extra ports therefore does not establish the shared audio path described in this guide.
A designed multiple-microphone system approaches the problem earlier in the chain. Its compatible microphones feed the system hardware, and the computer receives the intended combined input. That arrangement can be easier to operate in a shared meeting room because the operator selects a known input instead of attempting to manage a collection of unrelated microphones.
This does not mean every microphone can be connected to every controller. Matching connectors are not sufficient evidence of electrical compatibility. Power requirements, wiring and the supported connection arrangement matter. Use the microphones, adapters and cables specified for the system. Before adding an existing microphone from a drawer, confirm that Martel supports that exact combination.
If your organization already has separate USB microphones, describe them accurately when asking for advice. A plan for combining independent USB devices is a different project from installing a purpose-built conference microphone package. Start with the architecture you actually own.
Separate microphone count, device count and track count
Three numbers are often confused during a purchase: the number of physical microphones, the number of inputs visible to the meeting application and the number of audio tracks available in a recording. They describe different things.
A room might have eight tabletop microphones while the application uses one selected USB input. That does not mean eight separate participant tiles appear in the call. It also does not establish eight independently editable recording tracks. Physical pickup positions serve the room; software routing and recording settings determine the digital outputs available later.
Write down the actual result you need. “Everyone around this table should be heard through the room computer” describes a shared-input meeting task. “We must isolate each person's voice after the meeting” describes a separate recording requirement that needs explicit verification. Do not let the word “multiple” silently promise the second when the system is being purchased for the first.
For ordinary hybrid discussions, the useful goal is often straightforward: a remote person can follow the room without asking quieter participants to repeat every contribution. Keep that goal visible while evaluating the connections and controls.
Choose the package around the room you will connect
Martel offers four-, eight-, twelve- and sixteen-microphone packages. Begin with the actual speaking positions rather than the number of USB ports on the laptop. A longer table, separate presenter position or divided seating arrangement may create a need for more useful pickup locations.
For this installation guide, the important principle is that the room layout belongs on the microphone side of the controller. The laptop connection remains a shared USB audio task. Additional physical pickup positions should solve an identifiable seating problem; they should not create an improvised cable scheme beyond the supported system arrangement.
Inventory the equipment before arranging the table
Unpack where you can see the complete kit. Compare the contents with the current package listing and supplied instructions. Identify microphones, supported extension cables, controller, USB connection, power adapter and case. Put uncertain components aside until you understand their purpose.
Make a simple inventory card with a count and a description for each item. Photograph the unpacked equipment for internal reference. If the package will travel, the same card becomes a return check after every meeting. Missing power components or a borrowed USB cable can otherwise make a complete kit appear to have developed a mysterious software fault.
Do not begin by trying every available socket. First identify the controller connections from the instructions and follow the supported arrangement. If labels are unclear, obtain clarification before applying power or inserting an adapter. A small amount of certainty at this stage is more useful than a room full of equipment connected by resemblance.
Keep the original packaging information available through the first successful rehearsal. Record the package identifier alongside the room name so a later support request begins with the actual configuration.
Plan the table connections before plugging them in
Sketch the table, controller location and computer. Mark the planned microphone positions and draw the supported cable route between them. Include the power outlet and the path from the controller to the laptop. This helps you see whether the working layout can be achieved without stretching a connection or putting a cable across an access route.
Place the controller where the operator can reach it without leaning over participants or moving a microphone. Leave room for ordinary table use: documents, water, laptops and a clear place to sit. A technically connected system that prevents people from using the table will be rearranged during the meeting, often in ways that undo the original plan.
Use the manufacturer-supported cabling and extension arrangement. Avoid assuming that a longer cable with a similar connector is interchangeable. If the planned room requires a different distance, ask about that requirement before inventing a chain of adapters.
Label the route by function. “Table section A” is more useful than an unexplained colored sticker when a substitute operator must reconstruct the setup. Keep labels legible and consistent with the room sketch.
Assemble in a deliberate, documented sequence
The supplied instructions govern the exact connections and power sequence for your package. The following procedure organizes the work around those instructions without substituting an assumed wiring diagram.
Confirm the controller, microphones and cables match the intended package.
Position the microphones and controller according to the room sketch.
Connect the supported microphone arrangement exactly as documented.
Connect the specified power arrangement according to the instructions.
Connect the controller’s USB audio path to the meeting computer.
Confirm that the computer recognizes the intended audio input.
Select that input in the meeting application and run a short test.
Test every planned speaking position with a remote listener.
Pause when a step fails. If the computer does not recognize the input, moving microphones around the table will not solve the selection problem. If the selected input works but a distant speaker is unclear, reinstalling the meeting application may distract from placement. The sequence is valuable because each successful step becomes evidence about the next one.
After the first complete success, photograph the working arrangement and record the input name exactly as the computer displays it. That name may differ from the marketing name on the product box.
Distinguish the USB data connection from power
A controller can be connected to electrical power while the computer audio path remains incomplete. Conversely, a visible USB connection does not excuse ignoring the package’s specified power arrangement. Treat power and data as separate items on the setup checklist, even when their connectors look familiar.
Use the supplied or explicitly supported components for each role. A cable that charges another device is not automatically proof of a working USB audio data connection. If an approved replacement cable is needed, identify the required function rather than selecting solely by connector shape.
The practical test is recognition followed by audio. Can the computer see the intended input? Can it receive speech from the microphone system? Those are different observations. An illuminated component proves less than a successful recording and replay from the actual microphones.
If the system travels, store its power adapter with the kit and label it clearly. Shared meeting spaces accumulate similar adapters quickly. Keeping the specified adapter with the controller removes a common source of uncertainty from the next setup.
Establish a simple computer connection before adding a dock
A laptop may reach meeting equipment through a dock, a hub, an adapter or a monitor connection. Each additional component creates another item to identify when the input is missing. Where the computer and supported connections permit, establish a known working path with the simplest arrangement first.
Once that path works, evaluate the intended everyday arrangement. Connect the approved dock or adapter and repeat the recognition and audio checks. Record which arrangement passed. This is a controlled comparison, not a claim that every dock fails or that direct connection guarantees success.
Also consider the physical laptop workflow. Will someone disconnect the computer after each meeting? Does the room use a shared laptop, or do presenters bring their own? The answer affects how often device selection and permission checks must be repeated. A room with a rotating computer needs a clearer setup card than one with a permanently assigned machine.
Do not make the first important meeting the first test of a new adapter. Rehearse the complete connection that people will actually use, including power and the selected playback device.
Confirm the computer recognizes the intended input
Before opening a meeting, inspect the computer’s available audio inputs. Identify the controller by the displayed device name and compare it with the entry recorded during setup. Avoid choosing the laptop’s built-in microphone merely because it is already available.
Use an ordinary spoken sentence from a planned table position. Watch for input activity if the operating system provides it, then make a short sample recording through an appropriate approved application. Replay it. A moving indicator shows some activity; listening establishes whether the activity is useful room speech rather than handling noise or a different microphone.
If the input is absent, return to the controller’s supported power and USB connections. Check whether the data path is complete and whether an intermediate component has changed. Note what the computer does show. A clear description such as “built-in input present, expected USB input absent” is more useful for support than “nothing works.”
Once the computer path is established, move into the meeting application. Treat that as another selection step rather than assuming the application adopted the same choice automatically.
Select and verify the system in Zoom
In Zoom, choose the intended system as the meeting microphone and choose the room’s intended playback device separately. Zoom’s official audio settings guide describes microphone and speaker testing. Its audio troubleshooting guidance also identifies connections, mute state and microphone permissions as checks when audio fails.
Use a two-part rehearsal. First verify that Zoom receives room speech. Then ask someone outside the room to join and report what they hear from the actual table positions. A local playback test is useful, but it does not reproduce the full experience of a remote participant following a conversation.
Include one quiet speaker and someone facing away from the computer in the rehearsal. The purpose of multiple pickup positions is to serve the people around the room, so a successful test spoken directly over the controller is weak evidence about the far end of the table.
Record the selected microphone and speaker names in the operator’s instructions. Recheck them after changing computers or reconnecting equipment. A familiar meeting window does not prove that the same input is still selected.
Select and verify the system in Microsoft Teams
Microsoft’s microphone troubleshooting guide for Teams explains selecting the microphone in Devices, checking access permissions and using a test call where available. For a shared room, identify the USB system explicitly rather than leaving the operator to infer which generic device name belongs to the table.
Test Teams with the actual room computer and the intended meeting account. Organizations may use different clients and policies, so keep the local setup instructions tied to the environment you have checked. If the available controls differ from a screenshot, use the current application’s device settings and the relevant official guidance.
A shared room also needs suitable voice processing. Microsoft’s voice isolation guidance says to turn that feature off when other people sharing the device should be heard. Include this check in a room where several people intentionally speak through one input.
Finally, rehearse an exchange with a remote participant. They should hear more than the operator’s setup sentence. Ask them to follow a brief conversation from two separated seats and report any lost words.
Check microphone permissions at the right layer
An application can list an input yet still require permission to use the microphone. Desktop applications, operating systems and browser-based meeting sessions can involve different access checks. Follow the official guidance for the environment you are actually using instead of applying a desktop instruction to a browser session by habit.
When troubleshooting, write down three observations: whether the operating system sees the input, whether the application offers it and whether the application receives speech after selection. This separates recognition from permission and from signal quality. It also prevents repeating physical reconnections when the remaining obstacle is an access setting.
For managed computers, involve the person responsible for the organization’s configuration when a setting is unavailable or controlled centrally. Record the specific blocked step. “The microphone permission control is managed” is a practical request for help; repeated changes to the table arrangement are not.
After resolving access, run the same short phrase again from the same position. Consistent test conditions let you confirm that the change addressed the problem instead of merely coinciding with a different speaker moving closer.
A closer look at Martel’s Audio Grabber tabletop microphone. Microphone placement and the complete connection path should be checked for your room.
Select the camera independently and avoid accidental input changes
A room may use a dedicated camera while the Martel system supplies microphone audio. Document the intended camera, microphone and playback device as three named selections. The camera image being correct does not establish that the microphones are correct.
Watch what happens when other equipment is connected. A new headset, display or camera can add device choices to the computer. The operator should check the selected microphone after a connection change rather than assuming the table system remains active. This is particularly useful when presenters bring their own accessories.
Test with a quiet sentence from the far end of the table. If the sound changes dramatically when someone approaches the laptop, investigate whether the computer’s own microphone is in use. Do not treat that observation as a diagnosis by itself; confirm the selected device and repeat the comparison.
Keep the setup card close to the computer position. Three exact device names can prevent a long investigation, especially when the room is operated by someone who did not purchase the equipment.
Set sensitivity by listening, not by chasing the largest meter
A high input indication is not the goal. The goal is understandable speech from the planned positions without objectionable overload or unnecessary room noise. Start with the manufacturer’s instructions for the available controls and make small, deliberate changes.
Choose one ordinary speaker and one quieter speaker. Ask each to deliver the same short test sentence in their normal posture. Listen remotely while adjusting only the relevant control. Repeat the phrase after each change. This comparison is much more useful than turning several controls at once while people talk over one another.
Do not confuse microphone sensitivity with speaker playback volume. Increasing what the room hears from remote participants does not necessarily improve what remote participants hear from the room. Label the controls by their actual role in the operator’s notes.
If the quiet speaker remains difficult while nearby table noise becomes prominent, reconsider the microphone position. Bringing a useful pickup location closer to speech can address a different problem from increasing the level of everything the microphone hears.
Understand the scope of each hardware control
Before the meeting, learn which microphones or connected group each controller setting affects. Do not infer independent per-person control from the number of microphones on the table. The supported wiring and controller design determine the scope of a control.
Create a harmless rehearsal phrase for each table section. Adjust a control modestly while a colleague speaks from that section, then restore the intended setting. Document the result. This establishes a practical map between the physical table and the controller without requiring the operator to memorize an unfamiliar panel during a live discussion.
The same principle applies to mute. A software mute in the meeting and a physical control in the microphone path may affect different parts of the workflow. Never assume their indicators synchronize unless that behavior is explicitly documented and verified in your configuration.
Assign one operator to make necessary adjustments. Several people independently changing computer volume, microphone sensitivity and meeting settings can erase the evidence needed to understand a problem. One deliberate adjustment followed by one listening check is easier to evaluate.
Keep outgoing pickup and incoming playback under control
A hybrid room needs a working conversation in both directions. Confirm that remote voices play through the intended output and can be understood at the occupied seats. Then ask the remote participant whether the room’s playback is returning to them in a distracting way.
Do not assume a microphone package includes loudspeakers or a complete echo-control design. Identify the actual playback equipment and evaluate its placement as part of the room. A speaker aimed into a nearby pickup position may create a different challenge from one placed with the room layout in mind.
When a problem appears, describe it precisely. Is the remote person hearing their own speech returned? Is there a continuous ringing sound in the room? Are words simply unclear? Those descriptions guide the next investigation more effectively than calling every audio fault “feedback.”
Rehearse a normal exchange with pauses and interruptions. A system that sounds acceptable while only one side speaks still needs to support the way your meeting actually operates. Keep the rehearsal civil and short, but make it realistic.
Match the shared connection to a complete Martel package
If your current room relies on a microphone beside the laptop, use the connection plan to identify where additional pickup positions would help. Compare Martel’s four-, eight-, twelve- and sixteen-microphone systems, then confirm the supported package for your table layout. Bring the computer connection and playback arrangement into that discussion so the equipment choice serves the entire meeting workflow.
Test every speaking position with a repeatable passage
Write a brief original passage with a name, date and fictional reference number. Give each test speaker the same text. Ask them to read it at their normal level while sitting naturally, then ask a remote listener to repeat the important details.
Work around the table in a known order. Mark any location that needs another listen and note whether the speaker was facing the table, a display or the chairperson. This creates a useful record without pretending to measure a universal coverage radius.
Include ordinary working conditions. Put the laptops and papers where they normally sit. Run the ventilation as it will run during the meeting. A test in an empty, unusually quiet room may not expose the difficulties that appear once participants begin using the table.
End with a short conversation between separated positions. The listener should follow who is responding to whom and hear the actual words. A series of isolated loud test phrases can conceal problems that become obvious in an ordinary discussion.
A worked example: connecting a compact project room
Imagine a project team using a single table with a shared laptop at one end. They choose a four-microphone Martel package after comparing the occupied positions with the package guidance. The room already has a chosen playback arrangement and camera, so the new work concerns outgoing speech.
The operator inventories the kit, sketches four useful positions and follows the supplied connection instructions. They establish the USB path, note the computer’s displayed input name and select it in Zoom. A colleague in another room joins the rehearsal.
The first sentence from the nearest seat is clear. The far-end sentence loses a project code because the speaker turns toward a display. Instead of immediately changing every level, the team adjusts the relevant microphone position and repeats the same sentence. The listener can now repeat the code. They then test incoming speech at every seat.
The finished setup card records device selections and a table photograph. The team’s success is a verified layout, not merely the fact that the laptop has recognized a USB device.
A worked example: connecting a divided training table
Consider a training room with participants seated at two table sections and a facilitator who usually stands beside a display. The organization is evaluating an eight-microphone package. The room sketch reveals that the facilitator’s normal speaking position is separate from the participants’ table positions.
Before installation, the organizer asks Martel to confirm the supported connection arrangement for that layout. They route the specified cables without crossing the main access path and keep the controller accessible to the operator. The facilitator agrees to use a designated speaking position during discussion.
The first Teams rehearsal reveals that only the operator is consistently heard. The team checks processing rather than assuming the distant microphones are defective. After reviewing the shared-device settings, they repeat the passage around both table sections and verify each location remotely.
They finish with a question-and-answer exercise. Participants ask from their normal seats, and the facilitator answers from the designated position. This checks the training workflow that the equipment must serve, including transitions between speaking areas.
A worked example: building a portable committee kit
A committee meets in different rooms each month. Its equipment travels in a case, and several volunteers share setup duties. The organizer is comparing larger Martel packages because the tables and attendance vary. The central operational risk is inconsistency between venues.
They create a kit inventory, a labeled connection plan and a short room assessment card. At each venue, the operator marks occupied positions, checks outlet access and confirms that the supported cable arrangement can serve the layout. A different room does not automatically inherit the previous room’s approved microphone positions.
The committee rehearses setup with a volunteer who did not create the instructions. That person finds the correct controller connection but initially selects the laptop microphone in the meeting application. The team improves the card with the exact displayed input name and a verification phrase from the farthest planned seat.
After the meeting, the volunteer checks every item back into the case. The portable system now includes a repeatable operating method, which matters as much as the initial successful connection.
Troubleshoot by the last point that worked
When audio fails, identify the last confirmed stage in the path. Was the system recognized by the computer? Did a local sample contain speech? Did the meeting application receive it? Did the remote participant hear it? These questions narrow the problem before you disturb the whole setup.
Observation
Useful next check
Expected input missing from the computer
Supported power, USB data connection and intermediate hardware
Input present but no speech received
Microphone connections, relevant controls and permissions
Local sample works but the meeting is silent
Application input selection, access and mute state
Near seats clear, distant seats weak
Pickup positions and normal speaking direction
Room speech works but remote voices are absent locally
Selected playback output and room listening level
Live call works but saved file is incomplete
The specific recording workflow and required sources
Make one meaningful change, then rerun the same test. If you change the cable, input selection, sensitivity and speaker position together, a successful result will not tell you which change mattered. A written symptom and a short sequence of checks preserve useful evidence for the next operator or support conversation.
Validate the recording separately from the live meeting
If the meeting must be recorded, decide who is responsible for starting the authorized recording and where the result will be checked. Follow the organization’s recording and notification practices. Equipment setup should support that workflow rather than leave it to chance after people have begun discussing important business.
Make a short sample with one room speaker and one remote speaker. Stop it, locate the saved result and replay it using the intended review method. Confirm both sources are present and understandable. Also check that the person who must prepare notes can actually access the file through the approved process.
Do not assume separate microphones create separately labeled recordings or reliable speaker attribution. Ask about those requirements explicitly if they matter. A shared input can serve a useful meeting purpose while still requiring a different solution for independent post-production control.
Use fictional content in the rehearsal. You need evidence that the workflow works, not a sample of confidential committee business sitting in an unreviewed test folder.
Make a setup card that another person can use
The best setup card records decisions, not a long technical essay. Include the kit identifier, connection diagram or photograph, required power arrangement, exact microphone and playback device names, and a brief listening test. Add a clear stop point for seeking help when a component is missing or an input never appears.
Write each instruction as an observable action. “Check sound” is vague. “Ask a remote colleague to repeat the sentence spoken from the far-end seat” tells the operator what to do and what counts as evidence. Use the same labels on the card, cables and storage compartments.
Have a colleague follow the card without coaching. Watch where they hesitate, then revise those instructions. This small exercise often exposes assumptions the original installer no longer notices, such as which USB cable carries audio or which menu entry belongs to the controller.
Keep one accessible copy with the kit and another in the team’s approved documentation location. Update both when a verified equipment or software change affects the workflow.
Meeting-room illustration from Martel’s gallery. It illustrates distributed microphone placement; it is not a measured coverage plan or an exact package inventory.
Maintain a known configuration between meetings
Once the room works, record the working configuration before experimenting with a change. Note the computer, application, selected devices and physical layout. You do not need to freeze the room forever; you need a clear reference when a later result differs.
After a computer replacement, software change or new docking arrangement, run the short recognition and remote listening checks again. Limit the rehearsal to the parts affected unless the result reveals a broader concern. Verification should be proportionate and useful, not an elaborate ceremony that operators eventually skip.
For portable equipment, pack down in a consistent order. Inspect cables for obvious damage, avoid pulling by the connector cable and return the specified power adapter to the case. Report a missing component before the next meeting begins.
A monthly meeting can become a poor memory test if no one records its working setup. A photographed layout and a completed inventory give the next operator something concrete to reproduce.
Prepare a support request with useful evidence
If the problem persists, gather the package identifier, computer model or operating environment, meeting client and the displayed input name. Describe whether the system worked previously and what changed immediately before the failure. Include the simplest successful test, if any.
State the symptom in the listener’s terms and the stage you checked. For example: “The computer lists the expected USB input and a local sample contains speech, but Teams participants cannot hear it.” That description helps separate a meeting selection issue from a missing physical connection.
Photograph the controller connections and the overall layout if sharing those images is appropriate. Avoid sending screenshots that expose participant names or confidential meeting material. The useful evidence concerns the equipment and settings.
Bring the question back to the verified configuration rather than asking support to interpret several simultaneous experiments. Martel can address a specific package and proposed connection arrangement more effectively when the request names what is connected and what the tests established.
Frequently asked questions
Can I connect several microphones through one USB port?
Yes, a compatible multiple-microphone system can combine its supported microphones before presenting audio to the computer through a shared USB connection. The exact wiring, power and microphone limits belong to the chosen system. Follow its instructions rather than treating a single connector as permission to attach arbitrary equipment.
Will a USB hub combine my existing USB microphones?
A hub adds USB connections. It does not automatically mix independent USB microphones into one meeting input. If you already own several separate USB microphones, describe that equipment when planning a solution. A controller-based package and a collection of independent USB devices are different starting points.
Do I need to select every Martel microphone inside Zoom?
The purpose of the shared system is to provide the computer with an input for the microphone arrangement. Select the intended USB audio input in the meeting application, then verify the individual speaking positions by listening. Physical microphone count should not be confused with the number of participant tiles or recording tracks.
Can I use a separate conference camera?
Plan the camera, microphone and playback selections independently and confirm the actual configuration. The correct video image is not proof that the intended microphone is selected. After connecting camera equipment, recheck the input and run a short room speech test from a position away from the laptop.
Why can remote participants hear the operator but not the table?
Confirm that the application is using the intended system rather than the computer’s built-in microphone. Then check the supported microphone connections, relevant controls, processing and placement. Use the same phrase at several positions. The symptom alone does not identify which of those stages needs attention.
Should I turn every sensitivity control to its highest setting?
Set controls by listening to normal speech from the planned positions. The highest setting may also raise unwanted room sound or create an unsuitable level. Follow the controller instructions, make one change at a time and compare the same spoken passage remotely before deciding whether it helped.
Does one USB input mean every microphone gets a separate recording?
No. Physical microphones, selected computer inputs and recorded tracks are different parts of the workflow. Verify independent-track requirements explicitly before purchase. For a meeting recording, save and replay a sample containing the room and remote voices you actually need to retain.
Why does Teams behave differently from Zoom on the same computer?
Each application has its own selected devices and relevant settings. Confirm the input in the application that is failing rather than assuming a successful call elsewhere proves its setup. Check access permissions and shared-device processing, then repeat a remote conversation test in that application.
Can the equipment stay connected between meetings?
Use the storage or installed arrangement appropriate to the room and the supplied instructions. A permanent setup still needs a brief check before use, particularly after a computer or cable change. A portable kit needs an inventory and a documented layout so repeated setup does not depend on one person’s memory.
What should I ask before ordering a package?
Provide the table layout, typical attendance, separate speaking positions, computer connection options and recording needs. Ask Martel to confirm the supported package and cabling for that arrangement. The most useful purchase discussion connects a room requirement with a documented system configuration and a practical acceptance test.
Build a shared input the room can operate confidently
Connecting multiple conference microphones to one USB computer input is a complete workflow: compatible microphones, supported connections, a recognized controller, correct application selection and a remote listening test. When those pieces are documented together, the system becomes easier to use repeatedly and easier to troubleshoot when the room changes.
Explore Martel’s Zoom Multiple Microphone Systems with your room sketch and computer setup in hand. Choose the microphone arrangement that serves the speaking positions, confirm the supported connections, and rehearse the actual Zoom or Teams conversation before the first important meeting.
Martel gallery image of the 16-microphone system. See the product page for the supplied configuration.
Martel Electronics | 7 hours ago
How to Connect Multiple Conference Microphones to One USB Computer Input
Connect multiple conference microphones to one USB input. Follow a practical Martel setup, select audio in Zoom or Teams, and test the room.