Body Cameras for Security Guards: Buying Guide
Evaluate body camera equipment for security teams. Plan mounting, audio tests, charging, downloads, local storage and staff recording routines.
Choose an interview recorder for clear questions and answers. Compare connections, room placement, recording tests, file handling and playback equipment.
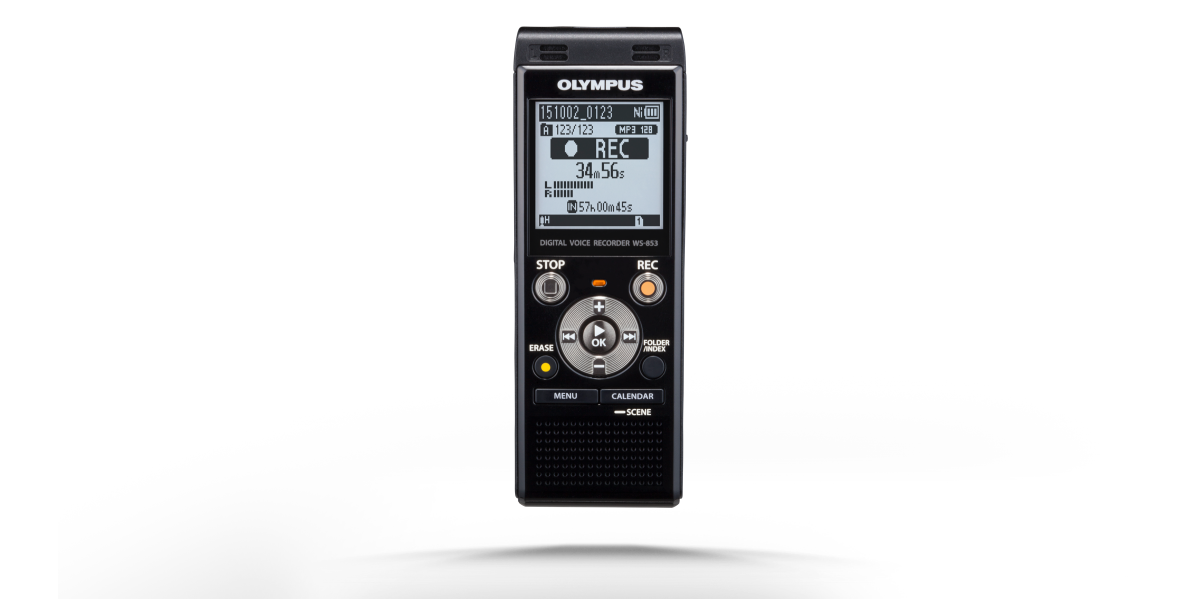
An interview recorder should preserve a usable exchange between people. That sounds simple until the interviewer speaks loudly, the guest answers softly, the room echoes, and someone turns away from the microphone. A useful buying decision starts with those conditions. Storage capacity, a familiar brand, or a long feature list cannot tell you whether the important answer will be understandable afterward.
Describe your usual assignment in one sentence. You might record two people seated in a quiet office, a customer conversation at a busy workplace, or several participants around a meeting table. These are different capture problems. A compact recorder may serve the first well, while the other situations may require different placement, additional microphones, or a different interview location.
This guide explains how to compare interview recorders, plan the complete equipment chain, and evaluate a proposed setup before a real assignment. It uses Martel products as practical purchase options. The sample interviews and worksheets are original illustrations, not claims of hands-on testing or customer outcomes. Product specifications and package contents should be confirmed on the current linked pages and in the supplied model's instructions.
The intended output changes what you should evaluate. A recording used to check a few quotations may need clear speech and easy navigation. A full transcript requires repeated close listening across the entire conversation. A published audio interview may need a more demanding sound-production workflow. Decide which of these tasks the recorder must support before comparing accessories.
Also identify whether the recording is the primary record, a backup, or one source among several. A backup needs an independent path that actually captures the required voices. A primary source may need more detailed documentation and review. Do not buy a second device and call it a complete backup plan without checking its placement, power, and saved files.
Some interviews are conducted under an employer's, institution's, or client's procedures. Follow the applicable recording permission, handling, and delivery requirements. A recorder's capabilities do not determine whether a conversation may be recorded or how it may be distributed. Settle the intended use and approved process before inviting a participant to speak.
Make a short deliverable note: source format, approximate duration, number of speakers, transcript style if needed, and delivery destination. This note becomes a useful purchasing brief. It helps Martel distinguish a simple recorder request from a requirement for microphone coverage, foot-pedal review, or a complete recording-to-transcript arrangement.
A quiet, furnished office gives a recorder different conditions from a large room with hard walls. Listen to the room before the participants arrive. Notice ventilation, machinery, traffic, nearby conversations, and reflections after a short spoken sentence. If moving the interview is practical, a better room may do more for intelligibility than adding a feature to the equipment list.
Think in terms of speaking positions rather than room size alone. Two people may sit close together in a large room and still need only a small pickup area. A long narrow table can place them far apart in a modest room. The relationship between voices and microphones matters more than a square-footage label.
Identify the least favorable ordinary position. It may be the guest who sits back, turns toward a window, or looks down while answering. Include that position in the trial. A test performed while everyone leans toward the recorder can create confidence that disappears during a natural conversation.
For a recurring assignment, draw a simple seating note and keep it with the equipment configuration. You do not need a technical acoustic model to record where the interviewer, guest, and microphone were placed. That information helps reproduce a working setup and explains why a later recording sounds different after the furniture changes.
Built-in microphones reduce the number of separate items to carry and connect. For a stable two-person interview, that simplicity can be valuable. The recorder must still occupy a useful pickup position, which may be different from the place where the interviewer wants the controls. Practice operating it without repeatedly moving or touching it during speech.
An external microphone input separates microphone placement from recorder placement. The interviewer can keep the controls within reach while locating the microphone nearer the speaking area. This can be helpful when a participant is quiet or the tabletop is awkward. It also adds compatibility, cable-routing, and connection checks.
The Martel Olympus recorder package lists a 3.5mm microphone input and includes a 32GB card and AC adapter. It is a compact option to discuss for spoken interviews. Confirm the exact recorder currently supplied and the microphone arrangement you intend to connect, rather than assuming specifications from a similarly named model.
Ask what happens to the built-in microphones when an external microphone is connected. The behavior is model-specific. Also confirm the recorded channel arrangement, especially when a mono microphone is connected to a stereo input. A connection can produce audible sound while still saving it in a channel configuration the reviewer did not expect.
Microphone inputs, line inputs, headphone outputs, and USB data connections serve different purposes. Similar-looking sockets do not make them interchangeable. A microphone usually produces a much weaker signal than a line-level source, and the receiving device must be designed for that signal. An adapter that changes the plug shape does not automatically change the electrical relationship.
Power is another separate issue. Some microphones need plug-in power, some use their own batteries, and some professional microphones require an interface with a different power system. Confirm the requirements for the microphone and the recorder together. Do not apply power based only on the connector size or an online diagram for another model.
USB microphones ordinarily connect to a suitable computer or supported host. A handheld recorder's USB port may be intended for file transfer or charging rather than accepting arbitrary USB microphones. Ask about the documented capability instead of assuming that two USB products can be joined directly with a cable.
If an extension is necessary, include it in the final test. A direct connection that works on the desk does not verify a longer cable, splitter, or adapter added for the interview. The external microphone guide explains how to evaluate the complete chain without replacing multiple parts at once.
Interviews are often recorded by the person asking the questions, which makes it tempting to place the recorder next to that person. The result can favor the interviewer while the guest sounds distant. Since the answers usually contain the desired information, evaluate the guest's ordinary voice carefully before accepting that arrangement.
Do not solve a weak guest recording by asking the person to shout for an hour. Move the pickup point when possible, reduce competing noise, and use a suitable microphone arrangement. Then check the interviewer again. A change that helps one voice may make another voice too strong, particularly when the participants have very different speaking styles.
If the recorder offers manual level control, use representative speech to set it. Include a louder natural phrase as well as quiet speech. If the recorder uses an automatic level function, learn how it behaves during pauses and changes in speaker level. The presence of automatic adjustment is not a guarantee of a balanced final recording.
Review the saved sample through the intended listening setup. A built-in speaker may be convenient for a basic check but may not reveal every detail. Use headphones when available and appropriate, at a comfortable listening level. The goal is understandable speech, not making the loudest possible recording or turning playback volume to its maximum.
Look for a recording state you can recognize quickly. You should be able to distinguish powered-on, ready, recording, paused, and stopped states on the supplied model. Learn whether an elapsed-time counter advances during capture and what indicator confirms that a file is being saved. A device can display a sound meter without recording the session.
Practice the first minute of an interview several times: identify the file or folder, start capture, check the state, ask the opening question, and stop normally. This simple rehearsal is more relevant than exploring every menu item. It reveals whether the controls fit the operator's routine and whether the opening can be captured without distraction.
If a hold function is available, understand how it interacts with the controls. Locking a running recorder may protect against accidental presses, but the operator must be able to unlock it confidently. Avoid learning this during an interview break while the guest waits and the recording state becomes unclear.
Give one person responsibility for the recorder. When two colleagues both believe the other started it, a complete equipment package can still produce no file. A clear operator role, visible state check, and short saved-file test are practical safeguards that cost less than adding unnecessary hardware.
An interview answer may begin with hesitation, a quiet negative, or a correction after a pause. Continuous recording generally provides a more straightforward source for reviewing that sequence. Sound-triggered operation may omit quiet intervals or weak speech depending on the device, threshold, and microphone position. Choose the mode deliberately.
Voice activation can be useful for some personal notes, but an interview is less controllable. The guest may not repeat a missed phrase, and a later listener may need the pause to understand the response. Do not select activation simply to increase advertised recording time without considering what the omitted material could mean.
Plan manual breaks explicitly. If recording stops for a comfort break or equipment adjustment, note that fact and identify the restart. If the guest continues an important account while the device is paused, ask whether they are willing to restate it after capture resumes. Never reconstruct missing speech as if it were present in the source.
For detailed comparison, use the continuous and voice-activated recording guide. The decision should follow the interview's purpose and the recorder's documented behavior. Preserving the timeline and obtaining clear words are separate needs, and both deserve checking.
An appointment includes setup, waiting, the interview, breaks, and file checks. Battery planning should cover the expected recording period with margin, not merely the scheduled question time. Manufacturer runtime figures depend on settings and operating conditions. A recorder's longest rating is not a promise for every format, accessory, or battery condition.
Check the available power arrangement in the intended location. If the package includes an AC adapter, confirm how the recorder operates with that adapter and whether recording remains supported while powered. A USB connection can place some devices into a transfer or charging state, so the cable alone does not establish continuous recording capability.
If replaceable batteries are used, follow the device's instructions for type and charging. If the battery is built in, know how long the normal recharge takes and how the low-power indication behaves. The practical question is whether the operator can prepare and recognize the remaining margin before the session begins.
Keep power changes away from important speech when possible. A planned break is easier to document than an unexpected shutdown. If a backup recorder is used, verify its power independently. Two devices connected to the same vulnerable power arrangement may share a failure that the word “backup” does not reveal.
Recording capacity depends on format and settings. A large hour count may refer to a compact low-bit-rate mode, while the interview workflow uses a different quality setting. Check the recorder's remaining-time display for the selected mode and active storage destination. Internal memory and a removable card may be separate choices.
Use a representative recording to inspect the resulting file size and compatibility. If your project requires a particular format, confirm that the supplied recorder can create it in the required channel and quality configuration. Do not infer the details from a filename extension alone or from the specifications of another recorder in the same product family.
Keep storage planning separate from deletion decisions. The fact that space is running low does not determine which interviews may be erased. Follow the project's transfer, verification, and retention process. Arrange enough capacity before the appointment so the operator is not making rushed decisions about old recordings while a guest is waiting.
For long sessions, learn whether the device divides recordings into multiple files. Practice opening them in order and checking their boundaries. A full-length appointment may be represented by several valid files, and the reviewer needs to know the sequence. File organization is part of buying a usable recording system, not merely an administrative task afterward.
A panel interview or small group discussion can outgrow a single convenient recorder position. Participants at opposite ends of a table may have very different distances from the microphone. Moving one recorder halfway between them can help in some rooms, but it may still leave soft speakers difficult to hear.
The Philips Simple Meeting Recorder with four microphones provides four Martel Audio Grabber pickup positions, four 25-foot extensions, a splitter, charging equipment, and a carrying case. Those components support a distributed table arrangement. The benefit is placement flexibility; it should not be confused with automatic identification of participants.
Map microphones to speaking areas and keep the cable routes safe and understandable. Ask each participant to speak in the practice recording from their actual seat. Do not accept a test where everyone leans toward the nearest microphone and then sits back once the interview begins. Include normal paper use and any interpreter or facilitator who must be heard.
A larger package still benefits from conversational discipline. If two people speak over one another, their voices may overlap in the recording. Additional microphones do not guarantee that mixed speech can later be separated. The focus-group recording guide explores the planning needed when interaction among participants is central to the session.
Before ordering a recurring-work setup, define what a satisfactory trial would demonstrate. The criteria might be understandable questions and answers from the normal seats, complete quiet corrections, a readable recording indicator, successful file transfer, and playback in the intended review software. These are concrete observations, not a broad claim that one recorder is “professional.”
Use a short original script with ordinary language, names, numbers, and a self-correction. For example, an illustrative guest might say that a workshop opens at nine, then clarify that volunteers arrive at eight thirty. The reviewer should hear both statements and their relationship. The example is a test design, not an account of a product test performed by Martel.
Include the real accessories. If the interview will use an external microphone, extension cable, power adapter, and headset, test that arrangement. A demonstration of the recorder alone does not establish the complete configuration. Record the settings so the accepted setup can be reproduced after the equipment is packed away.
Write down any limitation rather than hiding it in a general pass label. A setup might be suitable for a quiet office but remain unsuitable beside operating machinery. That is a useful purchasing result. It tells the buyer when a change of location or a different microphone plan is required.
Imagine a small organization that interviews one employee at a time in different offices. Most conversations last less than an hour, but the rooms vary. The interviewer travels with a laptop and wants to prepare a written summary with a few checked quotations. This is an illustrative scenario designed to show a decision process.
The first requirement is a compact recorder that can be operated confidently without the laptop participating in capture. The second is a way to handle rooms where the guest's chair is distant from the convenient control position. An external microphone option may therefore be worth discussing even if the first trial succeeds with built-in microphones.
The review requirement is different from the capture requirement. The interviewer needs to locate quotations and replay uncertain words. If that becomes frequent, a transcription kit with foot control may be useful. Buying the review equipment does not change the recorder's capture quality; it supports the later work of checking what was actually said.
The organization should test one typical office and one more difficult permitted room, record the limitations, and standardize the working configuration. It should also decide how files are named and copied. The result is a repeatable interview process rather than a collection of individually promising accessories with no clear relationship to one another.
Stop the recorder normally and let it finish saving before disconnecting it. Copy the expected files to the approved working location and confirm that they open. Check the beginning, ending, and any point where recording paused or equipment changed. For work requiring complete source review, those initial checks are only the beginning.
Keep the source and any edited listening copy distinguishable. A shorter excerpt can be convenient for review, but it should not silently replace the only original. Retain the relationship between the excerpt and the source file. If timestamps are used, identify which version supplies time zero so another reviewer can locate the same passage.
For sustained manual transcription, compare the Martel All N One Transcription Kit. Its software, USB foot pedal, and headset support repeated listening while text is prepared in a separate application. Installation assistance and technical support are included in the current product offering.
The kit does not automatically create a finished transcript or repair missing audio. Its value is in controlling supported playback efficiently. Check a representative file and the Windows 11 workstation before making a large transcription assignment dependent on the setup. The complete workflow should work from capture through delivery, not stop at a successful recording light.
After a successful buying trial, use the accepted configuration for the first assignment. Avoid adding a new splitter, unfamiliar filter, or different recording mode just before the guest arrives. If the circumstances require a change, repeat the relevant check. A known setup is easier to operate and troubleshoot than an arrangement that keeps changing between preparation and use.
Pack the equipment in the order it will be needed. Keep the recorder, confirmed microphone, power items, and transfer cable identifiable. A small printed equipment note can record the selected mode and the location of the recording control without becoming a complicated checklist. The operator should be able to prepare the system even when the appointment starts under time pressure.
Afterward, write one short improvement note. Perhaps the cable needed a different route, the guest's chair was farther away than expected, or the transfer folder was unclear. Make the next change during preparation time and verify it. This creates a practical improvement cycle while preserving confidence in the configuration used for each actual interview.
A buying comparison should include controls, placement options, supported format, power, file transfer, review equipment, and support. Give each item a practical question. Can the operator recognize the recording state? Can the quiet participant be heard? Can the file be opened where it will be reviewed? Can the configuration be repeated next week?
Avoid assigning precise scores to features you have not tested. A weighted spreadsheet can look authoritative while concealing guesses. Record confirmed specifications separately from observations and unresolved questions. That makes it easier to see whether one missing answer affects the purchase or whether a feature is simply optional for the job.
Support matters when several pieces must work together. A recorder, microphone, and playback program may each function alone while the proposed combination needs clarification. Martel can discuss the actual models, connections, and file requirements. Ask about the complete arrangement rather than requesting a guarantee that every microphone or recording format will work.
Your final equipment note should be short enough to use: selected package, approved accessories, recording mode, storage destination, power arrangement, file-transfer method, and review software. Keep the current product links with it. That turns the buying decision into an operating reference and makes future replacements more deliberate.
Ask whose speech must be captured and where those people will sit or move. This identifies the pickup problem before you compare memory or battery figures. A recorder selected for one nearby speaker may need a different microphone arrangement for two people across a table or several participants in a group.
No. Runtime is one requirement among several, and the rating depends on settings and conditions. A long-lasting recorder in a poor pickup position can still produce difficult audio. Match power, intelligibility, controls, storage, and review compatibility to the actual appointment and its expected duration.
It may, if the microphones, placement, room, and speaking levels are suitable. Test the interviewer and guest at their ordinary positions. Do not assume success because one nearby voice sounds clear. The useful result is an understandable exchange, including the question that gives the answer its context.
It is useful when the pickup point needs to be separated from the recorder controls. That can help with a quiet guest or an awkward tabletop. Confirm the exact microphone, power, wiring, and cable arrangement, then inspect a saved sample from the complete setup rather than the recorder alone.
No. Signal level, wiring, power requirements, and channel arrangement also matter. A plug can fit while the connection behaves incorrectly. Give Martel the exact recorder and microphone models and explain the intended use. Avoid buying a chain of adapters before establishing what each end requires.
Do not assume that capability. The port may be intended for charging or file transfer rather than hosting a USB microphone. Use the recorder's documented supported inputs. If computer-based capture is the intended workflow, evaluate that separately from a standalone recorder arrangement.
Convenience is only one factor. That position can favor the interviewer and weaken the guest. Compare the normal voices in a saved sample and consider a more balanced position or external microphone. The answers should remain useful without losing the questions that make them understandable.
A brief request may help communication, but the equipment plan should not depend on an unnatural performance for the whole interview. Improve placement and reduce avoidable noise where possible. Test the guest's normal voice, including moments when they look away or speak more softly.
Neither is universally preferable. The available controls and their behavior depend on the recorder and the assignment. Evaluate changes between quiet and loud speech, pauses, and room noise. Choose a setting the operator understands and can reproduce, then verify the resulting file.
It shows that a signal is reaching a monitored point, according to the device's design. It does not by itself prove that the correct file is being recorded or saved. Confirm the recording state and listen to a saved sample before relying on the setup for important answers.
Consider whether quiet starts, short answers, and pauses must remain in the source. Continuous recording is generally easier to interpret for a complete exchange. If activation is selected, test its behavior explicitly and document the mode. Do not choose it only because it can reduce stored silence.
Make the recording state clear and follow the agreed process. Note the interruption and identify the restart when appropriate. If useful discussion occurs while capture is paused, ask whether the participant wants to repeat it afterward. Do not later present unrecorded remarks as transcribed source material.
No. Confirm that the recorder supports the intended powered-recording arrangement and test it. Connections, power availability, storage, and controls can still interrupt capture. External power is one part of the plan, not a substitute for understanding the device and checking its saved output.
Base the estimate on the chosen format, quality, expected duration, and reasonable margin. Check which memory location is active. Do not apply a maximum-hour claim to every setting. Plan transfer and retention separately so low storage does not force rushed deletion decisions before an appointment.
Retain all parts and establish their order. Review boundaries and note any known gaps. Give the transcript or summary clear source identifiers so another person can find a passage. Multiple files can be normal device behavior, but that behavior should be understood before the assignment.
Not automatically. Stereo channels may each contain both voices, depending on microphones and placement. Independent speaker isolation requires an appropriate recording arrangement. If that capability is essential, ask how the specific system routes and saves each source rather than relying on the word “stereo.”

Choose an interview recorder for clear questions and answers. Compare connections, room placement, recording tests, file handling and playback equipment.
They can improve pickup coverage but do not guarantee later separation of simultaneous voices. The final channel structure matters, and the conversation may still be difficult to transcribe. A facilitator should help participants avoid unnecessary overlap while preserving the interview's intended interaction.
Only when the speaking arrangement justifies it. A compact setup may be easier for two people in a suitable room. Several microphones are useful when distinct table areas need coverage. Compare the setup burden and actual listening result instead of equating more components with a better interview.
Create a short original practice dialogue with ordinary names, numbers, a quiet correction, and a pause. Use the intended positions and accessories. The exercise should reveal likely problems without exposing client, employee, or research information. Keep its results tied to the conditions actually tested.
Clear pass conditions and a saved recording are more useful than a demonstration of a meter. Check the voices, controls, transfer, and review software that matter to the job. Record limitations honestly. A trial in one room supports that configuration, not an unlimited claim about every environment.
Some processing may change how audio sounds, but it cannot reliably recreate speech that was obscured or never captured. Improve location and placement before the interview whenever practical. Preserve the original file and distinguish any processed listening copy from the source used for verification.
It can support focused listening and reveal details that a small built-in speaker makes difficult to assess. Use a comfortable level and check the output device. A headset helps the reviewer hear the captured signal; it does not establish that every word was recorded correctly.
Consider one when repeated pause, replay, and back-step actions are a regular part of producing or checking text. A compatible pedal keeps those controls available while the hands type. Test the complete software-and-pedal combination with a representative file instead of assuming universal pedal support.
The kit described here is a manual playback system. The person listens and types in a separate document application. Its software, pedal, headset, and support help organize that work. Automatic speech recognition and completed-transcript production should not be inferred from the word “transcription” in the product name.
Follow the project's retention requirements and keep the source distinguishable from derivatives. An excerpt may omit context or use a different time basis. Link it to the original file and identify any edits. A convenient short copy should not silently become the only record of the interview.
Use a consistent project or session identifier, date where appropriate, and part number. Avoid unnecessary personal information in filenames that may circulate widely. Keep a relationship to the recorder's original output if files are renamed. The system should remain understandable to someone who did not conduct the interview.
Yes. Its microphone position, power, storage, and settings can differ from the primary setup. Listen to its saved sample independently. A second device is useful only if it captures the required material through a working path and its files can be identified and retrieved later.
Provide the exact models, connections, selected mode, computer details when relevant, and a precise description of the symptom. State whether the issue appears in the saved file. A harmless representative sample can help when requested through the approved support process, without sharing sensitive interview content unnecessarily.
Define the capture and review requirements first, then identify the missing connection or capability. Confirm compatibility before ordering adapters or extra microphones. A complete package can simplify the decision, but it should still match the actual number of speakers, room arrangement, and intended output.
Start with the compact Olympus recorder package for a portable interview setup, the Philips four-microphone recorder for distributed table coverage, and the All N One kit for sustained manual review. Use the current product details and ask Martel about the exact configuration your interviews require.
The connection and placement principles are informed by manufacturer education and recorder documentation. The purchasing examples and acceptance questions are original. No test results or customer endorsements have been invented.