Portable Conference Microphone Kits: Setting Up Meetings Away From Your Office
Plan a portable hybrid meeting with Martel’s 4-, 8-, 12- or 16-microphone USB systems. Compare current prices, packing, room layouts, Zoom and Teams checks, recording tests and original buyer questions.
A meeting held away from the office needs more than a laptop that connects to the internet. Remote participants need to hear the people around the table, local participants need to hear the remote speakers, and the organizer needs a repeatable way to set everything up in an unfamiliar room. A portable conference microphone kit helps with the room-to-computer part of that job. Its value becomes clear when you can carry the equipment in, place microphones near the discussion, select one computer input, and verify the conversation before the meeting starts.
This guide explains how to plan an off-site meeting with Martel's wired USB microphone packages. It covers choosing a package, transporting equipment, arranging tables, checking Zoom or Microsoft Teams, handling last-minute room changes, and packing the system for the next event. The examples are planning exercises rather than reports of tests performed at a customer's location. Every room still needs a listening check.
Start with the meeting you actually need to run
Write a short description of the event before choosing equipment. Include the number of people who will speak locally, how many people will join remotely, the seating arrangement, and whether the discussion must be recorded. A six-person committee around one table presents a different task from a training session with a presenter, a panel, and audience questions. The number of chairs alone does not describe either arrangement well enough.
Identify the audio owner. This person connects the room microphones, selects the meeting application's audio devices, and confirms the remote listening result. A second person can manage the agenda, admission of remote participants, screen sharing, or minutes. Assigning these jobs in advance avoids a common problem: everyone assumes someone else checked the sound.
Describe the required outcome in plain language. For example, remote attendees should understand normal speech from each occupied seat without asking the speaker to repeat it. If recordings matter, add a separate requirement that a saved sample must contain both the local discussion and the intended remote audio. These are useful acceptance goals. A microphone count is only one part of meeting them.
What a Martel portable USB microphone system does
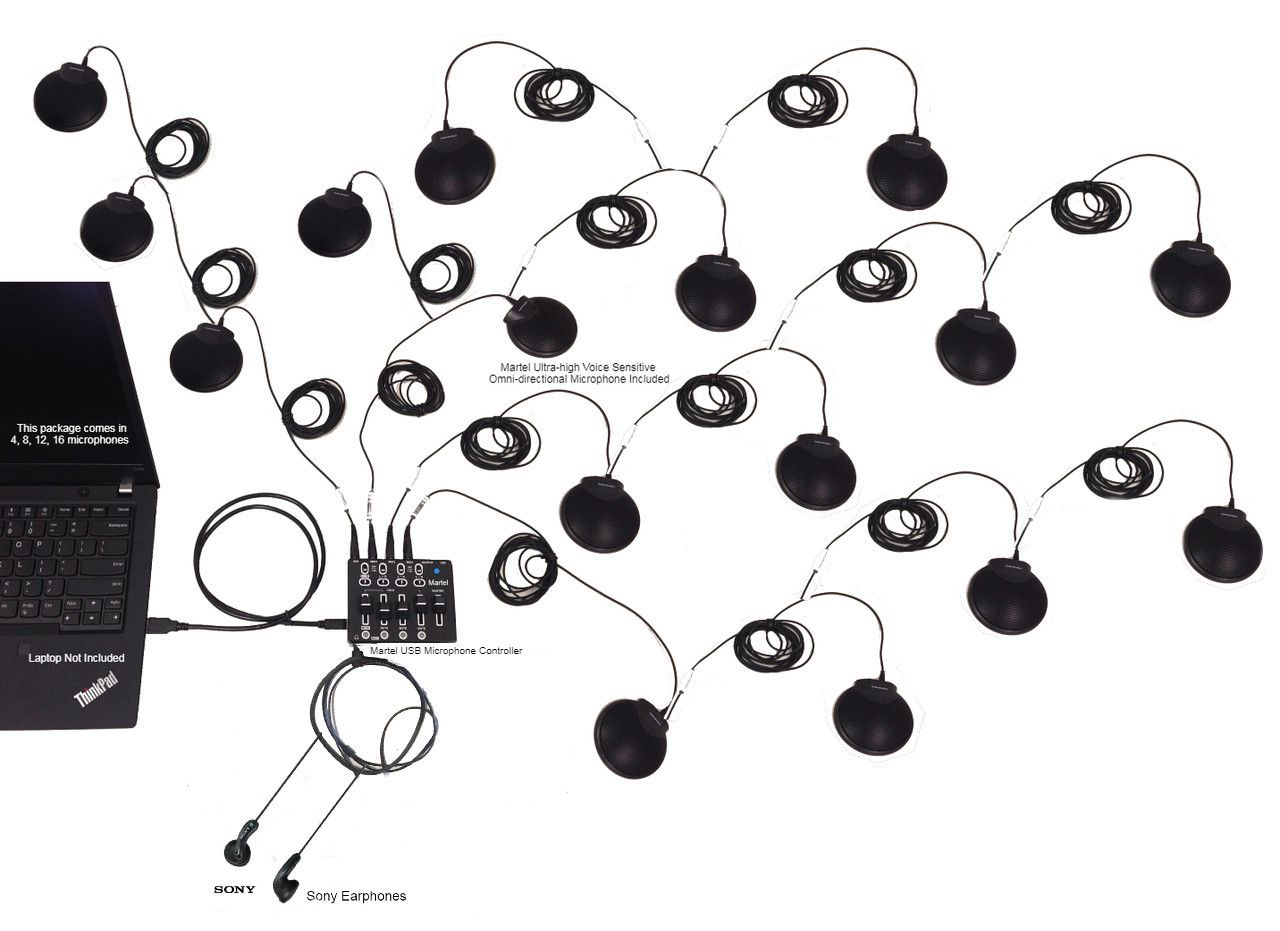
Martel's multiple-microphone systems combine several wired microphones through a controller and present a USB audio input to the meeting computer. The room microphones do not each need their own USB port on the laptop. This arrangement makes it possible to distribute pickup points along a table while keeping the computer connection manageable.
The microphone path is different from the speaker path. Microphones send local voices toward the meeting computer. Speakers or headphones let people in the room hear remote participants. A microphone package should not be mistaken for a complete loudspeaker installation. Decide how remote audio will be played in the room, and test that playback with the chosen microphone positions.
Martel lists a controller, microphones, extension cables, USB connection, power adapter, and hard carrying case with this package family. Check the exact product's current contents before ordering accessories. A transport case helps organize a mobile system, but it does not make a controller, laptop, or cable immune to moisture, rough handling, or unsuitable power connections.
Compare the four packages and current prices
These equipment prices were checked on Martel's website on November 5, 2026. They are the listed package prices, not a complete event budget or a promise about future stock. Open the linked product page for the current price, configuration, availability, shipping terms, and any applicable tax.
A larger planned microphone layout with more pickup points
The category page suggests group sizes for each package, but those numbers are starting points rather than guaranteed room capacities. People facing away, large gaps between tables, noisy ventilation, or a soft-spoken participant can change the result. Choose around speaking positions and practical cable routes, then confirm coverage with real listeners.
Martel four-microphone USB conference system, SKU 565. Martel product photograph; not a frame from an evaluation trial.
Choose around speaking positions, not the largest attendance estimate
For a portable conference microphone system, the important question is where speech originates. Mark the chairperson's seat, each panel position, and any place where members are expected to participate. Then mark temporary positions such as a lectern, a public-comment table, or a second table that may be added late. This simple sketch often reveals why a kit that worked in one room needs a different arrangement elsewhere.
Consider distance to the nearest microphone along with the number of people. Two seats can sometimes share a useful pickup position, while two people on opposite sides of a large gap may need separate placement. Do not assume an omnidirectional microphone makes distance irrelevant. It receives sound from around it, including nearby papers and other room noise.
If the event regularly changes size, tell Martel about the normal layout and the largest realistic variation. Ask about supported expansion and controller connections rather than assembling an unverified chain from spare parts. For a more detailed comparison of counts and layouts, use how many conference microphones you need.
Ask the venue questions that change the equipment plan
Before traveling, obtain a room photograph or simple diagram if possible. Ask where the available outlets are, whether tables can be moved, and whether you can arrive early enough to test. Confirm whether the venue expects you to use its loudspeakers, a display's speakers, or your own playback equipment. These details affect setup time more directly than a room's marketing description.
Check how the laptop will connect to the internet. A microphone system cannot fix a weak network connection or a restricted guest login. Ask whether the network requires a browser sign-in, an access code, or help from the venue's staff. Make the connection before the session begins rather than discovering the sign-in screen after remote participants arrive.
Ask about room sound. Hard walls, high ceilings, nearby kitchens, movable partitions, and air-conditioning equipment can affect intelligibility. You may be able to choose a quieter table position or move a loud fan before testing. These are inexpensive improvements. Buying more microphones does not automatically overcome every acoustic or network problem at a venue.
Make a portable meeting audio packing plan
Pack the system as a known set. Count the microphones, the required connection and extension cables, the controller, its correct power adapter, and the computer USB cable. Include the documentation that identifies the supported connections. Label the adapter clearly enough that it will not be confused with another device's adapter during a rushed teardown.
Pack the meeting computer and its charger separately but record both on the same event list. Add any approved computer adapter required for the laptop's ports. If the laptop only has USB-C connections, verify the chosen USB adapter before travel. A connector that physically fits does not prove that the complete connection works with the computer and audio device.
Bring headphones for the person responsible for testing. They make it easier to compare a local microphone check with what a remote listener reports. If you carry spare cables, identify what each spare replaces and test it in that role. An untested bundle of similar-looking cables is not a dependable backup plan, especially when several volunteers share the equipment.
Use labels to make setup and fault finding easier
Number the microphones and label both ends of the associated cables. A room sketch can then say that microphone three serves the far-left table position. When a remote listener reports a weak seat, you can inspect the intended microphone and cable rather than guessing which connection reaches that location.
Use labels that remain readable without covering vents, buttons, microphone openings, or connector information. Keep a matching list in the case. If cables are shared across packages, note the event configuration so the next operator can restore the correct arrangement. The objective is a clear working record, not a complicated inventory system.
Record adjustments in terms another person can understand. Saying that the far-end microphone was moved closer to the end chair is more useful than saying the sound was improved. If a cable is damaged or a connector feels loose, remove that item from the ready-to-use set until it has been evaluated. A label can communicate a problem; it cannot repair it.
Plan the table and cable routes before connecting power
Place the controller where the operator can see it and reach the required controls without stretching across participants. Choose a laptop location that keeps its power and USB connections protected. Keep cables away from chair wheels, doorways, and places where people will stand to speak. Work with the venue to manage any necessary crossing safely.
Distribute the microphones around the occupied speaking area. Avoid putting a microphone immediately beside a stack of papers, a projector exhaust, or a loud portable fan when a better location is available. Leave room for nameplates, notebooks, and normal movement. A placement that works on an empty table may fail once participants spread out their materials.
Connect the system according to its documentation. Use the specified ports and supported chain arrangement. Additional extension cables and arbitrary adapters can change the reliability of a portable setup. Confirm the permitted layout with Martel when the table plan requires an unusual run or when you expect to combine microphone sets purchased at different times.
Martel eight-microphone USB conference system, SKU 598. Martel product photograph; not a frame from an evaluation trial.
Build one room audio path that everyone understands
Write down which computer is the room's audio endpoint. That computer takes the Martel USB microphone input and plays the intended remote audio through the selected output device. Other laptops may display documents or join the meeting for screen sharing, but their audio participation needs deliberate control.
Multiple active audio endpoints in the same room can create an unintended return path. A remote voice leaves a speaker, reaches a nearby microphone, and is transmitted again. Muting a second computer's microphone may still leave its speaker active. Zoom's own echo guidance identifies multiple active devices and overlapping telephone/computer connections as common problems.
Agree on the room arrangement before people start joining from personal devices. If someone needs a second device for viewing, explain how to keep it from becoming another room audio source. When the meeting requires a more complex audio arrangement, document it and test every path. The goal is a predictable conversation rather than several applications competing to handle the same room.
Check the microphone input in Windows 11
Connect the complete, powered system before choosing devices in the meeting application. In Windows 11, open Settings, select System, and open Sound. In the input area, identify the connected audio device. Device names can vary with hardware and the computer, so recognize the actual device in your system rather than relying on one expected label.
Have someone speak normally near each microphone while the operator watches the input response and listens to a permitted short sample. If a device is missing, check the physical connections and power before changing unrelated application settings. Test a known working computer port or approved adapter when appropriate, changing one part of the connection at a time.
If Windows receives audio but the meeting application does not, inspect the application's selected microphone and Windows microphone permissions. Keep track of which test passed. A working input indicator is useful evidence that sound reached a particular stage; it is not proof that remote participants heard every seat clearly or that a complete recording was saved.
Verify Zoom with the actual room microphone system
In the Zoom desktop application's audio settings, choose the connected Martel audio input as the microphone and choose the intended speaker output separately. Use Zoom's microphone and speaker test controls to check each path. Labels and menu positions can change with software updates, so use the current application's available audio settings.
The first test should use a normal speaking voice from the actual seats. A person standing directly over the laptop gives a misleading impression of table coverage. Ask the farthest participant and a quiet speaker to contribute brief sentences. Listen to the replay, then ask a remote participant to confirm the result through the real meeting connection.
Check the speaker output after any device change. Plugging in headphones or connecting a display can change the available output choices. Preserve the intended room configuration during the test, including the normal loudspeaker level. If you need more diagnostic detail, continue with Martel's hybrid conference room echo guide instead of adjusting every setting at once.
Verify Microsoft Teams without isolating one room speaker
In Microsoft Teams, the device settings let you select a microphone and speaker, and a test call may be available in the desktop application. Check the devices that are actually connected to the meeting computer. Some controls depend on the account, organization policy, application version, or meeting arrangement.
Pay particular attention to voice isolation when several people share the room microphone system. Microsoft describes that feature as keeping the enrolled speaker's voice while filtering other voices. That goal differs from capturing a committee discussion. Evaluate a shared-room configuration with every expected speaker rather than assuming a setting intended for an individual caller will suit the whole table.
Use the saved settings as a starting point and verify them at the venue. If Teams receives one person's speech but suppresses another person's contribution, compare the selected processing mode and the microphone placements before replacing hardware. Martel's guide to Teams missing voices around the room develops that problem in more detail.
Listen to the far end, not just the controller
A controller's monitoring output can help confirm local pickup, but the remote listening result includes more of the actual meeting path. Network behavior, application processing, speaker routing, and the remote participant's own device can influence what is heard. Use both perspectives when the meeting is important.
Ask a remote listener for specific observations. Can they understand the end chair? Does the first word disappear after a long pause? Does a quiet participant sound distant compared with the chairperson? Do they hear paper handling more strongly than speech? These questions give the operator a useful next test instead of a vague request to make the sound better.
Have the remote listener repeat a short statement that someone in the room must understand. This checks the return path. Then allow brief back-and-forth conversation to expose problems that do not appear during one-way reading. Keep the exchange ordinary; a participant should not need to shout or lean unnaturally into a microphone for the meeting to function.
Make a recording test separate from the live-call test
A successful live conversation does not prove that the intended recording was created. Decide which application or service will make the recording, who can start it, and where the saved file will be available. Follow the organizer's notice, permission, and retention requirements. The microphone package itself is not a recording service.
Create a short authorized sample containing local speech and a remote response. Stop the sample, locate the resulting file or approved playback location, and listen to it. Confirm that the expected participants can be heard and that the operator can retrieve the recording later. Do not rely only on a moving meter or a recording icon.
If the recording is intended for minutes or transcription, check the parts that support those tasks. Speakers may need to introduce themselves, avoid overlapping speech, and repeat audience questions into a covered microphone position. Microphones improve the incoming signal, but they do not guarantee correct speaker labels, an accurate transcript, or a complete official record.
Keep the room playback level practical
Remote participants need to be audible locally, but increasing the room speaker volume indefinitely can create a new problem for the microphones. Begin with a comfortable listening level and evaluate the conversation from the seats. If people cannot hear, inspect the output selection and speaker location before increasing every control.
Place the playback equipment with the venue's layout in mind. A speaker aimed toward a nearby microphone can contribute to a return path, while a speaker hidden behind furniture may be hard for attendees to understand. The right arrangement depends on the actual equipment and room. Verify it through conversation rather than relying on an assumed separation distance.
If the event also needs public-address reinforcement, discuss that requirement separately with Martel and the venue. The product family includes listed output options, but a useful PA arrangement requires compatible equipment, appropriate routing, and a feedback check. A microphone controller does not automatically supply a powered loudspeaker, an installed sound system, or every required connection cable.
Example: a traveling HOA board meeting
Consider an illustrative board meeting with six local board members and several remote residents. The organizer chooses a compact table arrangement and compares the four- and eight-microphone packages. The decision depends on where the board members sit, whether audience questions will be included, and how close each speaking position can be to a microphone.
Before the event, the operator confirms that the venue has an accessible outlet and allows early entry. The equipment case contains the matched controller, adapter, microphones, and required cables. A room sketch identifies the chairperson, secretary, and end seats. The operator connects one meeting computer and chooses its intended microphone and speaker devices.
The trial includes a normal statement from every board position and one audience question from the planned question location. A remote resident then speaks while the board checks local playback. An authorized short recording is saved and replayed. If the audience position is weak, the operator changes the layout or asks Martel about a supported configuration before treating the test as complete. This scenario is a planning example, not a claim about guaranteed coverage for every HOA room.
Example: an off-site training session with questions
A training event adds a different challenge: the main speaker may be easy to hear while audience questions are missed. Plan the question routine before choosing a microphone layout. A trainer repeating every question into a covered position may be workable for one event; a distributed discussion may require more pickup points and a different room arrangement.
Compare the eight-, twelve-, and sixteen-microphone packages against the actual seating and cable plan. Use the linked product descriptions to verify the included equipment. A larger package provides more microphones, but those microphones still need suitable positions and supported connections. Rows of seats, movable chairs, and aisles can complicate a plan that looked simple in a headcount estimate.
During the trial, test a question from the rear and an answer from the trainer. Ask the remote listener whether both are understandable at a normal listening level. If a person stands or moves while speaking, include that behavior in the test. Document the intended routine so the person leading the session can help participants use the coverage that was actually checked.
Martel twelve-microphone USB conference system, SKU 587. Martel product photograph; not a frame from an evaluation trial.
Handle room changes without losing a working baseline
Last-minute changes are common at off-site meetings. The venue may move the tables, add a lectern, or place a projector where the controller was expected to sit. Start by identifying what changed in the tested plan. A new table position is a coverage and cable-routing change, while a new laptop is a device-selection and software change.
Keep one known working connection path available while making adjustments. If a microphone position is weak, move that microphone or inspect its branch before replacing the entire computer arrangement. If the computer no longer sees the system, begin with the computer connection, approved adapter, and power rather than rearranging every microphone on the table.
After a significant change, repeat the relevant listening checks. Moving several seats can invalidate the original coverage result even if the application still displays the same input device. Tell the chairperson when the system has been rechecked. A brief, focused retest is more useful than beginning the meeting with an unverified compromise that becomes a problem during the first important discussion.
Prepare a sensible interruption plan
Decide in advance how the meeting will pause if remote participants lose understandable audio. The chairperson can stop the discussion while the operator identifies whether the local input, remote connection, or room playback failed. This avoids continuing a substantive exchange that one part of the meeting cannot follow.
Keep the last successful test result in mind. If the controller's monitoring path still works but remote listeners hear nothing, investigate the application and connection path. If a single table position is weak while others remain normal, investigate the local placement and that microphone's connections. The pattern matters more than the number of settings that can be changed.
For events that require continuity, define an approved fallback with the organizer. That could involve a different room arrangement or a separately tested audio route. Do not introduce an untested recording application or a new device during the meeting simply because it is available. A fallback is useful when the people running the event understand what it preserves and what it cannot preserve.
Pack for the next successful meeting
Before disconnecting equipment, confirm that required recordings have been saved and that the authorized person knows where to find them. End the meeting connection deliberately. Then power down and disconnect equipment according to its instructions. Protect connectors from pulling and twisting as cables are collected from around the tables.
Count equipment back into the case against the same list used for departure. Separate a suspect cable or microphone from the ready-to-use set, and leave a clear description of the symptom. Coil cables without tight bends or knots that place strain at their ends. Keep the matched power adapter with the system it belongs to.
Record what worked at the venue. A useful note includes the room arrangement, microphone positions, application used, playback equipment, and any issue discovered during the remote listening check. On the next visit, these notes provide a starting point. They do not replace a fresh test, because the venue, computer, network, or seating may have changed.
Compare the full portable-event cost
The package price is a useful starting point, but the event budget also depends on equipment you already own. List the meeting computer, playback equipment, any required approved computer adapter, and the transport arrangements separately. Mark each item as included, already available, or still needed. This keeps the price comparison clear without pretending that a microphone package includes everything required for a complete hybrid event.
At the checked prices, the difference between each adjacent package is $200: four to eight microphones, eight to twelve, and twelve to sixteen. That difference may be worthwhile when the additional microphones serve real speaking positions. It is less useful if the larger package is purchased without a workable cable plan or an operator who can deploy it. Evaluate the extra pickup positions before assigning value to the larger number printed in the package name.
Consider staff time as well. A labeled system with a tested arrangement can be easier for a second operator to deploy than an improvised collection of equipment. Do not assign a promised number of minutes saved unless you have measured your own setup process. Instead, run a rehearsal, note where the operator hesitates, and improve the instructions or packing layout. That gives your organization a practical basis for estimating future preparation time.
When comparing quotes, ask the same questions of every proposed configuration: how many microphones are supplied, which cables and adapters are included, what powers the system, how it connects to the intended computer, and what case or support arrangement is provided. Confirm the current warranty on each individual product page rather than assuming every package has identical terms. Keep optional equipment and tax or shipping conditions separate from the microphone package's listed price.
Martel sixteen-microphone USB conference system, SKU 429. Martel product photograph; not a frame from an evaluation trial.
Train a second operator before the equipment travels
A portable kit is more useful when its operation does not depend on one person's memory. Have a second operator set up the tested arrangement using the labels and written plan. The first operator should watch without taking over immediately. Any point that needs an explanation is a candidate for a clearer label, a photograph of the approved layout, or an additional instruction in the case.
Include three tasks in that rehearsal: choosing the correct application input, confirming remote playback, and locating an authorized saved sample. Then introduce one simple change, such as moving the end chair or changing the speaker output. The objective is to see whether the second operator can recognize which part of the plan changed and repeat the relevant check. This exercise is more useful than memorizing an application menu that may be rearranged by a software update.
Record a support handoff that uses ordinary descriptions. Include the package SKU, the computer model, the adapter used, and the last test that succeeded. If the system needs help at the venue, the operator can then explain the situation without exposing a meeting recording or sending unnecessary participant information. A clear support request helps separate a configuration question from a possible hardware problem and keeps troubleshooting focused on the event's actual requirements.
Questions and answers about portable conference microphone kits
1. Is a portable conference microphone kit the same as several separate USB microphones?
The Martel system family uses microphones connected through its controller, with one USB audio connection to the meeting computer. That is different from asking an application to combine unrelated USB microphones. Follow the connections described for the specific package. If you already own equipment, ask Martel to confirm how it can be used before buying adapters or assuming the parts can be combined.
2. Which Martel package is the least expensive starting point?
The four-microphone system, SKU 565, was listed at $399.99 when this article was prepared. It is the lowest listed price among the four packages compared here. Whether it is the right starting point depends on the room and speaking positions. Confirm current price and availability on its product page, and compare a larger package when the planned layout needs more pickup points.
3. Does the package include a computer?
The package contents list the microphone system and its associated equipment. Plan to provide a compatible meeting computer unless the specific offer expressly includes one. Verify that computer's ports, permissions, software access, power supply, and internet connection. A microphone system's compatibility with a computer platform does not mean the event's meeting account or network has been arranged for you.
4. Can I use the kit in different buildings?
Portability is one reason to consider this system family, and Martel lists a hard carrying case. Each building still needs its own setup and listening check. Outlets, table shape, acoustics, speaker arrangements, and network access can change. Keep a record of successful configurations, but verify the actual equipment and room before each meeting rather than assuming every venue behaves like your office.
5. Do these microphones need separate batteries?
Martel describes the wired microphone system as powered through its controller and specified power arrangement rather than individual microphone batteries. Bring the correct adapter and confirm the required connections. This does not remove the need to power the meeting computer or any playback equipment. Check the specific package instructions instead of substituting another adapter because its connector appears to fit.
6. Will more microphones fix a poor internet connection?
No. Microphone placement affects how local speech enters the audio system. Internet quality affects a later part of the meeting path. Test both independently. If a clear local sample becomes broken or delayed for remote participants, inspect the connection and application behavior. More pickup points may improve a weak seat, but they cannot supply bandwidth, bypass a guest login, or repair an unstable network.
7. Do I need a separate microphone for every chair?
Not necessarily. Choose around the distance and orientation of speaking positions, normal voice levels, table arrangement, and the measured listening result. Some adjacent seats may share a useful position; other arrangements need additional microphones. Start with a layout sketch and explain the expected discussion pattern to Martel. Avoid treating any suggested participant count as a guarantee that every room with that headcount will be covered.
8. Can I leave the laptop's built-in microphone selected?
Doing so can bypass the room microphone system you brought. Select the intended connected input in the meeting application and verify it by speaking from the table positions. If the software offers a generic device name, confirm it through a controlled test. A microphone icon or moving level meter alone does not tell you which physical microphone supplied the sound.
9. Why should another person listen remotely?
A remote listener evaluates the conversation after it passes through the meeting application and connection. That perspective can reveal problems a local monitoring check misses. Ask for comments about particular seats, quiet speech, first words after pauses, and room playback. Use those observations to choose a focused next test. A remote trial is especially valuable when the final recording or transcript will matter after the event.
10. Can attendees join from their own laptops too?
They may need to do so for viewing or sharing, but agree on how audio will be handled. Multiple devices with active microphones and speakers in the same room can create an unwanted return path. Keep one deliberate room audio arrangement and verify any exceptions. Do not assume that muting a microphone also stops the same device's speakers from playing the meeting into the room.
11. Will the kit automatically create meeting minutes?
The microphones supply audio to the selected workflow. Recording, transcription, speaker identification, and the preparation of minutes are separate functions. Choose the relevant application and authorized process, then test a saved sample. Clearer input can make review easier, but it does not guarantee correct wording or speaker names. Assign responsibility for checking the final document against the appropriate recording and meeting records.
12. What should I send Martel when asking for help choosing a kit?
Send the table dimensions or a simple sketch, the number and positions of local speakers, the meeting platform, and the computer's available ports. Explain whether the room needs loudspeaker playback, audience questions, recording, or a PA connection. Include the largest realistic layout variation. These details let Martel evaluate a useful package and accessory plan instead of recommending solely from a headcount.
13. Can a kit be used for an HOA, nonprofit, training group, or board?
Those are sensible meeting scenarios to evaluate when several local people need to be heard by remote participants. The organization type does not determine coverage. The room, speaking positions, application, and operating routine do. Use the examples in this guide to prepare a test plan, then check the intended system in the actual arrangement before relying on it for important discussion.
14. Should I choose the largest package so I never need to plan placement?
A larger package supplies more microphones, but it still requires planning. Poor cable routes, microphones beside noise sources, and incorrectly selected computer devices can undermine any package size. Choose enough appropriate pickup points for the expected arrangement, verify the supported connections, and test normal speech. Extra equipment is useful when it serves a clear position and the operator understands how to deploy it.
Product descriptions, package contents, pictures, and prices were checked against the linked Martel category and product pages. Software guidance was checked against Zoom's audio testing instructions, Zoom's echo guidance, and Microsoft's Teams audio settings guidance. These sources establish the referenced features and controls; the room-planning examples and explanations above were written originally for Martel.