How to Receive a Legal Videographer’s Mixer Feed on a Court Reporting Laptop
Identify the videographer’s supplied mixer output, record two practice speakers, and verify the exchange in a reopened reporting job.
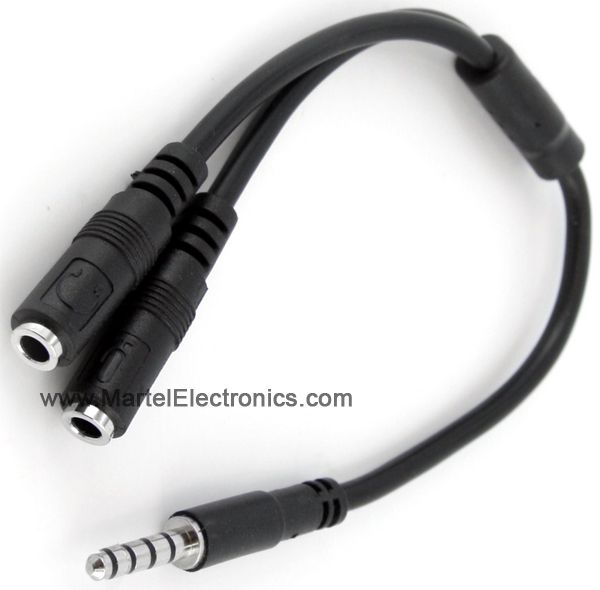
You have two plugs on the table and one round socket on the laptop. You want speech from your court reporting microphone to go into the computer, and recorded sound to come back through your headphones. The Martel laptop microphone and headset combo cable, SKU 2050, is made for that arrangement on a compatible laptop combination jack. The cable has one plug for the laptop and two labeled sockets for the accessories. Before you rely on the setup, make a short practice recording and listen to it. You should be able to answer two questions separately. Which microphone made this recording? Where did its playback come out?
Look along the edge of your laptop and find the exact opening you intend to use. Check the small marking beside it. A headset symbol can be a good starting clue. If the symbol is too small, use the port diagram for your exact laptop model. Look for a description that says the port supports headphones and a microphone together. Computers sold under similar family names can have different ports. A clear description of the port on the machine in front of you is worth more than a photograph of a similar laptop.
If the documentation describes only a headphone output, stop at that finding. It answers the purchase question about using that particular port for recording. A branching cable cannot add a microphone input to hardware that provides only sound out. If the computer already has separate and compatible headphone and microphone sockets, identify those two sockets first. You may already have the arrangement you need. If the microphone is a USB device, it uses its own USB connection. Count the actual connections involved before ordering an accessory.
Now examine what you want to attach. There should be a compatible microphone plug for recording and a separate compatible headphone plug for listening. If your headset already combines its earpieces and microphone into a single plug, write that down. It is a different arrangement from the two separate plugs described here. An earpiece furnished for a particular recorder may also have requirements specific to that recorder. If you are unsure, photograph the plugs alongside their model labels and keep the laptop's port description with them. That gives Martel enough information to investigate the right question.
For a reporter who alternates between a desk computer and a travel laptop, identify the target machine on the equipment list. “Works at my desk” describes a previous use. It leaves open which machine, jack and microphone were involved. A useful kit note might read “travel laptop, headset combination socket on left edge; separate reporting microphone and listening headphones.” Add the actual model names privately. When someone else packs the case, they can match the pieces to their purpose without remembering how the desk computer was wired.
Lay the Martel cable out on the desk before plugging anything in. One end terminates in a male plug. That goes into the compatible laptop jack. At the other end there are two female sockets. Martel identifies one for the microphone and one for the headset. Trace the sound you want recorded from the separate microphone, through the branch labeled for the microphone, into the laptop. Trace playback the other way, from the laptop, through the branch labeled for the headset, out to your listening headphones.
If the markings are hard to see indoors, use brighter light or a phone camera's magnification while the branches are lying still. Once you have identified each marking, add a small removable label to the cable jacket if it helps. Leave the contact surfaces, plug tips and jack openings clear. For a kit used by more than one person, label function in ordinary language. “Mic in” and “phones out” are short enough to read when the two sockets lie next to one another. The label is particularly helpful when the microphone and headphone plugs have the same color.
The product photograph illustrates a subtle point. The two sockets can look very similar from the front because they both accept a plug. Look at the markings from the side before connecting equipment. Their resemblance is no reason to assume either accessory can go in either opening. A person looking only at the two holes could also mistake the cable for a way to record two microphones at once. One branch serves listening. If you need two separately placed microphones, start with the number of microphone inputs you actually require. Martel covers that separate buying decision in its guide to microphone splitters and mixers.
Connect the microphone and headphones to their identified branches. Insert the laptop end normally, without force. Keep a little slack so the weight of an accessory or the edge of a binder is not pulling on the jack. Put the laptop where you normally type and the microphone where you intend to use it. Make this layout your starting condition. If you disconnect a component later, you can restore that condition before comparing two recordings. A clear photograph taken now can also help a colleague set up the same kit at another desk.
Start with the headphones before asking the microphone to prove anything. Choose a harmless existing audio file with a spoken phrase you know is present. An approved training clip or an earlier practice recording that plays clearly on the laptop speakers is a good choice. Using known content gives you a reference. If a brand-new recording is silent, you would otherwise have two unresolved questions at once. Was the recording silent, or was playback being sent somewhere you could not hear it?
Set the volume low and begin playback. Bring it up to a comfortable level. Check that the sound actually comes from the headphones by taking them off for a moment. A person in a quiet room can hear a laptop speaker even when a pair of headphones is sitting over their ears. If the laptop speakers remain active when you expected private listening, pause the file before changing settings. Use a training file for precisely this reason. A wrong output choice should be an ordinary equipment observation, never a disclosure of case audio.
In Windows 11, open Start, select Settings, then System and Sound. Look at the output device selected for playback. A connected monitor, another audio device or a wireless headset can be available even though the headphones are plugged into the laptop. Note the selected name. Play the same known phrase again after choosing the intended output. Some analog jacks use a shared speaker or headphone device name in Windows. The name does not have to contain “Martel” for the physical listening test to be meaningful. Record the name you actually see and what you actually hear.
A useful result is simple to describe. “I played the practice sentence and heard the last word in the wired headphones.” If you instead heard it from the monitor or laptop, record that observation. If you heard it nowhere, try the same known file on a playback route you previously confirmed, then return to the wired route. The purpose is to give the later microphone check a dependable listening point. Avoid changing the microphone level while chasing an output problem. It adds another variable and cannot fix a known-good recording that is being sent to the wrong destination.
In that same Windows 11 Sound settings page, move to Input. Read the input names before you change a selection. A laptop can have its own microphone, the combination jack's analog input and other recording devices available to applications. Connecting this cable does not supply a new USB device name. On some machines the manufacturer's audio software may ask what you plugged in. If it does, consider the prompt in light of the laptop's own instructions and the fact that you need both an input and an output. The wording and choices vary by laptop.
Select the recording input you intend to test and open its properties. Microsoft describes a microphone test in the input settings. Start the test, speak in your ordinary voice, stop the test and play the sample. Make a point of using the playback route you just verified. If the recorded sample is low, note the initial input setting before adjusting it. A high listening volume can make a weak recording sound louder at your desk without improving the saved recording anyone else receives.
Give the sample content you can identify. Speak a short line with a beginning, a number and a final word. “Maple desk, folder seven, ready for Friday” works better than tapping a microphone and watching a bar move. A bar can respond to noise or to the built-in microphone while telling you very little about the words. A tap may be picked up by the computer through the desk. Ordinary speech lets you listen for what matters to a reporter, including whether the first syllable, the number and the end of the sentence are recoverable.
If the built-in and external microphones are both plausible candidates, use their physical positions to investigate. With the laptop and external mic in separate practical positions, speak at a normal level near the external mic and identify that position aloud. Then speak a different marker from near the laptop. Keep settings the same and compare the two passages in the saved sound. The louder or clearer marker can be a clue. In a small room both microphones may hear both phrases. When the result remains uncertain, repeat with the input explicitly selected in Windows and a known change in setup. Document the uncertainty until you have evidence that distinguishes the sources.
The short Windows input test is a convenient first pass. For a reporting kit there is a second question. Can you make a practice file, stop recording, and come back to it as you would after a job? On a Windows 11 computer with Sound Recorder installed, open Start, search for Sound Recorder and open the app. Use the intended recording device if the app offers an input selection. Begin a new recording. Use fictional words and numbers, then stop recording normally. Find the new item in the app and identify it by its recording time or a practice name.
A spoken start and finish help distinguish a current success from yesterday's clip. For example, say “blue card, practice one,” pause briefly, and say “the final entry is fourteen.” Leave a moment after the last word before stopping. Play the entry on the known listening route. Write down the last number you actually hear before checking your card. Close and reopen the app and locate the same entry again. If your normal workflow needs the file outside the app, use the app's available file-location or sharing controls under your own storage process. Identify the copy that you can actually open at the intended review station.
Repeat in your reporting software using an empty practice job or other training workspace approved for your use. Speak a different marker this time. A working Sound Recorder file establishes that one Windows recording path worked. The reporting application may select another microphone or use a choice remembered from an older setup. Open its own audio settings and identify the input for the practice job. Save the job normally, reopen it and play the marker from the job. A colleague who was not there should be able to tell which of the two samples came from which application simply by listening to the markers.
Keep the two results together. If both recordings are clear, you have verified a useful chain of events with the physical equipment you intend to carry. If Sound Recorder succeeds and the reporting program does not, you have narrowed the investigation. You can now look at a particular program's selection, settings or permissions while keeping the cable, listening route and practice position the same. If both attempts fail, confirm the known playback file still plays, then return to the Windows input and physical branch. The order saves a great deal of unnecessary reconnecting.
Imagine a training desk with a compatible combination jack, the Martel cable, a separate microphone and a pair of wired headphones. Put two questions on an index card. First, did an existing known-good file play through the intended headphones? Second, did the new microphone marker appear in a saved file when checked on an independently verified playback route? The second question matters most precisely when the answer to the first is no. Without another way to listen, a silent pair of headphones tells you nothing conclusive about what is inside the new file.
| Known file in intended headphones | New marker in saved recording on a verified route | What to examine next |
|---|---|---|
| Yes | Yes | Verify the actual recording source, then repeat in the reporting application |
| Yes | No | Check the microphone branch, input selection, app permission and selected recording device |
| No | Yes | Keep the working capture setup and investigate the headset branch and output destination |
| No | No | Establish known playback first, then examine input and capture as a separate observation |
Here are four invented training notes for using the table. At desk A, the old file plays through the wired headphones and the new saved file says “folder nine.” That supplies two positive observations. It still leaves a source-identification question if the built-in microphone was also available. Ask the operator to show the selected input and repeat with the external microphone in a distinguishable position. The fact that a laptop can record speech is good news. The customer bought a cable specifically to use the external microphone, so the final observation should cover that microphone.
At desk B, the old file is clear through the headphones. The new saved file opens at the correct duration but does not contain the spoken marker, including when reviewed on an independently verified output. Turning up the headphone volume is unlikely to answer the remaining question. The reviewer already demonstrated playback. Check whether the microphone went into the marked recording branch, which input was selected in the recording application, and whether the application had permission to record. Change one thing, then use a different marker on a fresh file.
At desk C, the headphones are quiet. A colleague uses the verified laptop speaker route with a harmless sample and recovers the newly recorded marker. Capture worked somewhere in the system. The remaining issue with the silent headphones can be investigated without undoing the microphone setup. Ask which output the player used and check where the headset plug was inserted. When the known file finally plays in the headphones, reopen the successful recording. This final step demonstrates that the two working halves can be used together on the intended equipment.
At desk D, the operator says, “I could not hear the old file or my new recording.” Before placing this note in the last row, ask how the new recording was checked. If both listens were through the same silent headphones, the second answer is unknown. Use the approved independent output with the practice recording first. The result could move desk D into the third row. Marking unknowns honestly is the most useful part of the exercise. It keeps a failed listening test from being mistaken for a damaged microphone and helps purchasing avoid replacing the wrong piece of equipment.
A reporter practices on Monday at a desk with a monitor and an external keyboard. Both headphones and microphone work. On Tuesday the laptop comes out of its case at a training room without the monitor. The same cable and microphone are present, yet the first playback comes from the laptop speaker. That observation is worth writing down precisely. Monday's success established a particular arrangement. Tuesday's equipment list is slightly different. The fastest first comparison is often the name of the current output and where the known file actually plays.
Give the Monday and Tuesday practice files distinct spoken labels. If you use the same default file name and say “testing” on both days, a successful playback may belong to Monday. Put a harmless new detail in Tuesday's line and ask a colleague to identify it. Hearing the new detail from the headphones resolves two questions together. The listener has the current recording and the selected output is reaching those headphones. You can then ask the more specific question about capture from the external microphone and make a second sample if necessary.
A small paper card in the case can capture the information people forget when hurried. Write the laptop model, jack location, microphone model and headphone model on the front. On the back, leave room for the output name, the input name in Windows, the input name used in the reporting application and the last practice marker. Add a date when a setup change has been tested. A colleague should be able to sit at the computer and find the same controls using those names. If the names change after equipment is replaced, update the card after checking the new setup.
A rehearsal also helps distinguish transport problems from software choices. A kit may arrive with the right laptop and microphone but two similar-looking branching cables. Put the designated Martel accessory in the same pocket as its setup card. Trace its two labeled sockets before removing the backup from the case. If the right cable works while another accessory does something different, keep their functions separate on the inventory. A case full of round plugs is much easier to manage when each item has a named job and a known place.
Suppose a twenty-second recording begins clearly and the last few words become faint while you move a binder. Start by keeping the saved practice file and noting the approximate playback position. Replay it without touching the cable. If the same words are faint at the same position on an independent known-good output, the observation travels with the recording. If the symptom changes while playing the same file, the listening equipment or its current connection deserves attention. Neither observation alone proves which individual connector is responsible.
Restore an ordinary desk arrangement with slack in the leads. Make another short practice file while everything stays still. If that works, make a separate sample in the normal working position and note the ordinary action associated with the change. There is no need to bend a plug, pull the cable repeatedly or press sideways on a laptop jack. A simple description of when the existing symptom occurs is better evidence for support than creating a different fault by stressing an accessory.
Include one example of what still works. “The wired headphones played our reference file after the interruption” tells Martel that the listening route was verified at a useful time. “The saved file was also faint on the laptop speaker at twelve seconds” adds evidence about the recording. If you changed the input selector, note which name you selected and whether the same outcome followed in Sound Recorder and in the reporting software. A few short factual sentences can be more useful than a long list of settings changed in the hope that one might fix the symptom.
When asking about a purchase or replacement, send the model information, the type of computer port and a photograph of the plugs if requested. A photo of the two branch markings can prevent confusion between the Martel combo cable and a headphone-sharing cable already in the kit. Use a harmless practice sound if a recording is appropriate under your procedures. Most of the time, the test sentence, the selected device names and the known-good playback result are enough for the first conversation. The support contact can ask for a more specific sample if the observation needs to be reproduced.
Start with the port description for your exact laptop. You want a combination socket that accepts a microphone and provides headphone playback. Then identify one separate microphone plug and one separate headphone plug compatible with the setup. Martel lists this accessory as SKU 2050. Compare the photograph and the two branch functions with the plugs you already own. If your gear includes a USB microphone, a one-plug headset or equipment that requires its own audio interface, describe that arrangement when asking whether this cable has a role.
The single projecting plug goes to the compatible laptop jack. The two openings on the branches receive the separate accessories. If you are holding another cable that looks similar, inspect the markings on both branches. You should be able to identify a microphone connection and a headset connection. Before you pack it, trace each path with a finger and say its purpose. That simple exercise catches a surprisingly basic purchasing error, choosing an accessory with two headphone outputs when you need a microphone input.
For the setup in this guide, that branch serves playback and the separate microphone uses the other labeled branch. A reporter can therefore plan the two jobs independently, subject to the connectors and equipment being compatible. If the accessory you want to use has its own microphone and only one plug, give Martel its exact model before buying anything else. The question then becomes how that combined accessory is intended to connect, which is different from connecting two separate plugs.
A USB microphone connects through its supported USB connection. The Martel combo cable has round audio connectors. It does not provide a USB socket or convert USB data to analog microphone audio. You may still use headphones on a compatible laptop audio output while recording through a USB microphone. In that arrangement identify the USB device under Input and the headphones under Output. Decide whether you need a branching cable at all after mapping both routes on your actual laptop.
The two branch openings serve different functions. Only one is identified for the separate microphone. The other provides a route to the headphones. Two visible sockets on this accessory do not give a recording program two independent microphone inputs. If your real problem is hearing people at different positions around a table, describe the positions, how many microphones you want and whether each needs its own recording channel. That information points to a different equipment decision than adapting one combination jack for listening and recording.
Check the full manual or technical specification for the specific model. A terse drawing may abbreviate the name; a detailed description can resolve it. If the manufacturer identifies the port as output only, choose a supported recording input elsewhere on the laptop or an appropriate external recording device. The cable can route an existing signal. It cannot turn an output-only circuit into the recording input required for an external microphone. Keep the confirmed port description with your equipment notes.
First identify where the sound really comes from using a harmless known file. Observe the selected output in Windows and, if the player has an output selector, look there as well. A monitor or computer speaker can keep playing when your intended headphones are connected to the wrong branch or the app is using another output. Pause the file, check the branch marking and reseat the compatible plug normally. Test the same known phrase again before investigating the microphone.
The cable described here uses the laptop's analog combination jack. The computer may show the name of its own audio device or driver. A new device bearing the accessory's product name is unnecessary for the setup to work. Write down the actual Windows input and output names. Then connect those names to observations, such as the distinct phrase captured from the external microphone and the familiar file heard in the wired headphones. Those results give the device names meaning.
Identify the selected input and make a practice recording with spoken location markers. Position the external microphone and laptop so their locations can reasonably be distinguished. Speak near the intended microphone, then nearer the laptop, leaving settings unchanged. If that comparison is inconclusive because the room carries speech well, use a separate test with the known built-in input selected and compare. Avoid deciding solely from a moving level meter. It shows some input activity but does not identify the physical microphone by itself.
Use the test in Sound settings when you need to establish which input is selected and hear a short sample at normal speaking volume. Use Sound Recorder when the question includes making, saving, finding and reopening a practice recording. A purchased kit often needs both observations. Stopping after the Windows test leaves open what your recording app actually saved. Beginning with a full reporting job can make a basic input-selection problem harder to distinguish from an application setting.
Use a short sentence with details the listener cannot predict. A color, a number and a day work well. Ask the listener to write down the number and the last word before you show the sentence. Then ask whether they heard each on the first listen or after replaying. “It sounded loud enough” is less informative than “I heard fourteen on the second play, but the last word was missing.” Use a different sentence when you repeat the test after a change.
The headphones and recording microphone use separate branches and separate Windows selections. Playing an existing file establishes that the playback path handled a file containing sound. It tells you little about what the microphone sent to the program. Confirm the silent sample on another verified playback route, check the branch labeled for the microphone, then look at the selected input and the app's permission to use it. Start a new recording after a change. Replaying an older silent file cannot show an improvement in capture.
If you can recover today's spoken marker on the speakers, you have evidence that the new file contains speech. Preserve the working recording setup. Use that same harmless file or your reference file to investigate the headphone connection, selected output and playback level. If the headphones also work with a separate known-compatible source, include that observation in your notes. It narrows the question to the combination of headphone plug, branch, laptop jack and playback choice at this desk.
You can rehearse that sequence with a practice file. Some computers change their audio choices when plugs are connected or disconnected. Make the recording the way you intend to work, connect the headphones as planned, select the expected playback route and listen for the new marker. Then make another short recording with the headphones connected and verify the source again. The purpose is to see whether your particular laptop preserves the choices you need during that ordinary transition.
The two programs can use different input selections. Confirm the Sound Recorder success with a saved marker, then check the recording device and recording status inside a training job in your reporting software. Check Windows microphone permissions for the applicable type of application if access appears unavailable. Speak a new marker and reopen the saved job before drawing a conclusion. If one app continues to work, tell support which one and give the selected device names. That is more specific than reporting a general cable failure.
Decide first whether the recording itself is quiet. Play a familiar reference and the new practice file on the same verified output at one comfortable level. If only the new recording is low, check the intended microphone selection and its input level. Note the starting setting, make one change and create a fresh sample at the same speaking position. If both files are hard to hear at that desk, look at the playback route and listening level before changing the recording setup.

Use one combination socket for a separate court reporter microphone and listening headphones. Verify capture and playback independently in Windows 11.
The presence of separate microphone and headphone branches does not establish that a particular laptop or program provides live monitoring. Hearing a saved file through the headphones is a different feature from hearing your voice during capture. If you need live monitoring, ask about that requirement explicitly for the exact laptop, recording application and accessory configuration. During the trial record separate observations for live sound and playback of a saved file. Success with either one leaves the other question open.
Have the first person label the cable, connect the equipment and record a harmless private answer key for a practice phrase. Give the second person the laptop and directions to the practice file, without telling them the important words. Ask them to locate the file and identify the marker through the headphones. Then have them make a new recording and reopen it. This checks another person's ability to find the two branches, follow the saved audio and reproduce the setup without relying on memory.
Identify the file, approximate playback position and action taking place when you first heard the crackle. Check the same file again with the cable at rest and on another verified output. State whether the sound returns at the same position in the recording or changes between plays. Note any ordinary movement of the laptop or cable at the time of capture. That description gives support a reproducible observation. There is no need to apply force to a connector in an attempt to provoke the noise.
Make a short recording in the application you actually use, with the selected external microphone and the laptop positioned as planned. Stop normally, reopen the practice job and identify a detail recorded near the end. Verify that playback reaches the headphones and that the correct current recording can be found after reopening the application. Put the verified cable and the setup note in the same case. For details of the connector arrangement or to identify the accessory when ordering, use the Martel SKU 2050 product page.