In this guide
- Choose what will reach the recorder
- Give each speaking position a name that survives a seat change
- Listen to one microphone, then to the open room
- Use the individual sliders before changing the master
- A worked four-seat listening exercise
- Read the saved mix from the reviewer’s point of view
- Rebalance after the room changes
- Decide what to keep in the setup notes
- Questions about four courtroom microphones
If the person in the witness chair sounds faint and the person beside you sounds loud, raising the mixer's master control makes both louder. Start by finding the individual control that serves the witness chair. Have someone speak there, make one small adjustment during rehearsal, and listen to the recorded result. When all four positions are understandable at one comfortable playback volume, listen once more with people taking turns in their natural speaking voices. That last recording is the one that tells you whether the balance will work for the person reviewing the file.
A four-microphone courtroom mixer gives you four places to pick up speech and individual controls with which to combine it. This guide follows a single rehearsal from the writing desk to the far end of the table, through the mixer and into the saved file. It includes a seat card you can copy by hand, an example in which increasing a level is the wrong first adjustment, and a way to explain exactly what you have verified if someone asks for separate tracks.
Choose what will reach the recorder
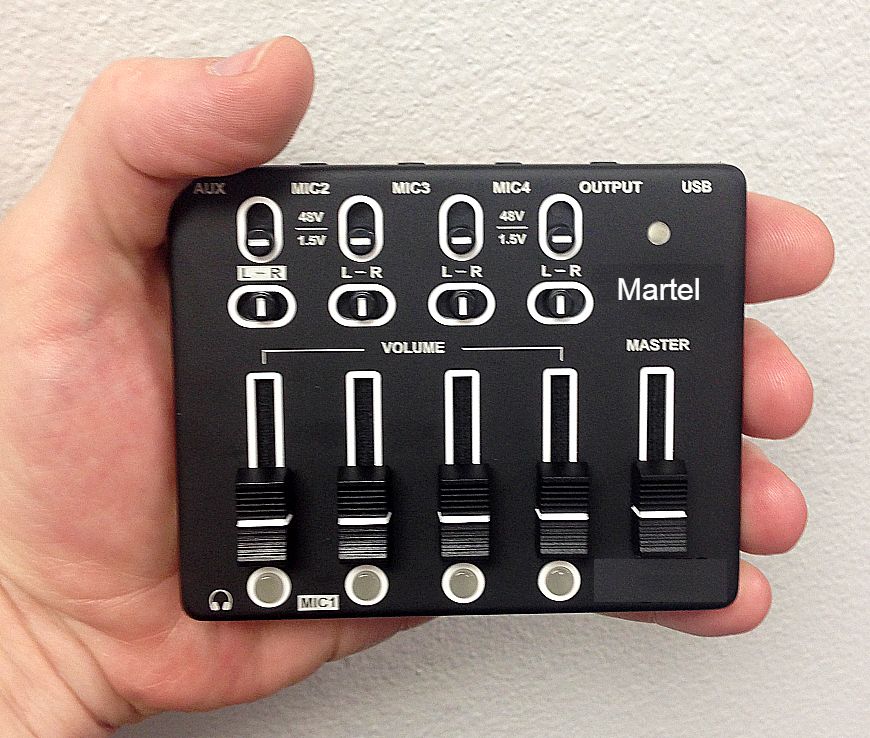
The Martel Court Reporter Microphone Mixer, SKU 1179 accepts up to four microphones. Martel lists USB output for a laptop, a one-eighth-inch output for a compatible recorder or writing system, and a headset monitoring option. The product gallery shows four individual volume sliders and a separate master slider. Those are useful facts when you draw your signal path. For a particular microphone, identify its connector and power requirements from the instructions for your equipment before putting it into service.
The four-microphone courtroom mixer package, SKU 12 includes a mixer and a four-microphone configuration. The package is a starting point when you need both the controls and the microphones around the table. If you already own microphones, inventory what they require and check that arrangement before choosing the mixer on its own. If you are ordering a different microphone-count option on the product page, use the contents for your selected option when planning the room. A gallery photograph can show a layout without telling you exactly what is in every option.
For each destination, finish a sentence on paper. “From the mixer, audio goes by USB to the reporting laptop, where the recording application saves the file.” If a backup recorder will be used, write a second sentence that names its connection and input. Then draw a box around what is common to the two sentences. A second recorder can produce a second file, although both files can contain the same missing witness if the witness microphone never reached the mixer. Keeping that shared part visible on paper makes your tests more informative.
Decide what you expect to hear in the finished file. For a mixed recording, the goal can be that all four positions are clear enough to identify speech at one listening volume. For a job that expressly requires separate playback of each speaker position, ask what the equipment and the recording application will actually deliver. Four input labels, a stereo output and four separately selectable tracks describe different things. A rehearsal in which the receiving program actually opens and solos the required tracks is a good way to settle a separate-track requirement before a purchase or assignment.
Give each speaking position a name that survives a seat change
Stand at the reporting desk and choose four physical positions. A seat can be “window end,” “door end,” “near the display” or “beside the reporter.” If an actual room has two doors, choose another landmark. “My left” tends to reverse when the relief reporter faces you across the table. If the room has moveable furniture, note the orientation of the table or draw a rectangle and put the fixed room door on the sketch. The next person should be able to find a position without knowing who sat there first.
Put the room position in one column and the mixer's physical input in another. Add the cable label if the cables have them, then write the expected file destination. Leave some room for a brief observation. A useful comment is “soft when speaker turns to screen” or “lead crosses paper stack.” A row of four identical check marks will not tell the afternoon reporter why a microphone is six inches closer to an unusual seating position. Write down only the feature that somebody might actually need again.
| Physical position in a practice room | Trial cable label | Input to verify at mixer | Phrase ending used to identify this position |
|---|---|---|---|
| Window end of the long table | Window | 1 | amber folder |
| Door end of the long table | Door | 2 | maple ticket |
| Chair facing the display | Display | 3 | copper ribbon |
| Seat beside the reporter | Desk | 4 | silver thimble |
These assignments are invented. In your room, trace each lead and record what you find. If somebody connects the door microphone to input three during set-up, you can relabel the card or restore the intended connection. Either can be a sensible decision during preparation. Changing a cable and leaving the old label in place will confuse the next adjustment. Check the map again after the change by having the person at that position speak while you move only the control you expect to affect it.
A cable can reach the correct chair while the microphone sits at the wrong end of a stack of exhibits. Look from the speaker's position as well as from the reporting desk. Choose a supported, stable placement with a clear path for the voice. Keep microphone cables away from surfaces that participants routinely sweep with binders or pull across a table edge. Use your practice speech to compare placements. A second setup that makes soft words easier to hear with less paper noise can be an improvement even when the meter shows a lower peak.
Listen to one microphone, then to the open room
Begin with the room in the condition in which people will speak. Put the normal paperwork on the table, run any display that will be used and leave the ordinary ventilation as it is. Keep the monitoring volume comfortable. When your test involves connecting, disconnecting or moving a microphone, first lower monitoring to avoid a loud surprise and follow the device instructions. Avoid changing unfamiliar power switches to chase a low voice. Identify the microphone model, required supply and correct input before deciding whether any power setting needs attention.
Have one person take each seat in turn if four volunteers are unavailable. At the first seat, say an ordinary sentence as someone would actually speak it. Avoid tapping the microphone or leaning an inch from it to say “testing.” A tap tells you very little about speech from the chair. Use a second phrase in a slightly softer voice if the assignment will include speakers who naturally speak quietly. Keep enough distance from the script that a reader can sit in a normal posture. The speaker should not spend the whole check facing the tabletop.
With the four positions mapped, use the supported input controls during the rehearsal to hear the contribution of one position at a time. Make a note of the original control positions before isolating one. Bring other inputs back to their intended state afterwards. In a small room nearby microphones can pick up the same voice, so a person at the window may still be audible with the window input reduced. Look for the change in closeness and intelligibility at the expected control. A faint version arriving through another microphone can disguise a disconnected input.
Repeat one sentence after all the intended microphones are open. The individual checks answered “which microphone contributes this voice?” The combined check answers “what will the recorder receive in the room as configured?” Four open microphones can collect the same ventilation, paper movement and voices at different distances. Listen for words losing definition when the other microphones return. Try repositioning the microphone that adds the most distracting sound, then listen to the combined pass again. Keeping a single short phrase constant between passes makes this comparison easier.
If headphones at the mixer sound clear, write down what that result actually covers. You have heard a signal at the monitoring point. The computer may still be recording its built-in microphone, or the backup recorder may be set for another input. Make a short file on each intended device, stop it and replay it. Give those files distinguishable names or note each device's assigned name. Each playback should contain the identifying phrases from the same rehearsal.
Use the individual sliders before changing the master
Choose a reference seat where speech already sounds understandable. Have that person and the quietest speaker alternate short sentences. Set a comfortable headphone level once and leave it there while you compare them. If you turn up the headphones when the quiet speaker begins and down when the louder speaker answers, your ears compensate for the imbalance you were trying to identify. That may make a live check feel comfortable while leaving the later listener with unnecessary work.
Compare the apparent distance of the two voices. Does the quieter voice sound close and understandable but lower in level, or does it sound far away with the room almost as loud as the words? In the first case a modest adjustment to that individual microphone may help. In the second, look at how far it is from the person and what sits between them. Raising the microphone level also raises sounds reaching it from the room. Changing its supported position can alter the relationship between the intended voice and everything else it hears.
Adjust one input by a small, repeatable amount, have the speaker repeat the sentence, then alternate with the reference seat again. If you ask only the quiet person to speak over and over, you may have no immediate impression of how they now fit beside the louder person. Mark the new position on the paper card if the control has no suitable printed scale. A rough sketch of the actual slider travel is more useful than inventing a gain figure in decibels for an unmarked setting.
Use the master control when the entire combined output needs an adjustment. Make the same deliberate check at the receiving end after a master change. A laptop connected by USB and a recorder connected to the analog output can have different input settings. A clean laptop recording does not tell you how loud the analog signal is at the recorder's input. Compare each file at its own fixed listening level. Trying to make two unlike meters display identical bars can take time away from the more important question of how the recorded words actually sound.
Give the loudest ordinary speaker one longer sentence. Listen for a harsh break on a word they emphasize. If it is present in a saved file, repeat the same line with less level at the relevant stage and compare recordings. Turning down only headphone volume can make the harsh sound quieter in the headphones without removing it from an already distorted recording. Where the speaking level varies widely, allow some margin for a strong answer. There is no single slider position that applies to every room, microphone and receiving device.
A worked four-seat listening exercise
For this invented exercise, each speaker reads two pairs of words on one turn. A listener away from the table writes the words they heard without seeing the script. Use eight ordinary pairs suited to your own group. Include several soft word endings and pairs that are easy to confuse if the consonants disappear. Keep personal names and case details out of a training script. A score in this example counts individual target words heard correctly. It has no claim to measure an equipment specification or anyone's hearing ability.