About This Blog
We write for customers, neighbors, and anyone interested in what we do and how we do it. This is a place to stay connected, learn something new, and get a closer look at what’s happening around our business.
Plan vehicle and portable field recording with Martel’s MDP6 Police Dash Cam System, SKU 3311-2. Review the current price, equipment transitions, wireless audio, saved-file checks and twenty original FAQs.
A department choosing a portable police dash camera needs to think about two working positions. In the vehicle, the equipment must record the intended view while remaining properly mounted and connected. Outside the vehicle, the operator must deliberately frame the scene, manage the microphone arrangement, and preserve the resulting files. Moving between those positions creates a handoff that deserves its own procedure and acceptance test.
Martel lists this product as the MDP6 Police Dash Cam System, SKU 3311-2. In this guide, MDP6-2 refers to that specific Martel package; it does not describe a separate camera model with additional unlisted features. The current MDP6 product page is the reference for its configuration, price, accessories, and purchasing options.
This original guide develops a practical vehicle-to-field workflow around the published equipment. It includes planning examples and suggested tests, not a claim that the equipment was independently tested for this article. Vehicle installation, operational use, recording decisions, access, and retention remain subject to the supplied instructions and your agency's approved procedures.
The published package combines an HD camera with officer wireless audio, remote camera controls, removable-card recording, and a light-bar activation cable. Martel describes use in the patrol vehicle and removal for field documentation. These features create several recording possibilities, but the department still needs to define how operators will transition between them.
Start with the intended job. A vehicle view might document the roadway and a stopped vehicle. A portable view might document the general scene, a vehicle interior, or a particular item with a deliberately chosen framing. Those uses have different requirements for camera position and operator attention. A portable camera does not automatically provide continuous coverage of everything that happens around its operator.
Write down which functions matter to your proposed deployment. If the agency needs a permanently installed multi-camera vehicle arrangement, compare that requirement separately with Martel's DC7 police car camera system. Do not assume that a portable camera package and a dedicated multi-camera installation have identical coverage or operating behavior.
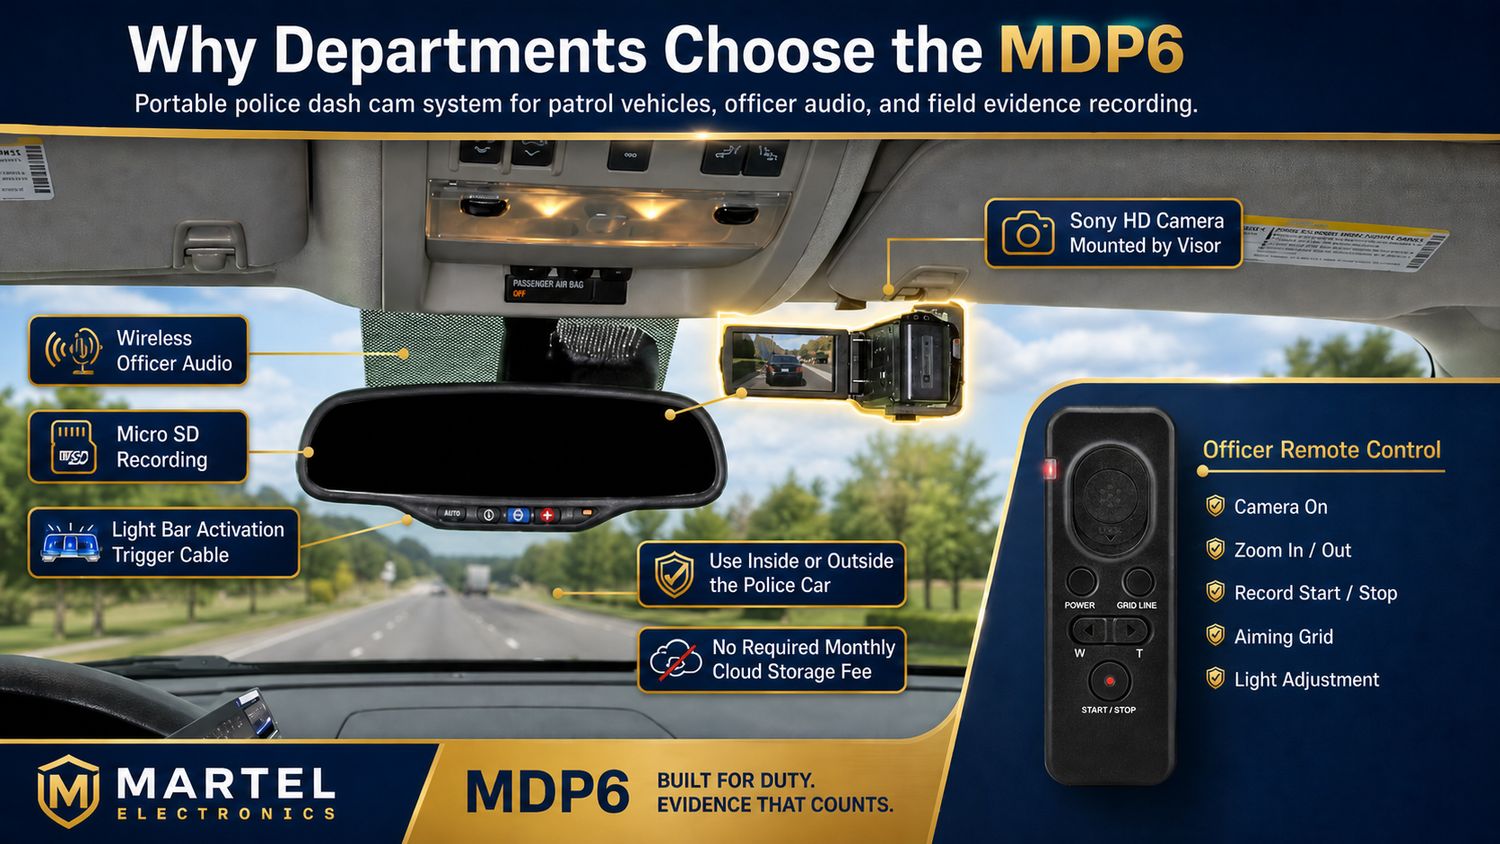
The MDP6 Police Dash Cam System, SKU 3311-2, was listed at $1,999.99 on Martel's website when checked on November 5, 2026. Confirm the current price, availability, configuration, tax, shipping, and purchasing terms on the product page and written quote. An article price is a dated reference rather than a promise that every future configuration will cost the same amount.
The current page lists the camera, a wireless microphone receiver, an officer transmitter, a Micro SD memory card, a remote control for zoom and photo functions, a light-bar recording activation cable, an instruction manual, an installation diagram, and a two-year warranty. Match the delivered items against the final order configuration before installing or assigning the equipment.
Build the purchasing comparison around the complete workflow. Identify the vehicle installation work, approved review computer, receiving process, storage, training, and any additional mounting or power arrangement required for the intended use. The package price should remain visible alongside those separately identified requirements. A portable camera's purchase price is not the same thing as the complete department cost of operating and reviewing recordings.
The MDP6 is described as a portable vehicle and field recording system. A body camera is worn to provide a viewpoint associated with its mounting position on the wearer. Those are different operating arrangements. A camera that can be carried out of a vehicle should not be described as a hands-free body camera unless a specific supported mounting and operating configuration establishes that use.
Compare the viewpoints your department needs. A vehicle camera can retain a view from its installed position while the operator is elsewhere. A body-worn camera moves with its wearer, subject to the camera's angle and possible obstructions. A deliberately operated portable camera can frame selected scene details. None of those viewpoints automatically replaces all the others.
For the wearable option, Martel's individual Crime Cam, SKU 3301, was listed at $499.99 on the same review date. That price describes an individual body-camera offer, not an equivalent vehicle system or a complete department storage installation. Use body cameras versus in-car systems to organize the coverage comparison before selecting equipment.
The department should specify what the installed camera needs to show. Identify the expected roadway area, the stopped-vehicle position, and any other required scene content. Evaluate that view using the actual vehicle and approved mounting arrangement. A photograph of a camera on a dashboard is not a substitute for reviewing a recording from the proposed position.
Have installation decisions made by the appropriate qualified personnel using the supplied documentation and vehicle requirements. Do not improvise attachment points, electrical connections, or cable routes from an article. Camera equipment and wiring must be evaluated alongside the vehicle's controls, visibility, safety systems, and normal operation.
Include the range of expected vehicle use in the acceptance process. Changes in seating position, windshield conditions, reflections, or equipment placed near the camera may affect the view. Review actual recorded samples. If an important area is outside the frame or obscured, resolve that issue through the approved configuration before treating the installation as ready for service.
A portable workflow needs a clear description of what remains connected in the vehicle and what changes when the camera is removed. Identify the camera connections, microphone arrangement, activation connection, and approved power arrangement. Do not assume that every function available when installed continues unchanged after the equipment is moved.
Use the installation diagram and current instructions to establish the supported configuration. Confirm how connectors are identified and how equipment is secured. A cable with a familiar-looking connector should not be substituted without confirming its intended purpose and compatibility. The correct physical fit is only one part of a valid connection.
Document the configuration in a form another authorized operator or technician can understand. An equipment identifier, an approved connection diagram, and a short description of the vehicle-to-field transition are more useful than a collection of unlabeled cables. If the configuration changes, update that record and repeat the relevant acceptance checks rather than relying on the earlier test result.
Before an assignment, verify the equipment's state using the supplied instructions and department procedure. Check that the camera is properly secured, the intended view is unobstructed, the required power arrangement is present, and the recording media is ready through the approved process. Confirm the correct camera and operator identifiers where those form part of the agency's workflow.
Create a short permitted sample that includes the intended vehicle view and ordinary speech. Review that sample through the approved check. A powered display or a connected cable is not the same thing as a verified recording. The test should establish that the particular camera, audio arrangement, and storage configuration being assigned can create a reviewable file.
Identify what happens when a check fails. The operator needs a clear path for reporting uncertain recording state, an obstructed view, damaged equipment, or an audio problem. An exception should be resolved through department procedures instead of hidden by changing unrelated settings. Martel's police car camera pre-shift guide provides a broader framework for organizing these checks.
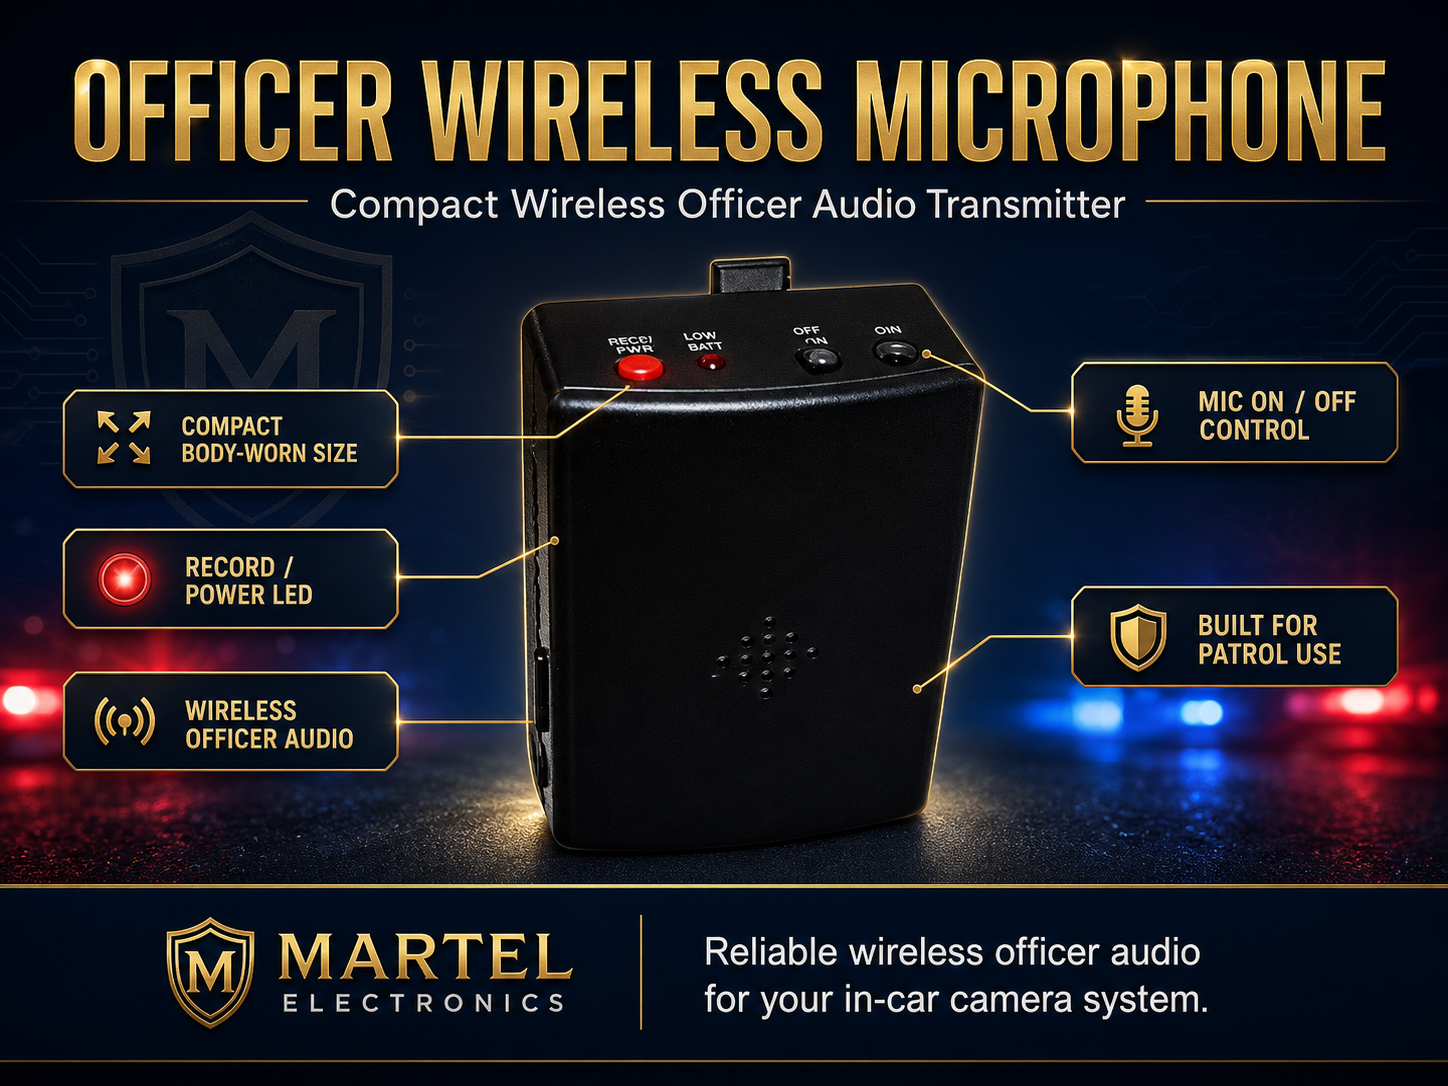
The MDP6 package lists a wireless microphone receiver and officer transmitter. Their inclusion does not remove the need to verify the actual audio path. Follow the supplied setup and pairing instructions, then make a sample with speech from the intended operating positions. Listen to the saved result rather than relying only on an indicator that equipment is powered.
Compare speech near the vehicle with speech from another position relevant to the approved trial. Record the environment and the configuration used. Do not invent a universal wireless range from a successful demonstration at one location. Vehicle construction, intervening objects, placement, interference, power state, and the exact equipment arrangement can affect the practical result.
Test the vehicle-to-field transition explicitly. Confirm which components remain in the vehicle and which are carried. Check whether the intended microphone audio is present after the move and in the resulting file. If the instructions do not establish how the wireless audio is supported in a proposed portable arrangement, ask Martel to confirm that configuration before relying on it.
Martel lists a light-bar recording activation cable with the package. Have the supported installation and intended trigger behavior confirmed through the supplied documentation and authorized installation process. The presence of a cable does not prove that every vehicle signal, every connection arrangement, or every desired recording rule is supported.
Use a controlled acceptance check for the installed configuration. Record what action was performed, which equipment state was observed, and which file was created. Review the beginning and end of that sample. A visible change on the camera can be useful, but the saved recording establishes what the configuration actually preserved during the test.
Do not assume a trigger, pre-event buffer, or automatic-recording rule from another Martel product applies to the MDP6. If a department requires a specific start condition or a particular amount of pre-event footage, make that an explicit purchasing and acceptance question. The recording triggers and pre-event guide explains how to separate equipment states from verified saved recordings.
The listed remote provides zoom and photo functions for the supported camera arrangement. Before deployment, verify which controls are available, how the operator recognizes the result, and which states are appropriate for normal use. Work from the supplied instructions rather than assuming the remote's buttons behave like another device's controls.
During an authorized stationary test, perform one remote action at a time and review the resulting recording or still image. Confirm that the expected operation occurred. If a function does not appear to work, inspect the supported configuration and equipment state before changing unrelated settings or assuming the recording media failed.
The operator's attention and the vehicle's safe operation take priority over an attempt to improve framing. Establish the department's rules for when equipment adjustments may be made. This guide describes equipment evaluation and workflow planning; it does not prescribe camera manipulation while driving or replace agency decisions about operational conduct.
Treat removal as an equipment transition with a before state and an after state. Before an approved move, identify the recording status, the supported portable power arrangement, and the connections that will change. Follow the supplied procedure for handling the equipment and its cables. Do not assume that pulling the camera from its installed position preserves every function automatically.
After the move, confirm the intended camera state and view through the permitted indicators and checks. Include the microphone path when audio is required. During a staged acceptance exercise, create a new sample in the portable arrangement and review it separately from the installed sample. This shows which parts of the workflow were verified in each position.
Document any gap or state change observed in the exercise. A transition between operating arrangements should not be represented as uninterrupted recording unless the supported configuration and a reviewed test establish that result. The department can then decide whether that transition meets its requirements or whether another recording viewpoint is needed alongside the portable camera.
A portable camera allows deliberate framing, but close detail without scene context can be difficult for another reviewer to understand. In an approved staged exercise, begin with an overall view that shows how the relevant areas relate to each other. Then move to the closer view required by the task. Describe the intended sequence in the evaluation plan.
Avoid implying that a single camera movement establishes every spatial relationship. Review whether the recorded sequence actually lets someone understand where the closer detail was located. If the movement is abrupt, the frame is blocked, or the camera is pointed elsewhere at an important moment, document the limitation and repeat the staged exercise as appropriate.
Any narration should follow department procedure and distinguish observation from inference. In training, operators can practice clear, neutral descriptions using harmless staged objects. The camera records the selected view; it does not determine what an item is, why it is present, or how an agency should interpret it. Those questions belong to the appropriate investigative and review process.
Martel's current MDP6 description lists 30x optical zoom. Optical zoom is a useful feature to evaluate for framing a more distant detail, but magnification alone does not establish a useful recording. Camera movement, focus, lighting, framing, and the size of the intended detail still affect what another person can see.
Make a staged comparison that begins with a wider view and then records the selected detail using the supported controls. Review the transition and the final view on the intended workstation. Check whether the detail is actually useful rather than judging only by the apparent size of the object on the camera display.
Keep a clear distinction between an optical-zoom specification and a promise of identification at an arbitrary distance. If the department needs a particular detail to be visible from a particular position, define that task and evaluate it. Do not add a digital magnification or software enhancement claim that the proposed configuration has not established.
The product page lists optical image stabilization. That is a feature to verify in the supported camera configuration, not a promise that every handheld recording will look stationary. An operator's movement and the amount of zoom can change the practical result. Use the supplied handling instructions and evaluate ordinary, controlled movement.
Compare a stationary staged view with a view made during a normal permitted change of position. Review whether the required detail remains useful. If the image moves, distinguish whether the subject leaves the frame, the camera changes angle, or smaller detail becomes harder to interpret. Those observations can guide training and the final equipment configuration.
Do not invent a precise amount of stabilization improvement without measurement. The department's acceptance record can still be useful when it accurately describes the task, conditions, and observed result. A realistic training example is more informative than an unsupported statement that stabilization eliminates all motion or always produces a particular level of clarity.
The MDP6 package lists still-photo capability and a remote photo control. Confirm how those functions operate in the delivered configuration and how the resulting files are stored. Do not assume that a still photo has the same framing, settings, or file-handling requirements as a video simply because both are created by the same camera.
During a staged exercise, create a short video and a separate still-photo sample. Transfer both through the intended receiving process. Confirm that the reviewer can find, open, and associate them with the correct test event. This checks a practical handoff that can be missed when the demonstration ends after the operator sees a photo confirmation.
Define the agency's preferred method for identifying related records. File names, event references, operator identifiers, and receiving records may all be relevant, but the approved process determines which are used. Avoid an improvised naming convention that conflicts with existing department records or makes a later reviewer depend on one operator's memory.
The MDP6 product page describes low-light camera features. That description should not be expanded into an unlisted infrared, thermal, or zero-light capability. Evaluate the actual proposed equipment in the lighting conditions relevant to the department. Use a documented viewing task and preserve the distinction between a published feature and a measured result.
Include a scene with both brighter and darker areas if that reflects the intended use. Review the saved recording for the detail the task requires. A bright-looking display is not proof that a smaller object or movement will be clear on a workstation. NIST's public-safety video guidance identifies scene content, the viewing task, movement, and lighting as useful considerations in defining requirements.
For a body-worn infrared evaluation, use the separate Crime Cam night-recording guide. That guide addresses the Crime Cam's published infrared functions. Linking the two workflows is useful; transferring the Crime Cam's infrared specifications to the MDP6 would be inaccurate.
Martel lists Micro SD recording and an included card with this package. Confirm the delivered camera's supported card type, capacity, formatting procedure, and handling instructions. Do not assume that every card fitting the slot is supported or that a card used successfully in unrelated equipment is appropriate for this camera.
Establish who checks media readiness, how exceptions are reported, and when recorded material may be removed or prepared for reuse. A card with available space is not necessarily a card whose condition and preparation have been verified. Use the camera instructions and the department's approved process instead of relying solely on a capacity label.
When a recording is important, preserve the source through the required verification and protection steps. A file appearing on a workstation does not by itself establish a complete transfer or an adequate backup. If an error occurs, avoid repeated unplanned operations that could complicate recovery. Record the symptom and seek the appropriate support through the approved equipment process.
Returning to the vehicle is another configuration change. Restore the approved mounting, power, audio, and activation connections according to the instructions. Check that the intended view is unobstructed and that the equipment has not been left in a field-recording state inappropriate for its installed use.
Include this return transition in the staged acceptance exercise. Create and review an installed sample after the portable sample. If a remote function, audio path, or trigger no longer behaves as expected, investigate the restored connections and configuration. Do not treat an earlier pre-shift success as proof that the equipment returned to the same working state after being moved.
Document any equipment that cannot be restored to the approved arrangement. A loose mount, uncertain cable, damaged connector, or unverified recording state should have a clear reporting path. The department's procedure should explain what operators do next rather than leaving them to improvise a configuration that was never tested or approved.
Choose a receiving workflow that matches the camera instructions and department requirements. Identify who receives the media or files, how the event is associated with its records, and where authorized review takes place. A removable-card workflow still needs defined responsibilities even when it avoids a required monthly cloud storage contract.
Review representative parts of the transferred recording, including its beginning and end, and verify the expected audio. Check associated still images separately when they are part of the event. Confirm that the reviewer can locate the correct material without relying on an informal verbal description from the operator. Resolve exceptions before preparing the only source for reuse.
Create and check the protected copy required by the department's storage plan. Local storage, a second folder, and a tested backup arrangement are different concepts. Establish access, retention, and recovery responsibilities through the approved process. Martel's police video export guide develops the file-handoff questions without assuming a particular evidence-management platform.
An effective evaluation follows the camera through the full intended sequence. Begin in the approved installed arrangement, verify the required video and officer audio, perform the supported vehicle-to-field transition, create a portable sample, and return the equipment to its installed state. Then receive and review the resulting files on the intended workstation.
Write the viewing task for each stage. The installed sample may need to show a general vehicle view; the portable sample may need to show the relationship between an overall scene and a closer detail. The return sample can verify restoration of the approved configuration. Do not reduce these different tasks to one overall judgment that the camera recorded something.
Use known, harmless staged objects and consenting participants. Record the equipment identifiers, settings, positions, and file references. The reviewer should note which tasks are supported, which are not, and which need another trial. This creates a concrete purchasing and training record without presenting a proposed test as a performance result the department has not actually observed.
Imagine a department assigning a portable camera system to a vehicle that will also support planned field documentation. Before purchasing, the department lists the installed view, the officer audio arrangement, the expected portable tasks, and the receiving workstation. It asks Martel to identify the proposed configuration and any additional installation or accessory requirements in writing.
The department stages an acceptance exercise using that configuration. One person records the sequence, and another reviews the saved files against the intended tasks. A mounting issue is evaluated as a mounting issue; a missing audio sample is traced through the audio path; a playback problem is investigated through the receiving workflow. The exercise produces an exception list rather than a blanket assurance based on one attractive clip.
After the configuration meets the department's requirements, the agency trains operators on the same transitions and exception reporting. The equipment record identifies which vehicle and camera configuration were approved. This is a planning example, not a claim about a particular customer's installation or a guarantee that every vehicle can use an identical arrangement.
Use the checked $1,999.99 package price as one dated equipment input. Identify any approved installation work, additional compatible accessories, workstation requirements, local storage, training, and staff time separately. An existing computer or storage device should be evaluated against the intended workflow rather than assumed suitable simply because the department already owns it.
The product page describes written-quote options, including eligible budget-year arrangements for qualifying government agencies. Request the current terms for the actual configuration and quantity. Keep the full purchase total visible in the approval record, with tax and scheduling details handled through the current quote. A displayed budget-year amount is not an approval or a substitute for the department's purchasing process.
Compare alternatives around requirements. If the primary need is a dedicated installed vehicle system, review the DC7 versus MDP6 comparison. If the need is a wearer-associated viewpoint, review Crime Cam separately. The most useful comparison describes what each proposed arrangement must record and how the department will receive and review the result.
A shared vehicle or camera assignment needs a clear handoff. Record the camera identifier, vehicle assignment, relevant accessories, and the state of the recording media through the department's process. The next operator should know which configuration was approved and whether an unresolved exception exists. An informal statement that the camera worked earlier does not describe what changed during the prior assignment.
Use a staged training exercise in which one operator returns the equipment and another prepares it for the next assignment. Have the receiving operator identify the intended installed view, confirm the required connections, and complete the approved sample check. Watch for points where the operator needs information that was never recorded. Those points identify an opportunity to improve the handoff instructions or equipment labeling.
Keep the recording handoff distinct from the equipment handoff. A camera can be physically ready to move while files still require receiving, review, or protection. The department needs to know who owns each outstanding task. If a transfer is incomplete or a sample cannot be opened, document that exception and preserve the source as required before preparing equipment or media for reuse.
Include the portable arrangement in training rather than teaching only the installed view. An operator should be able to explain which connections change, how the supported portable configuration is recognized, and how the installed arrangement is restored. The department's instruction should also identify when an operator must stop and obtain technical help. That makes the procedure practical for different staff members without relying on undocumented assumptions about the hardware.
Field use can expose equipment to conditions that differ from a controlled vehicle demonstration. Ask Martel about the exact camera's published environmental requirements and any approved protective or mounting accessories needed for the intended work. Do not apply the Crime Cam's weather-resistance specification to the MDP6; they are different products with separately stated features.
Describe the expected conditions in the purchasing request. Explain whether the proposed use involves an indoor location, an exposed outdoor area, a substantial temperature change, or transport between locations. The current instructions and written configuration should establish which conditions the equipment supports and how it should be handled. Avoid treating the general word portable as an unlimited environmental rating.
Include equipment condition in the return check. Inspect through the approved process for damage, moisture exposure, cable strain, or other exceptions requiring evaluation. Record the observation rather than assuming a device is ready because its display powers on. The objective is a repeatable way to identify equipment needing attention before the next important recording task.
It refers to Martel's MDP6 Police Dash Cam System with SKU 3311-2, as identified on the current product page. The guide uses that identifier to connect the discussion to the requested product. It does not claim that a separate model called MDP6-2 has additional features beyond the configuration Martel lists for that SKU.
Martel listed SKU 3311-2 at $1,999.99 when checked on November 5, 2026. Open the product page for the current price and request the final configuration in a written quote. The department's complete cost may include separately identified installation, compatible accessories, review equipment, storage, training, tax, or other requirements that the package price alone does not describe.
Martel describes portable field use as part of the product's intended application. The supported removal, power, connection, and recording procedure must still be confirmed from the supplied instructions and actual configuration. Evaluate a staged portable sample and its saved files. Portability should not be interpreted as proof that all installed functions continue unchanged after the camera is moved.
No single viewpoint should be assumed to replace all others. A deliberately operated portable camera and a camera mounted on a wearer have different positions and operating routines. Compare the tasks your department needs to record. If a body-worn viewpoint is required, evaluate Martel's Crime Cam and the appropriate body-camera workflow separately from the MDP6 vehicle and field arrangement.
The current package page lists a wireless receiver and officer transmitter. Verify the delivered components and follow the documented setup. Test the actual saved audio in both installed and intended portable arrangements. Inclusion of wireless components does not establish a universal range or prove that every proposed camera-and-microphone position supports the same recording path.
The listed cable establishes an accessory to evaluate in a supported installation. It does not establish compatibility with every vehicle, electrical signal, or desired activation rule. Have the proposed installation confirmed using the supplied documentation and qualified personnel. Then create and review a controlled sample that shows what the installed configuration actually records when the intended action is performed.
No. Product specifications should remain attached to the product that lists them. The MDP6 page describes low-light camera features, while the Crime Cam page separately lists infrared functions. If infrared operation is a requirement, ask about the exact proposed equipment and evaluate that requirement explicitly. Do not transfer a feature from one Martel camera family to another.
The published package describes remote zoom and photo functions. Verify the controls and their behavior with the delivered equipment and instructions. A useful acceptance exercise includes the intended action and review of the resulting file or image. The remote's presence is not a reason to assume additional undocumented functions or to adjust equipment in circumstances prohibited by agency or vehicle-safety procedures.
An optical-zoom specification does not establish identification under every condition. Define the detail and viewing position required, then evaluate the saved recording. Movement, lighting, framing, and the size of the detail influence the practical result. Preserve a wider view where needed to explain how the closer detail relates to the scene, following the department's approved recording procedure.
Do not treat stabilization as a guarantee of a stationary image. Verify the delivered feature and evaluate ordinary controlled handling under the intended conditions. Review whether the task remains supported while the operator changes position. A report should describe the actual result rather than assign an unmeasured improvement percentage or claim that every handheld recording will look the same.
It establishes one part of the camera package. The department still needs to confirm supported media requirements, receiving procedures, usable capacity, retention, access, and a protected-copy arrangement. Estimate department storage using actual recordings and approved assumptions. A card supplied with a camera is not a complete long-term archive or a demonstrated recovery plan.
Include that step in the staged acceptance process. Returning equipment is a configuration change, and an installed sample can show whether the intended view, audio, and activation arrangement were restored. Use the supplied procedure and approved checks. An earlier successful recording does not prove that every connection and setting remained correct after the camera was moved and returned.
The current MDP6 product page states sales are to law enforcement agencies. Use Martel's current purchasing process and confirm eligibility and requirements with the company. This article describes an agency equipment workflow rather than an unrestricted consumer offer. A quote request also should not be represented as an order or as approval of purchasing or budget-year terms.
The photographs come from Martel's own MDP6 product page and identify the equipment being discussed. They are not represented as frames from an independent field trial conducted for this guide. A department's real evaluation samples should have separate configuration and condition records so a viewer can understand what each recording actually demonstrates.
Provide the vehicle information, intended installed view, officer-audio requirements, portable tasks, receiving workflow, and the quantity of systems under consideration. Explain any required trigger behavior or playback environment. Use Contact Martel, the MDP6 product page, or the written quote page. A specific description supports a more useful recommendation than asking for a camera without explaining the job.
No. A local recording workflow still needs appropriate storage, access control, backup, training, equipment care, and staff time. The absence of a required monthly cloud contract describes one purchasing characteristic. It does not remove the department's responsibility to receive recordings, protect required material, resolve exceptions, and verify that authorized reviewers can find and play the files later.
Confirm supported media against the delivered camera's instructions and current configuration. Physical fit alone does not establish compatibility, performance, preparation, or suitability for the intended recording settings. Keep the approved media arrangement in the equipment record and report errors through the department's process. Do not substitute unverified media during an important assignment simply because it is available.
A product photograph identifies equipment and accessories. It does not establish the view from a particular patrol vehicle or a result under specific field conditions. Review a controlled sample from the proposed mounting arrangement and the intended portable setup. Document the camera position, settings, viewing task, and resulting file so the acceptance decision rests on the actual configuration.
A clear identifier helps connect the assigned hardware, approved configuration, support history, and test results. Follow the agency's existing equipment-record process. Keep that hardware identification distinct from file, event, and media references where the workflow requires them. A reviewer should be able to determine which camera and configuration produced a staged acceptance sample without depending on one person's memory.
Write the intended installed and portable tasks on one page, identify the receiving and review workflow, and send the requirements to Martel. Ask for the exact proposed configuration and current price in writing. Use the acceptance exercise in this guide to identify what must be verified after delivery. This turns a general interest in a portable police camera into a concrete equipment and operating plan.
Product identity, current price, package contents, listed features, and purchasing audience were checked against the linked Martel MDP6 page. Related comparisons use Martel's own Crime Cam, DC7, and equipment-guide pages. The task-based evaluation approach was informed by NIST's public-safety video use-case guidance and lighting-level guidance. The workflow explanations, examples, and questions were written originally for Martel. Verify the delivered configuration and current instructions before adopting a department procedure.
By Martel Electronics · Updated November 5, 2026