In this guide
- Begin with the conversation the room is supposed to carry
- Walk the route before placing the first microphone
- Measure a speaking position in three directions
- Keep the open end available for the person who chooses it
- When the presenter moves between a bench and a table
- Choose pickup positions before selecting the package
- Give the outside listener a test that reveals missing words
- Compare two layouts while keeping the decision fair
- Make full participation part of the handoff
- Provide the measurements that a seller can use
- Practical questions and answers
Start with the seating choices that work for the participants. The microphone plan should serve a person at an open table position, someone at a higher surface and someone who turns toward a display without asking them to give up the position that lets them participate. A plan-view drawing alone cannot describe the height difference or an obstruction between a person and a pickup.
Begin with the conversation the room is supposed to carry
Imagine a meeting in which the chair sits at a standard table, a second presenter demonstrates equipment on a higher bench, and a third participant takes a place at an open table end. A person joining by video hears the chair clearly. During discussion the remote person repeatedly misses the last word of the question from the open end, then misses the presenter's reply when the presenter turns toward the bench. Moving every participant to one table could make the microphone test easier. It could also make that meeting harder for its participants to use. The more useful question is where the equipment can go while people participate as they intended.
Start by asking the organizer which parts of the meeting are genuinely interactive. A training demonstration might include questions from the side tables, brief pair discussions and a final group report. A board agenda might mainly involve a seated panel until a public comment period begins. A department meeting may let people join remotely even when they are in the same building. Identify where someone wants to contribute at each point. A single microphone in front of the chair can produce a very good recording of the introductions while telling you little about the discussion that follows.
Invite people to describe what works for them. One person may prefer having a microphone on the table throughout. Another may prefer that the chair repeat a question for the remote group. Someone speaking from a communication device may want to test how their chosen output reaches the meeting. The questions belong to the person organizing the session, and participants can decline a particular exercise. A setup team can test alternative locations with volunteers before a real meeting and invite further feedback later. It does not need a list of diagnoses to maintain a good room diagram.
Give positions names that describe furniture and sight lines. Use “window open end,” “display bench” or “door-side discussion table” in the room notes. People change seats. A label based on a person's name or a mobility device quickly becomes inaccurate and can make a reserved place feel unnecessarily conspicuous. A label based on a recognizable part of the layout lets the next organizer set up the same useful option for anyone who chooses it.
Walk the route before placing the first microphone
Follow a participant's ordinary trip into the room, up to a working position, and back out at a break. Use the arrangement the facility has approved for the event. Locate the place for papers, a laptop, a communication device or a drink where appropriate. Ask how far a chair or table may move during the meeting. Mark the spaces that must remain clear of microphones, cables, small stands and spare bags. A plan that leaves ample floor space on paper can become unusable when spare cable is coiled by a wheel, a bag is placed under a table or a control unit occupies the available work surface.
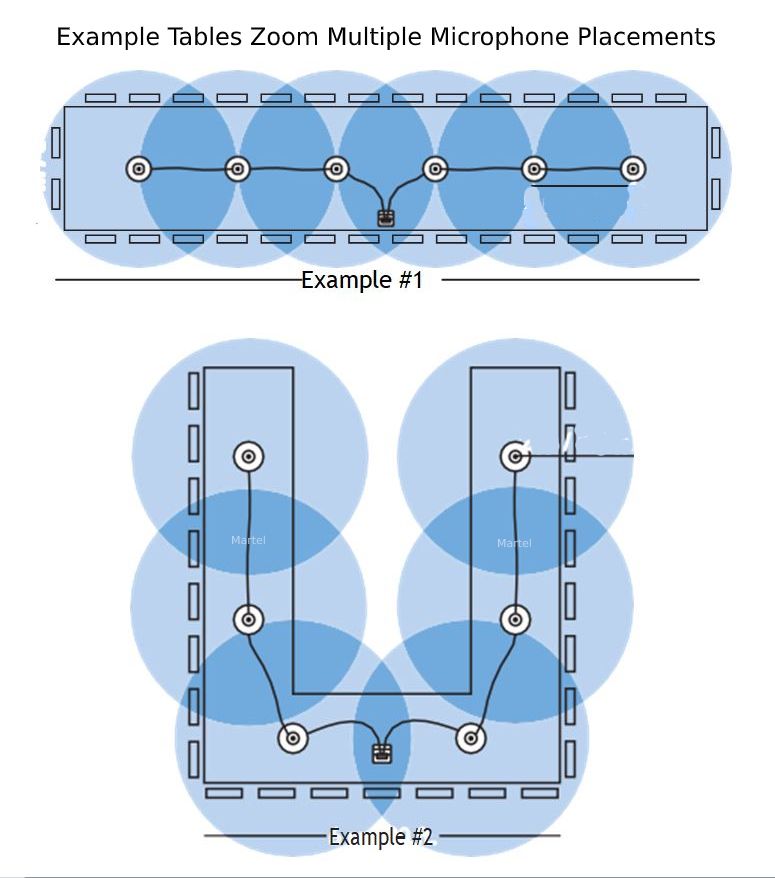
Repeat the walk after the equipment is set up. A cable can reach the controller when it cuts across an aisle, and still require a different route for a usable installation. Trace it along the approved edges and around fixed casework. Measure the usable route and identify who may secure or change it. Provide the distances to Martel when asking about the supported configuration. If the safe route is longer than the available connection, treat that as an equipment design question. Staff should have a practical alternative before anybody arrives and tries to improvise with the cables on hand.
At a height-adjustable table, ask the room custodian which positions are normally used and how the table moves. Check each permitted working height with the microphone cable in its proposed route. Observe where the cable enters the surface, where it crosses to fixed furniture and how staff can see it. The person adjusting the table needs to use it normally. Have the venue's assigned staff decide how to manage movement, secure equipment and keep travel paths clear. Capture those decisions in the room plan so the next event does not recreate the same problem.
Map the return audio as part of the walk. Where will a remote participant's voice come from? Does a local attendee need a different listening arrangement or access to the platform's captions? Who can adjust the appropriate control? The table microphones feed room speech to the computer. Room playback, captioning and any assistive listening arrangements are separate items to verify with the venue. A person may speak successfully into the meeting and still miss a remote question. Someone else may hear the return perfectly while their own words disappear from the call. Each experience deserves its own line on the setup sheet.
Measure a speaking position in three directions
A useful room measurement begins at a speaking position and ends at the microphone, with the person using an ordinary working posture. Draw the horizontal distance along the table and the sideways offset. On a second sketch show the difference in height between the speaking position and the pickup. All three measurements can be approximate planning dimensions. You can build a model using an empty working position and agreed representative points without measuring an individual. When someone chooses to help with a real setup, explain what information you want and keep the room notes focused on the equipment and furniture.
Think of looking down on a tabletop. A pickup may sit sixteen inches forward from a position and twelve inches off to the side. Its horizontal distance is twenty inches because the diagonal across the surface is longer than either individual measurement. If the speaking position is also sixteen inches above the pickup, the straight-line distance is about 25.6 inches. Another position with the pickup sixteen inches forward and directly in front, at the same vertical difference, measures about 22.6 inches. A drawing with a single arrow marked “sixteen inches” would make these configurations look identical.
For the examples below, we calculated the square root of the sum of three squared differences. All three differences use inches. To obtain feet, divide the final distance in inches by twelve. For the simple case of twenty-four inches horizontally and twelve inches vertically, the calculation is the square root of 576 plus 144, or approximately 26.8 inches and 2.24 feet. This is a geometry exercise using invented positions. These figures say nothing by themselves about speech clarity, a listener's needs, the limit of a microphone, or how a particular room surface affects sound.
| Example position | Forward difference | Sideways difference | Vertical difference | Calculated straight-line distance |
|---|---|---|---|---|
| Open end with pickup beyond the papers | 28 inches | 0 inches | 16 inches | 32.2 inches |
| Open end with pickup along the near edge | 16 inches | 0 inches | 16 inches | 22.6 inches |
| Same open end with the pickup set to the side | 16 inches | 12 inches | 16 inches | 25.6 inches |
| Higher work surface with pickup beyond the demonstration | 32 inches | 0 inches | 12 inches | 34.2 inches |
| Higher work surface with a clear side for a pickup | 22 inches | 8 inches | 12 inches | 26.3 inches |
| Standing presenter turned toward a display | 26 inches | 0 inches | 25 inches | 36.1 inches |
| Presenter using a separate approved surface | 18 inches | 6 inches | 22 inches | 29.1 inches |
Choose two feasible locations from that kind of sketch for the listening rehearsal. Record which arm movements, sight lines and work areas each preserves. The shortest calculated position may put the microphone precisely where a participant needs to write or where an interpreter needs a clear line of sight. The next shortest may preserve both. A microphone farther away without an intervening computer screen may serve a particular voice and room better than a nearer pickup hidden behind the screen. Test the chosen positions with fresh speech before deciding which to mark on the final plan.
Keep the open end available for the person who chooses it
A common furniture diagram shows an open end of a table and fills the available rectangle with an equipment box. In the actual meeting, that end may be an important place for anyone wanting a clear approach, a particular view of a presenter or the ability to come and go independently. Agree on a place for the controller and spare materials before the equipment comes out of its bag. Put a pickup on a supported part of the surface. Give the person an ordinary place for their things and keep the approach and exit available throughout the session.
A microphone on a far corner can be neat and barely useful if the person at the open end turns toward the screen when they talk. Try the near edge of an adjacent table and a clear side position. Ask a volunteer to pose a question facing the chair, then to read the amount shown on a shared display. Keep the display and the person's preferred position fixed. Ask an outside listener to record the exact amount and the question word they heard. It is quite possible for one location to work well in the first direction and lose the end of the amount in the second.
Consider who will move a pickup if the seating changes. The person at the open end may wish to do it, may ask another participant, or may reasonably expect the room already to work. A workable design gives the meeting host a simple way to request a change. Label the microphone by table position in the private setup drawing and identify the supported range in which the room staff can reposition it. Avoid requiring everybody to reach for a shared control or hand a device along a row before a brief contribution can be heard.
On the first day a room uses the new arrangement, offer a quick and private way to report a problem. A person should be able to say that a cable crosses the space they use or that the return speaker is hard to hear without stopping a meeting to justify a seating choice. The host can move the equipment along the agreed route or use an established alternative for that session. Record the resulting equipment change without attaching a permanent personal label to a seat. That note will help the next group even if none of the same people attend.
When the presenter moves between a bench and a table
A demonstration bench changes both the height and the direction of speech. A trainer may face the audience to introduce a procedure, then face down to read the small label on a part, and finally turn sideways to answer a question. An outside attendee who hears the introduction clearly might have to guess the name of the part. Mark the three actions separately in rehearsal. Choose an invented part number, a date and a corrected total so the outside listener can show exactly which pieces of information survived each position.