In this guide
- Give each part of the U a name
- Separate the room input, room output and recording requirement
- Measure the speaking positions and usable table surfaces
- Use a calculated seating example to choose the first test seats
- Read the geometry as a hypothesis you can test
- Choose a Martel package by the work the room must do
- Set up an uncoached far-end listening exercise
- Use different material when a seat needs a second trial
- Decide what to do with the open presenter area
- Plan cables around people and movable furniture
- Check the room under its ordinary working conditions
- Turn the drawing into a decision for a purchasing committee
- Try an agenda that crosses the open space
- Questions about U-shaped conference table microphones
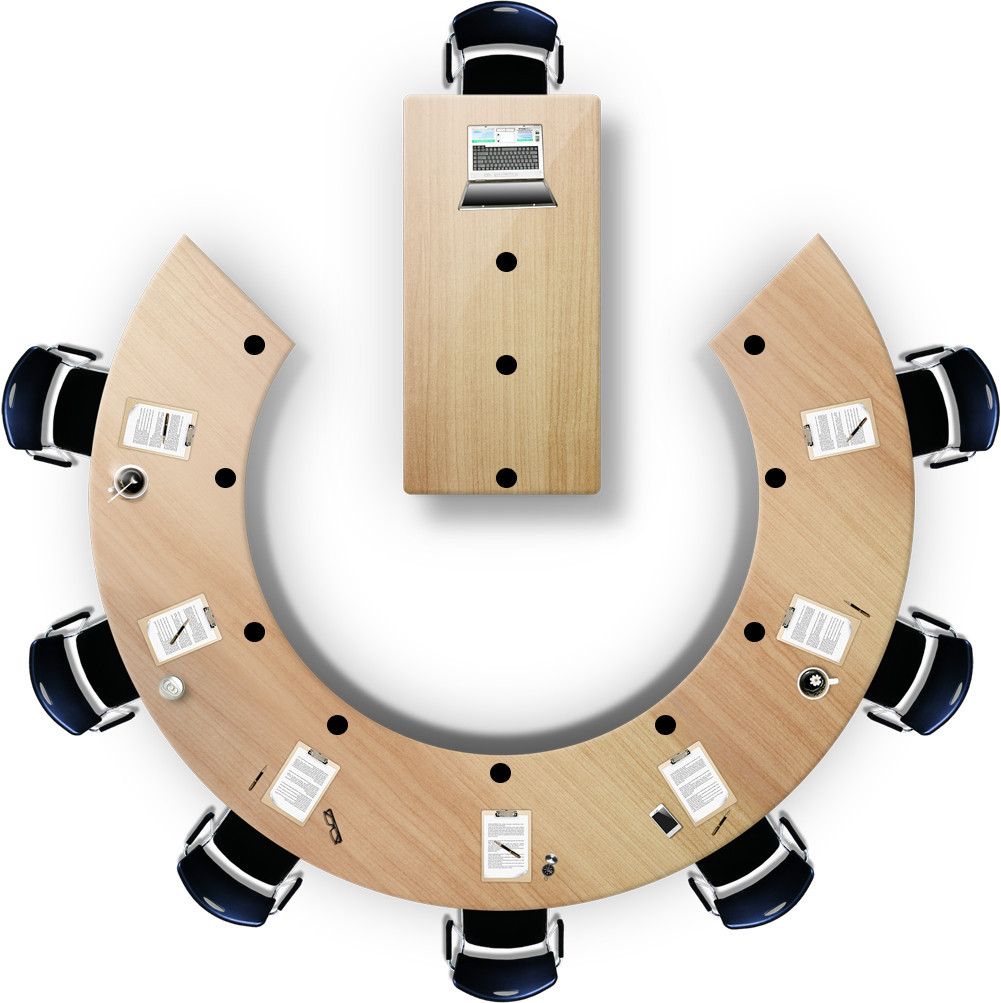
Start a U-shaped table plan by marking the people who will speak. The open ends, the two inside corners, the back row and the presenter can have quite different relationships to a tabletop microphone. Counting chairs gives you a purchasing quantity to discuss. It does not tell the remote participant whether they will hear the person seated at the open end when that person turns toward a screen.
Martel sells conference microphone systems with four, eight, twelve and sixteen microphones. A useful buying conversation identifies which positions need pickup, which computer supplies the meeting connection, how remote voices return to the room and what the organizer needs to keep afterward. This guide includes an original, calculated U-table example and an exercise for the people using the actual room. The distances in the example describe its drawing. The listening result has to come from a call in the space you intend to use.
Give each part of the U a name
Stand at the open end and face the closed row of tables. Call the side on your left the west arm, the side on your right the east arm, and the connecting row the back. These are drawing labels. They do not need to match compass directions. Mark the open and back ends of each arm. Someone who receives the drawing can now distinguish the open west seat from the corner where the west arm joins the back.
Write the positions from which someone actually addresses the meeting. Include the chair who opens the agenda, the person operating the presentation, the colleague who takes questions without leaving a laptop, and anyone expected to speak from outside the U. A placeholder chair kept against the wall for an occasional visitor should not get the same priority as a regularly occupied seat where the remote listener must hear short decisions. Mark these differences before deciding where to put the first microphone.
The open face of a U can point toward a display, a lectern, an audience or an empty wall. Those arrangements are meaningfully different. When people continually turn toward a display behind their chairs, the distance to the microphone may stay nearly the same while the direction of their speech changes. When a standing presenter walks between the two open ends, the nearest pickup changes with every step. A drawing with seat dots alone would miss both effects. Add a short arrow for the normal direction of speech at each demanding position.
Separate the room input, room output and recording requirement
On the drawing place one small box next to the computer that joins the call. Draw a line from the microphone system to the room input selected by the meeting application. Add another line from the application's speaker output to the device the local participants will hear. If the organization requires a meeting recording or separate local reference, draw that destination as a third box and say who will verify the completed file.
This simple distinction saves time during a U-table test. A remote person may hear the committee clearly while local people at the back struggle to hear the remote person. That points attention toward the room's return sound. Moving all microphones closer to the back row changes the outgoing pickup when the problem was incoming playback. Conversely, a loud room speaker cannot restore a missing phrase from the microphone at the open west seat.
Confirm the computer's actual input and output names after connecting the intended equipment. A laptop or display can offer its own microphone and playback selection alongside the conference system. A remote person who hears a loud, clear voice next to the computer may be hearing the wrong microphone. Make a reference call from a seat away from the computer. Ask the listener to repeat a phrase the operator did not give them beforehand. Their answer begins to identify which pickup path is serving that seat.
Measure the speaking positions and usable table surfaces
Take two sets of measurements. For the room plan, record the long dimension of each arm, the width between arms and the depth of the back table. For the equipment plan, identify the usable surface on which a pickup can sit without covering a document area, obstructing a participant or trapping a cable under a table joint. Measure to the equipment's intended place. A distance to the geometric center of the room may be easy to calculate and impossible to use.
Mark the approximate position of each seated speaker's mouth projected onto the drawing. This position usually differs from the edge of the tabletop. Keep a separate note about height, standing and turns toward a screen. A plan view cannot show a laptop screen between a talker and the pickup, a thick binder standing upright, or a portable display that forces a microphone underneath a shelf. Walk the room after making the drawing and mark what you found.
When exact room dimensions are unavailable, begin with a clearly labeled sketch and collect the measurements required for installation before buying extension components. A tape run laid around the outside edge of two tables can be longer than the straight line between the endpoints. Include any approved movement allowance and the route to the host computer. Keep these cable lengths separate from acoustic distance. The length of a cable that comfortably reaches a table says nothing about the clarity of a voice reaching a microphone.
Use a calculated seating example to choose the first test seats
Consider a compact illustrative U. The origin of the drawing is midway between its open ends. The horizontal coordinate increases toward the east, and distance along the arms increases toward the back. Coordinates and distances are in feet. West and east speaking lines sit at horizontal positions minus 3.6 and plus 3.6. The open, middle and corner speakers on each arm are positioned at 0.5, 2.6 and 4.8 feet from the open line. The three people at the back sit at a depth coordinate of 6, with horizontal coordinates minus 2, 0 and plus 2.
In the four-position example, two pickups sit on the arms at horizontal positions minus 3 and plus 3 and depth 2.75. Two more sit near the back at minus 2.2 and plus 2.2 and depth 5.25. The six-position calculation adds an open-arm pickup on each side at depth 0.65. The eight-position calculation retains those and adds two pickups near the back center at minus 0.7 and plus 0.7 and depth 5.35. We calculated the straight-line distance on the drawing from every speaker point to every pickup, then selected the smallest distance for that speaker.
| Speaking position in the example | Four pickup positions | Six pickup positions | Eight pickup positions |
|---|---|---|---|
| West open end | 2.33 ft | 0.62 ft | 0.62 ft |
| West middle | 0.62 ft | 0.62 ft | 0.62 ft |
| West corner | 1.47 ft | 1.47 ft | 1.47 ft |
| Back west | 0.78 ft | 0.78 ft | 0.78 ft |
| Back center | 2.32 ft | 2.32 ft | 0.96 ft |
| Back east | 0.78 ft | 0.78 ft | 0.78 ft |
| East corner | 1.47 ft | 1.47 ft | 1.47 ft |
| East middle | 0.62 ft | 0.62 ft | 0.62 ft |
| East open end | 2.33 ft | 0.62 ft | 0.62 ft |
The six-position column describes a test arrangement and does not name a six-microphone Martel retail package. Its purpose is to show what happens when two locations are added to the open arms. In this calculation, the change reduces the distance at both open ends and leaves the back-center distance at 2.32 feet. An organizer concerned about the back-center chairperson would gain little for that specific geometry by adding positions only at the open ends. An organizer who regularly invites standing remarks there might value a different change. Decide which of these explanations applies to your room by listening.
Read the geometry as a hypothesis you can test
Take the west open seat as a worked calculation. In the four-position arrangement the nearest arm pickup is 0.6 foot inward and 2.25 feet toward the back. The straight-line plan distance is the square root of 0.6 squared plus 2.25 squared, about 2.33 feet. Bringing a pickup to depth 0.65 changes the depth difference to 0.15 foot and the corresponding plan distance to about 0.62 foot. Both calculations describe this drawing accurately. Neither predicts a decibel change or an intelligibility score for a real microphone.
For a second example consider the back center. In the initial arrangement the nearest back pickup is 2.2 feet to one side and 0.75 foot forward, for a plan distance of about 2.32 feet. After the two central pickups are added, the nearest is 0.7 foot to one side and 0.65 foot forward, about 0.96 foot. The open-end additions have no effect on that central comparison. The intermediate column is valuable precisely because it separates the result of the first pair of additions from the second.
In an actual room the height difference between a person and a microphone adds another dimension. If a plan distance is two feet and the mouth is a foot above the pickup, the straight-line distance in space is about 2.24 feet. This remains geometry. It still leaves the speaker's direction, reflections, surrounding noise, microphone behavior and meeting processing unmeasured. Use the calculation to decide whom to invite to the first listening test. Use the words a remote reviewer can recover to judge the trial.
Choose a Martel package by the work the room must do
Start with the four-microphone USB conference system when four assigned pickup areas form a plausible plan to test. Consider the regular speaking areas, not just the total number of people. A small working meeting can have several people clustered around each of a few predictable zones. Another meeting of similar size may have widely separated short interventions from opposite ends of the U. Give Martel those two room descriptions separately even if the chair count is identical.
The eight-microphone meeting package provides more positions to allocate. Use a drawing to show which additional seats motivated the change. A request that says “we need the next size” gives purchasing little basis for checking whether the order solves a specific problem. A request that says “the back-center chair and both open-end respondents need independently tested pickup positions” can be matched to component placement and an actual rehearsal.